
I was recently able to get my hands on a netAlly EtherScope nXG for evaluation. I’ve been wanting to check out one of them since I saw its release at #MFD4. I’d like to share my impressions of it from the perspective of a wireless guy with an old school background in wired infrastructure and troubleshooting.
Table of Contents
Initial Impressions of the hardware
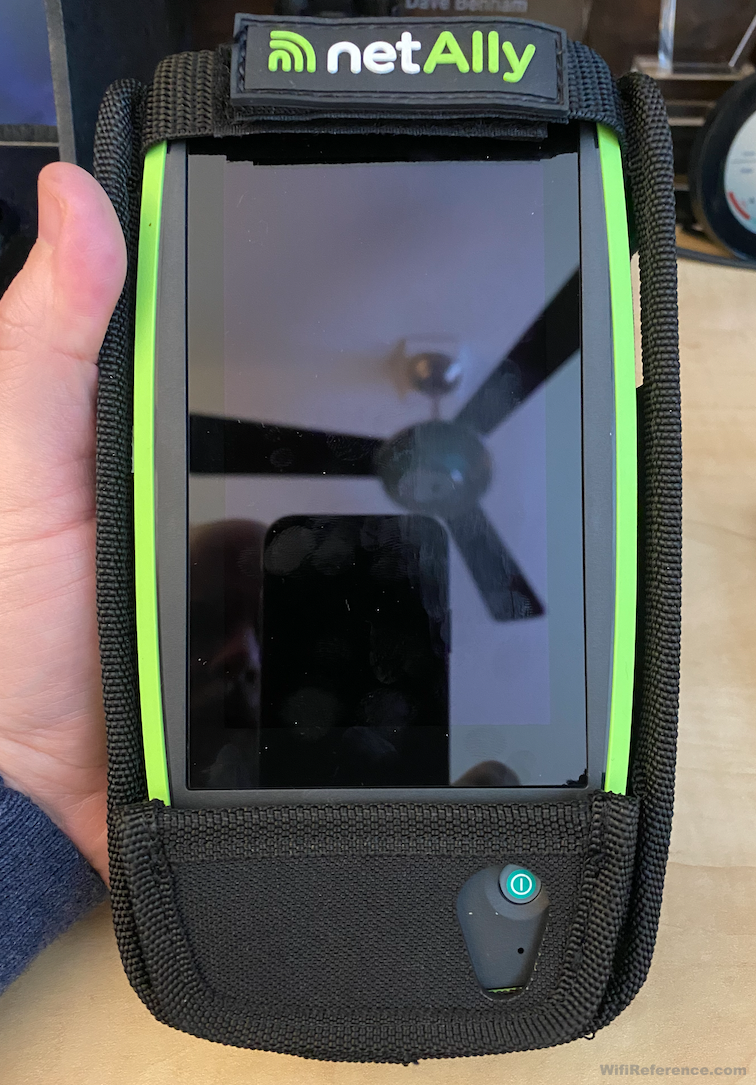
The first things I noticed: It’s chunky, it’s heavy, and it has a fan! You know things are about to get serious when you power on any handheld device that has a fan in it. The fan only runs when it needs to, and is variable-speed, so I never found the noise intrusive.
The case feels good in the hand, and the strap on the back of the case for your fingers gives you a better grip on the unit, especially when holding it at your side. One disappointment with the case is that it makes it nearly impossible to use the microSD card slot. The microSD card can be used for saving packet captures, screenshots, and other files. Unfortunately, my chubby fingers were unable to grab the microSD card once released, without removing the case. It’s just buried too deep when the case is on. With the case off, the microSD card is easily accessible.
The screen is very nice. The touchscreen looks and feels much higher-end than the AirCheck G2. It’s fast and bright enough to be easily readable in any indoor environment and can be seen from wide viewing angles.
I very much appreciate the USB-C charging port. It’s about time some of these tools start to use a standard power source and connector for charging. I currently have an array of chargers and cables for the things in my daily kit, and I hope this is the beginning of a trend toward USB-C for networking tools. If you have a newer MacBook or Android phone, you’ll likely be able to use the charger and cable you already have with you to charge the EtherScope nXG. However, expect to charge it often, because the battery life is not great when you’re actually using the device. I think you’d be lucky to get a couple hours of use out of it with the screen on, and running tests.
Speaking of battery life and charging, you can also charge the EtherScope nXG with PoE! However, there are a few criteria that must be met in order for this to work (initially, I couldn’t get it to work and I had to RTFM).
- The device must be powered on (this was counterintuitive to me) in order for it to be charged via PoE. I recommend immediately putting the display into sleep mode by briefly pressing the power button, in order for it to charge faster.
- You must have enabled the Charge Battery via PoE setting in the General Settings menu. This was off by default on my evaluation unit.
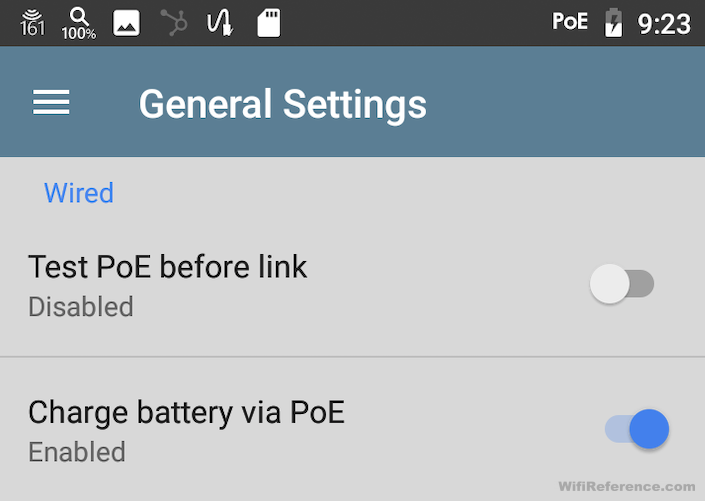
- You must have also already ran an Auto Test (more on Auto Tests later) with a Wired Profile that passes the PoE test to detect PoE availability. This means the PoE test must be enabled and configured with a Powered Device Class that is both supported by your switch and has enough power to charge the EtherScope nXG. I had to fiddle with this for a bit before I succeeded.
It took quite a bit of screwing around to get PoE Charging working. I had to run multiple Auto Tests with different PoE classes until I found one that drew enough power to charge the unit. The EtherScope nXG will only draw as much PoE power as you tell it to, by selecting the PoE Class in the profile. I actually had to resort to the manual to see what steps were required to get it working. To me, it seems like it should “just work.” Making it more disappointing is that it actually charges pretty slowly over PoE. In my environment, it would take 4+ hours to fully charge the unit over PoE. It’s nice that you have the option to charge over PoE, but I wish it required less effort to figure out, and I wish it would charge with the unit powered off so that it charged faster. At least it will greatly extend the battery life while running wired network tests.
It also has a camera and a flashlight built-in. The flashlight is actually pretty bright; brighter than most cell phones I’ve used. It’s a more focused beam, too and it would definitely come in handy in a networking closet. The camera is pretty poor, by today’s phone standards, especially in low light. It will work in a pinch, but it is not something you’re going to want to be doing a ton of photo documenting with.
General Observations
This thing is a beast. It is truly a jack of all trades. I’m able to perform virtually all of the tasks that I’m used to performing on my AirCheck G2, and also run a myriad of wired connection tests as well. It is capable of so many different things that they’ve included the user manual on the device itself.
It isn’t much larger than the AirCheck G2, and the screen is a heck of a lot better. I was particularly impressed with the “Discovery” application, which scans the network and attempts to determine what types of devices exist within it. I was surprised to see that when it is populated with SNMP community strings, it even showed all of the VMs (including powered-off VMs) that exist on my VM host!
The EtherScope nXG is an Android device, so the UI will feel relatively familiar to anyone that has used an Android smartphone or tablet. It is easy enough to figure out that you won’t need to reference the manual to perform basic tasks and access the applications.
Because it is an Android device, you should expect it to behave like one. It doesn’t boot as quickly as an AirCheck. Sometimes I found it to boot much more slowly than others, and on one occasion it actually booted twice before I could see the main application icon layout of the UI. After the main screen appears, things will still be slow/laggy for 30-60 seconds and then they get to full speed. If you are going to be moving between a bunch of networking closets running tests, you are going to want to put the unit to sleep rather than power it off. Putting it to sleep still drains battery, but allows it to instantly turn on when you need it.
On the main screen, you have many different applications at your disposal. You can choose to run a network discovery, run a cable test, run an iPerf test, scan the Wi-Fi channels, and a number of other things. At first, it seemed odd that these were all separate applications. One might expect that you’d run an “EtherScope” application that would have a bunch of options within it to perform these tasks. But they are separate applications. At first, this frustrated me a bit. However, the more I used it, I found myself using the Android multi-tasking switcher to quickly change between the apps and saving a lot of time.
You can even enable remote VNC connectivity, which allows you to view/control the device remotely (from another computer). This is an outstanding feature that will allow you to share the screen for training and demonstrating information to a customer. It also allows you to leave the EtherScope nXG in a network closet and access it remotely to monitor something on the network, or run further tests.
Connectivity
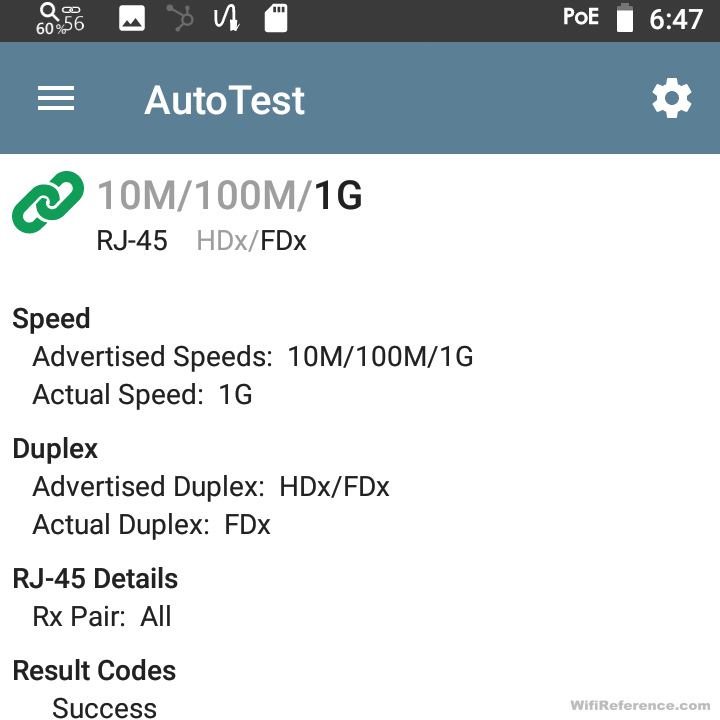
At the top of the EtherScope nXG you will see a copper port and an SFP port. The copper port is capable of 10M/100M/1G/2.5G/5G/10G connectivity, which will allow you to see whether or not your cabling is capable of supplying mGig speeds when connected to an mGig switch. The SFP port is 1G/10G and works with a variety of SFP modules.
On the side of the unit, there is another copper port. This port is only 10/100/1000Mbps, and is used for management and connectivity to the EtherScope nXG itself. It’s also used for iPerf, Discovery and Cable tests/wire mapping. To me, it was a little bit counterintuitive to have to use the slower port for iPerf, but I suppose it isn’t reasonable to expect a handheld android device to be able to move 10Gbps of traffic anyway. That’s obviously not the primary use case for this device.
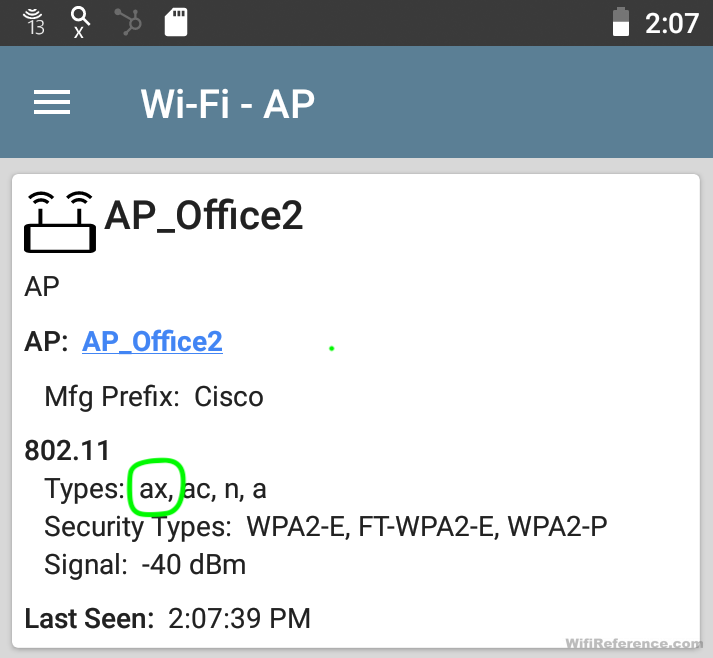
For Wi-Fi connectivity, the EtherScope nXG has a 4×4 Dual-Band (2.4GHz/5GHz) 802.11ac Wave 2 NIC on-board. It can be used with the integrated antenna, or an external hand-held semi-directional antenna for locating specific wireless signal sources. The directional antenna appears to be the same one that comes with the AirCheck G2. Even though it is not a Wi-Fi 6 radio, it can still detect the presence of Wi-Fi 6 in the beacon frames, and identify APs accordingly. There is also a separate 1×1 Wi-Fi radio that can be used for Android Wi-Fi connectivity and Bluetooth.
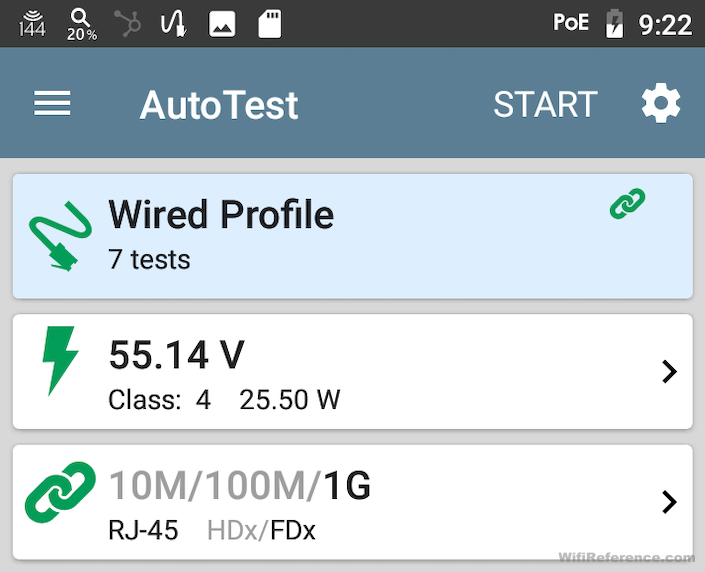
Auto Test
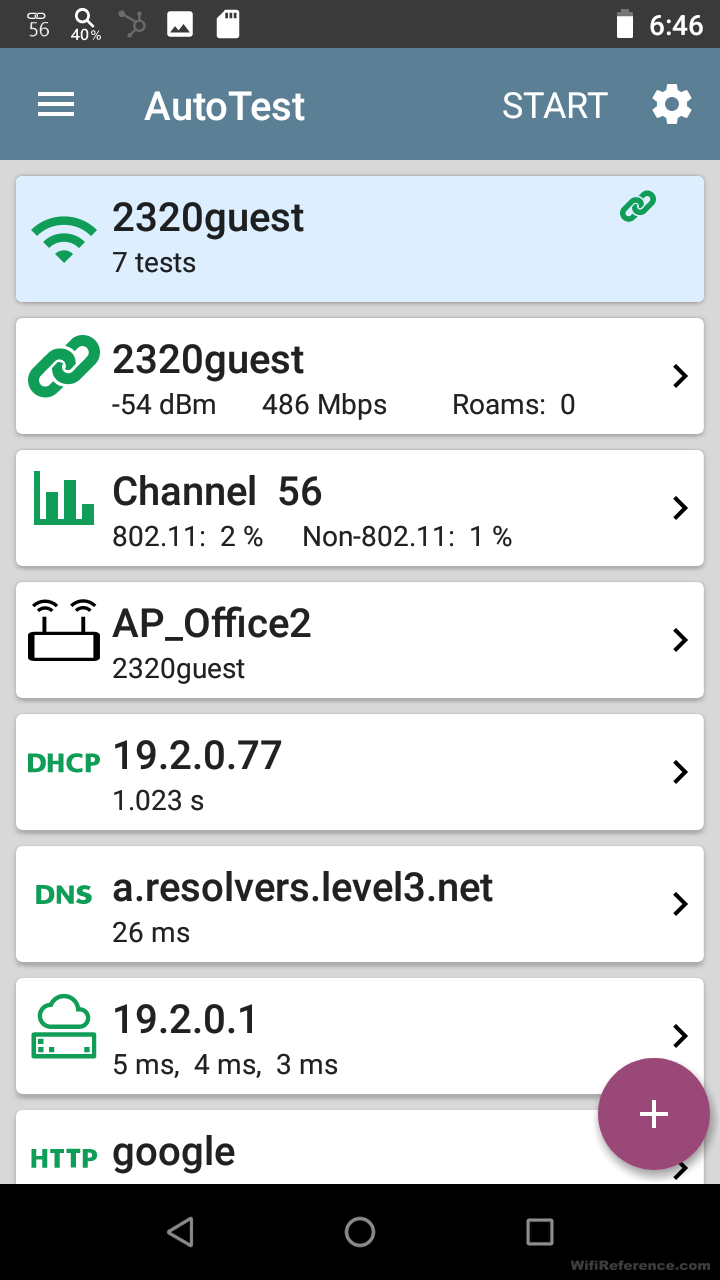
The Auto Test feature allows you to add a Wired profile, Wireless profile, or Air Quality profile. These can be used independently of one another, for running different tests. For instance, you could have a saved Wireless profile for each of the SSIDs that you wanted to test as you move throughout your campus.

It allows you to specify some of the “minimum” criteria and it will show green, yellow, red for each category after it runs the test. An example of a “yellow” result would be successful connectivity but high channel utilization. Another example would be interface discards on a switch.

These tests don’t only produce “pass/fail” results; there is a lot more detail within the results of each test. For example, here is the result of the DHCP portion of the auto test in my environment:
Auto Test – DHCP
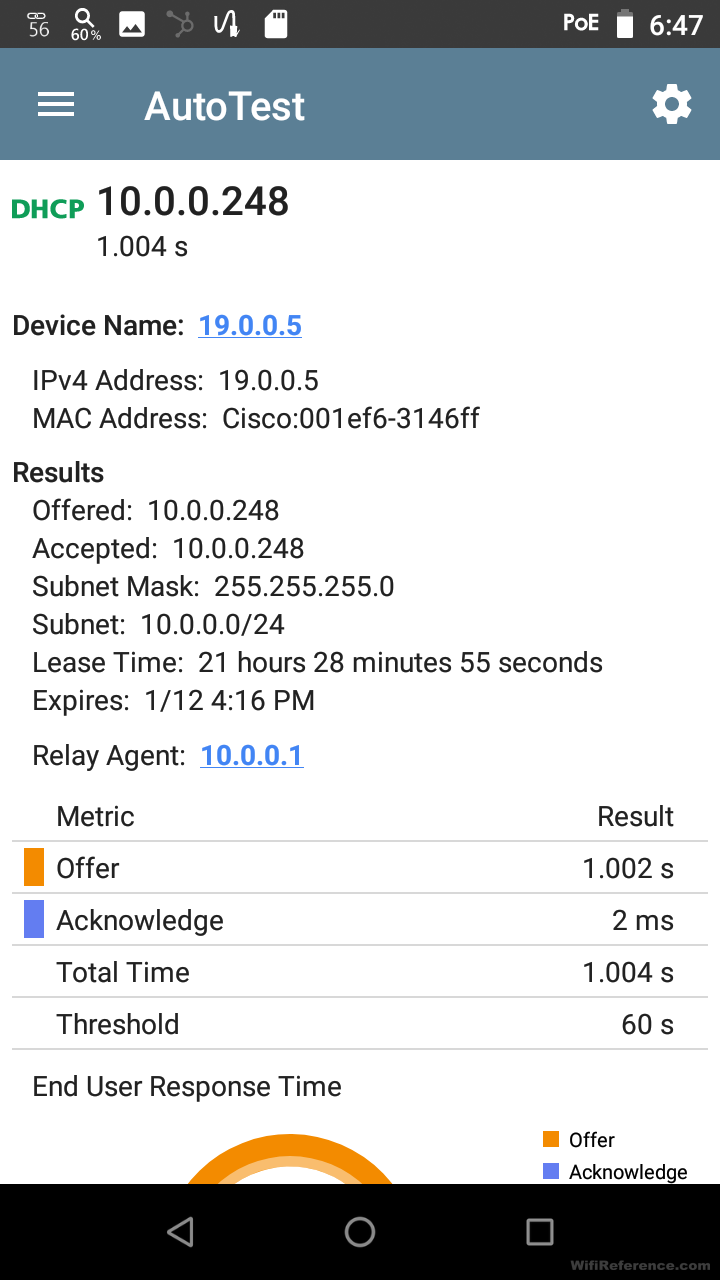
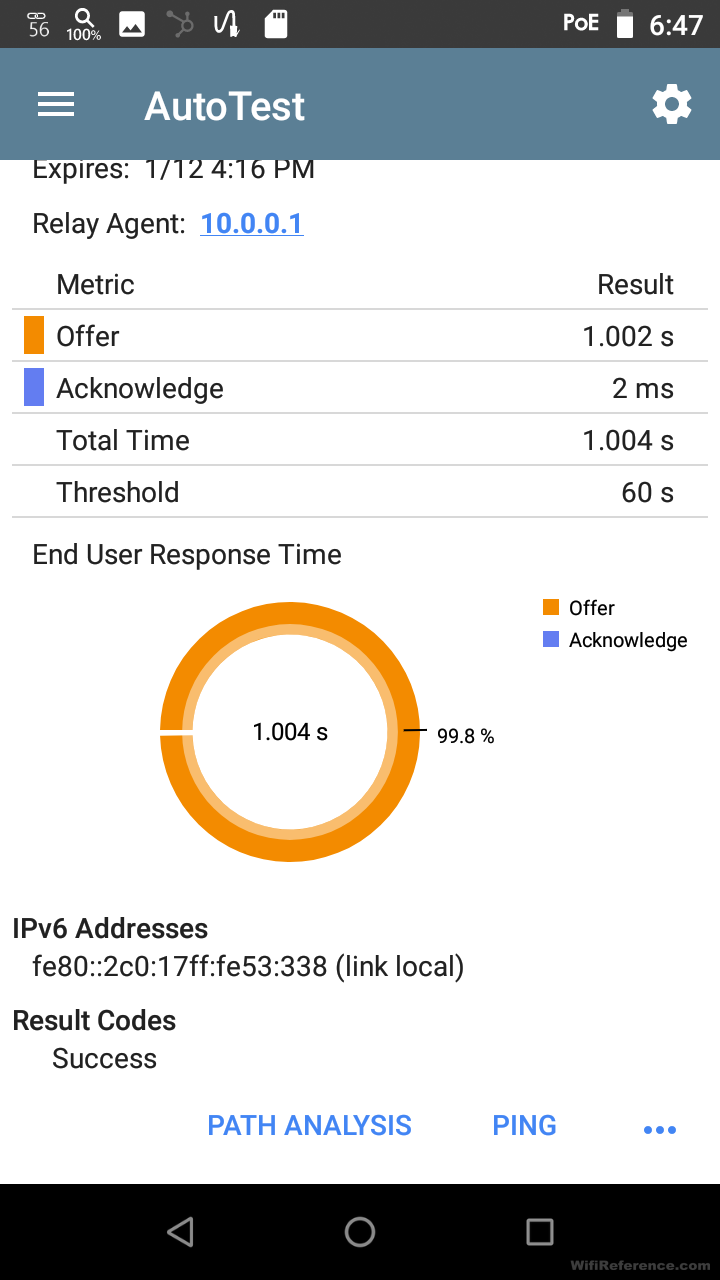
You can see that it tells you the amount of time each step of the DHCP process took. In my case, it took just over 1 second to receive the DHCP offer, and 2ms for the acknowledgement. My DHCP server pings for availability, and this takes exactly one second, before it will send a DHCP offer to a client.
Auto Test – DNS
The EtherScope nXG Auto Test feature also gives you a bunch of details on DNS. In this case, it did a public DNS lookup with each of the three DNS servers that were assigned via DHCP.
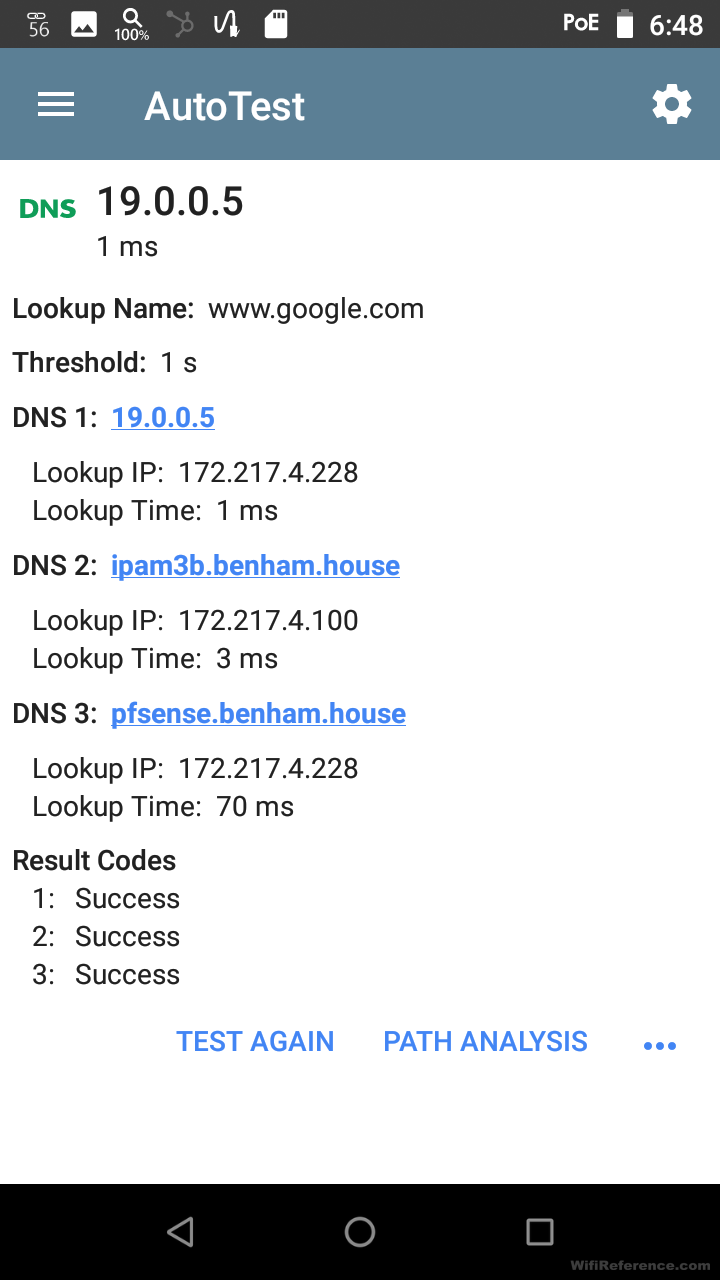
It tells you exactly how long each lookup too, so you can see how your DNS servers are performing. Presumably, the result would’ve been yellow if it took longer than 1s (the configured threshold), and red if it was unable to perform the lookup on that server.
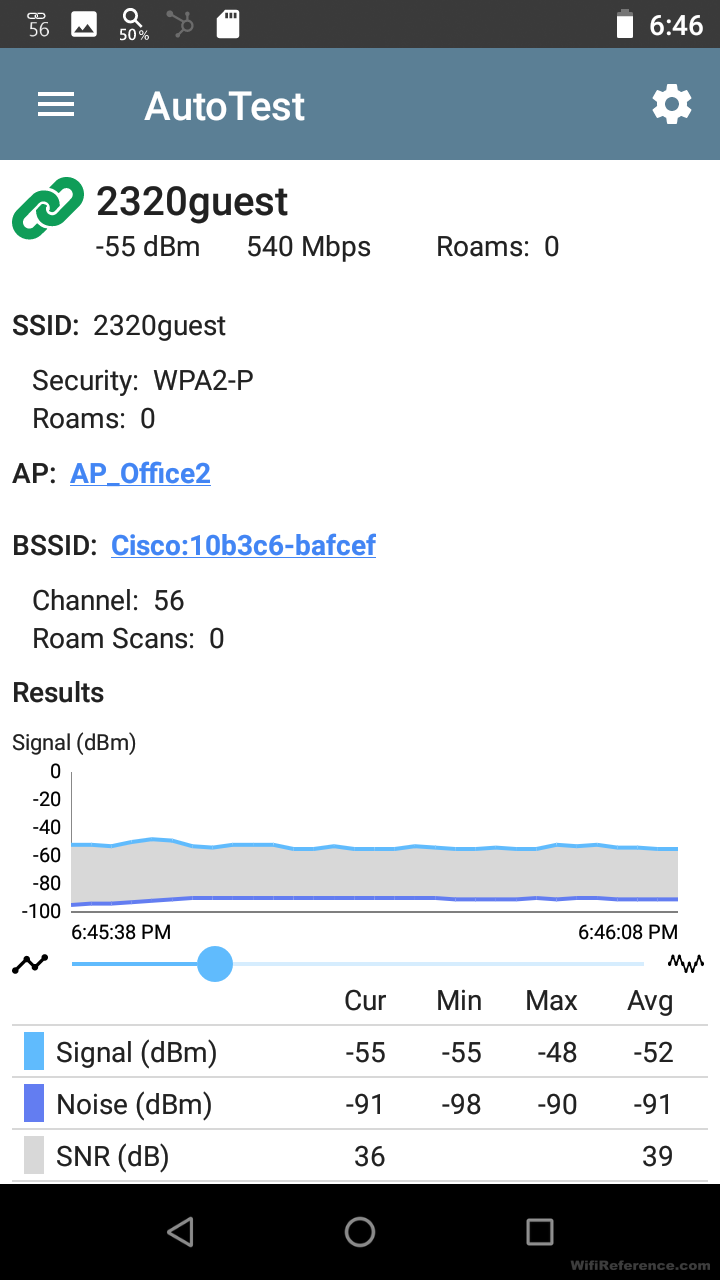
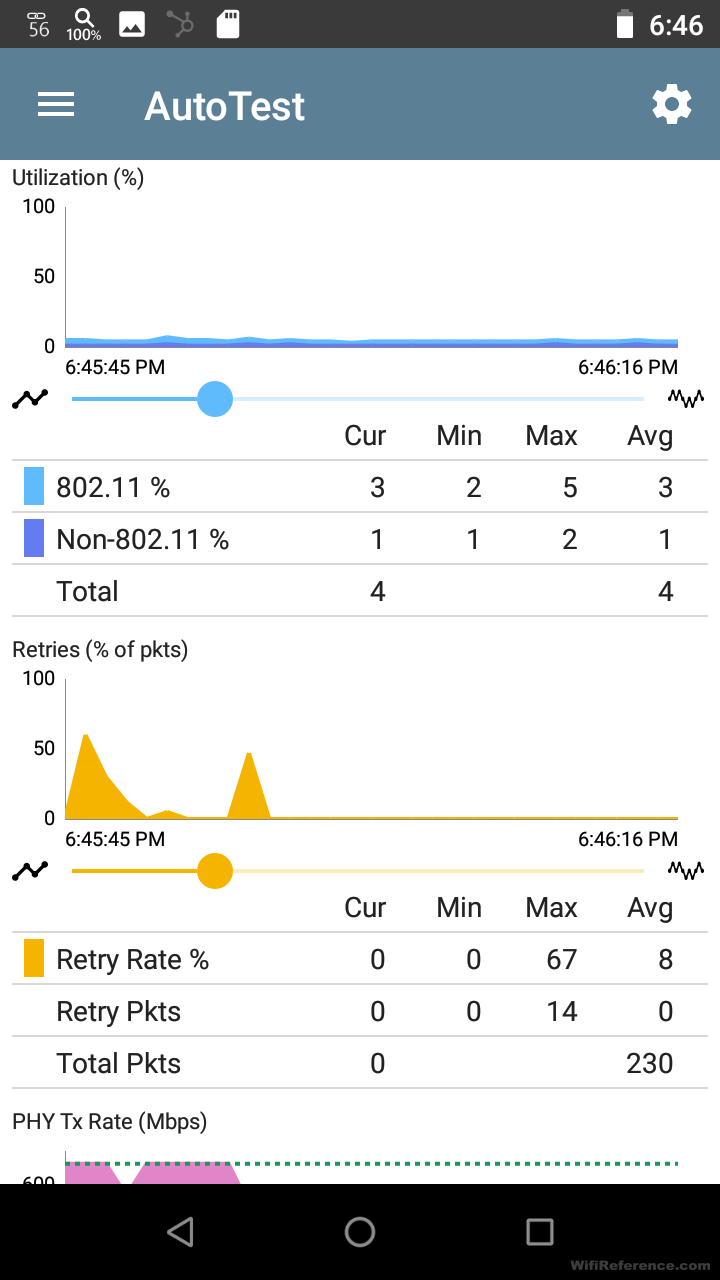
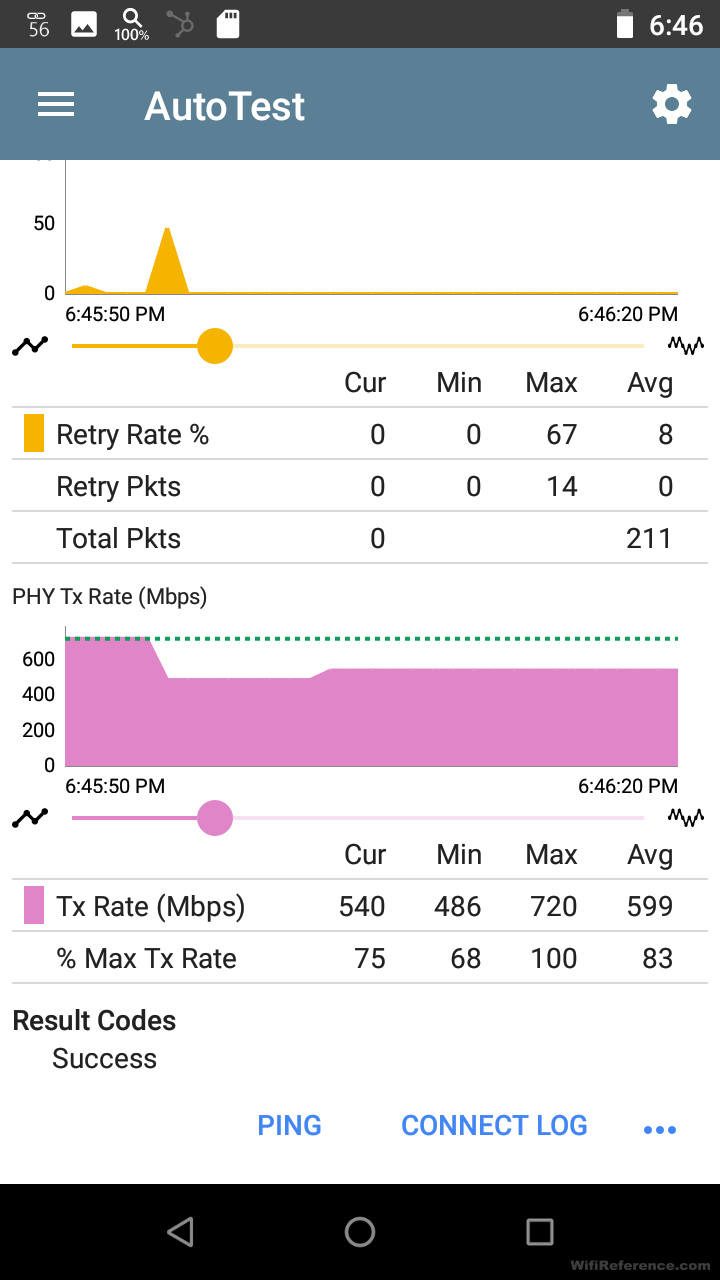
Auto Test – Wireless
The Auto Test feature also gives you an appropriate amount of detail about the Wi-Fi environment. Here are some screenshots showing the details it records:
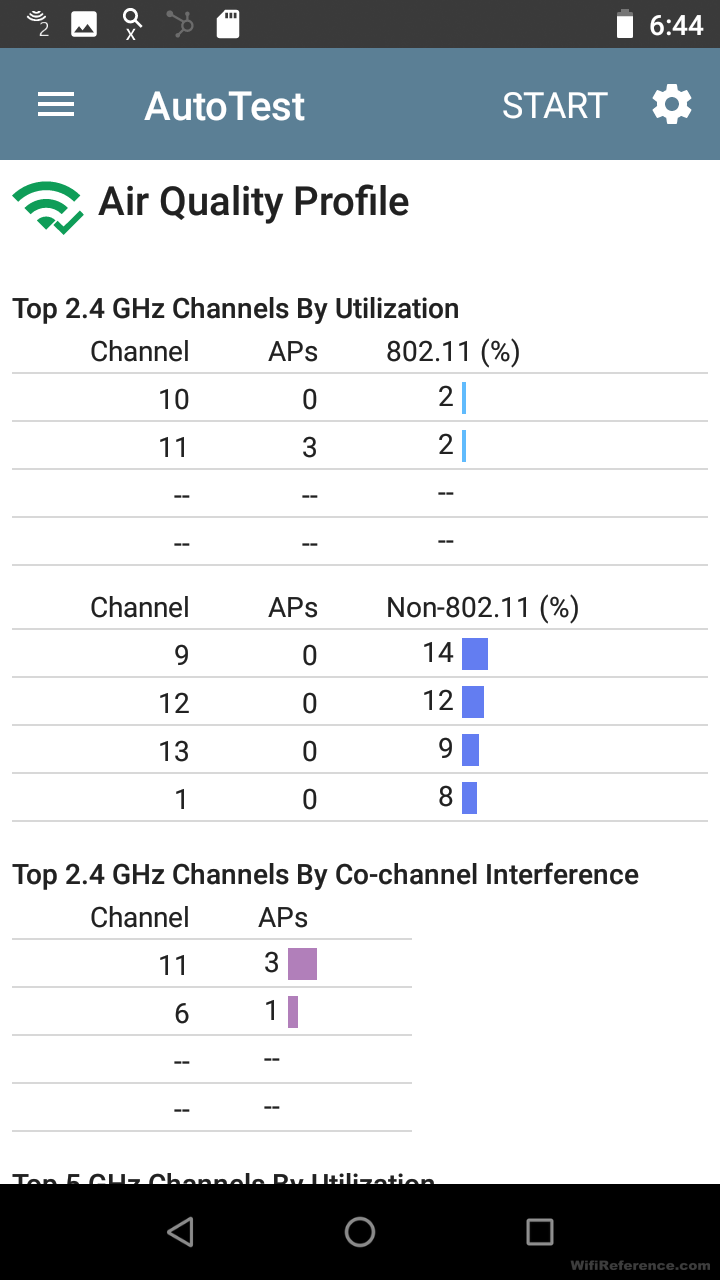

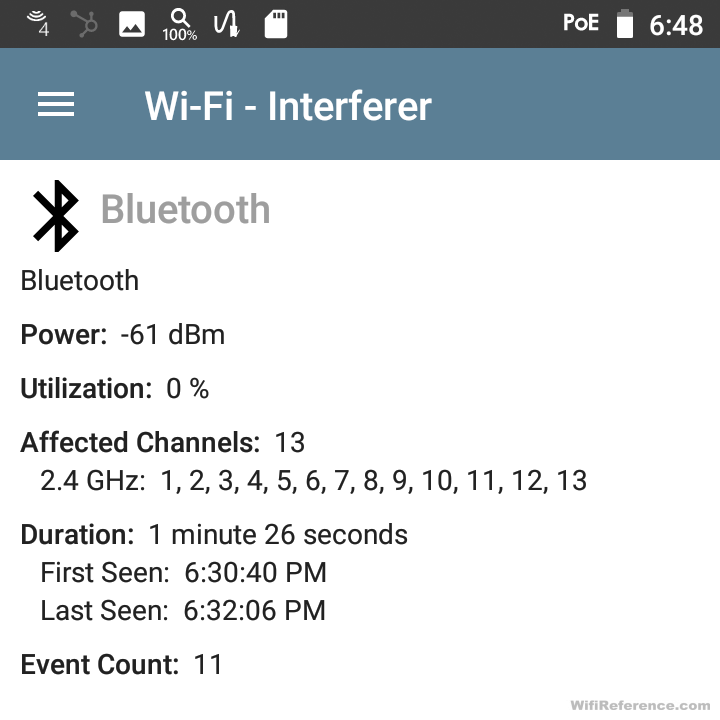
Wireless Interference
The EtherScope nXG is even capable of identifying Wi-Fi interferers in your network.
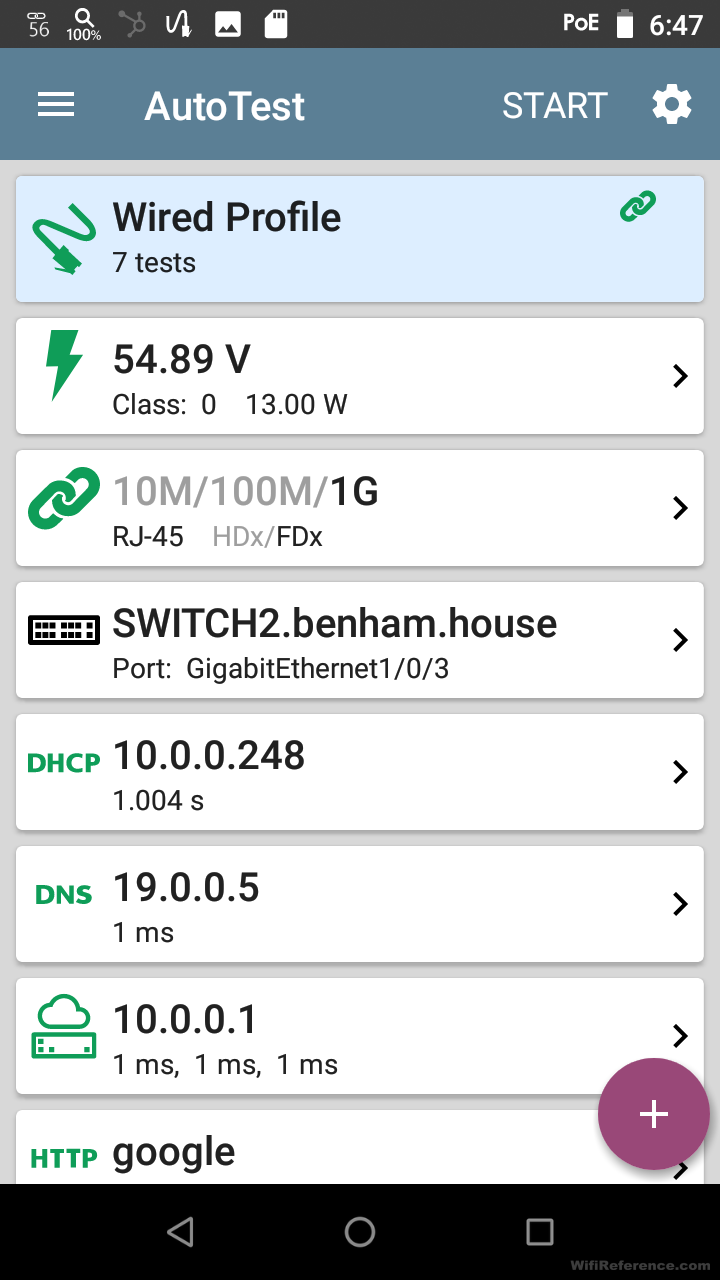
Auto Test – Wired
As I mentioned earlier, this device is also capable of a myriad of Wired network connectivity tests, including the basics like DHCP and DNS, as well as PoE.
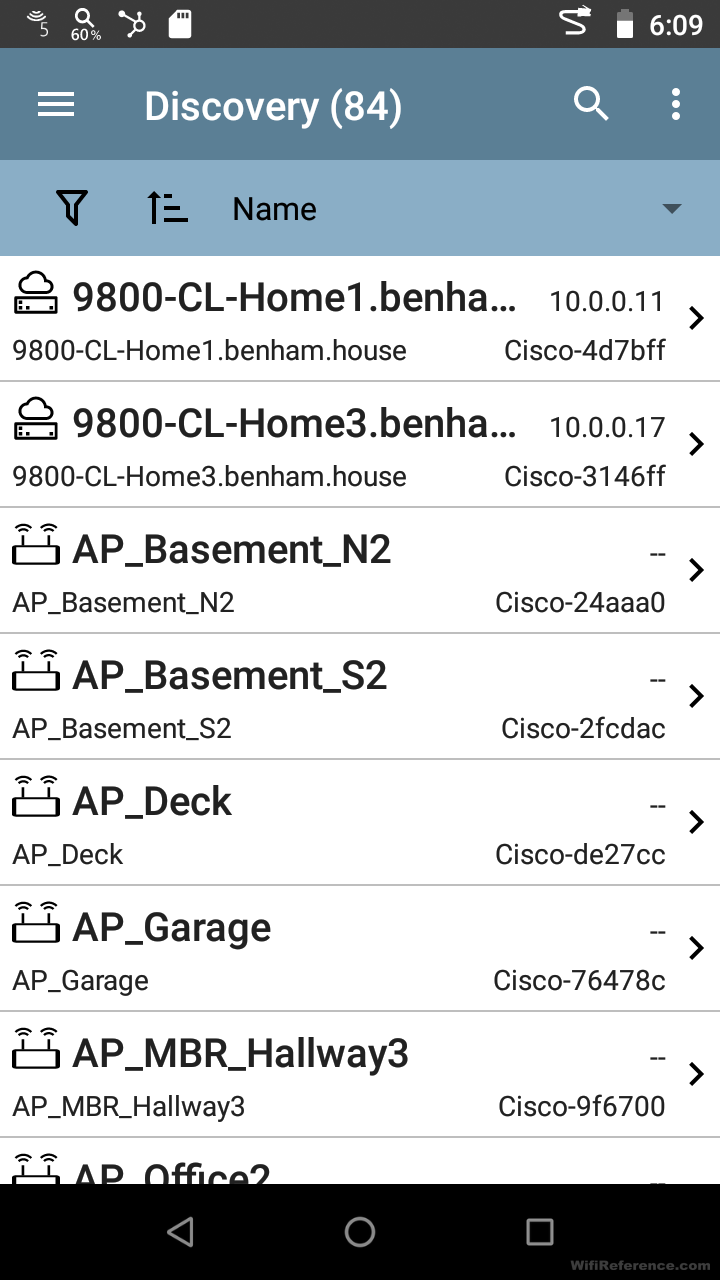
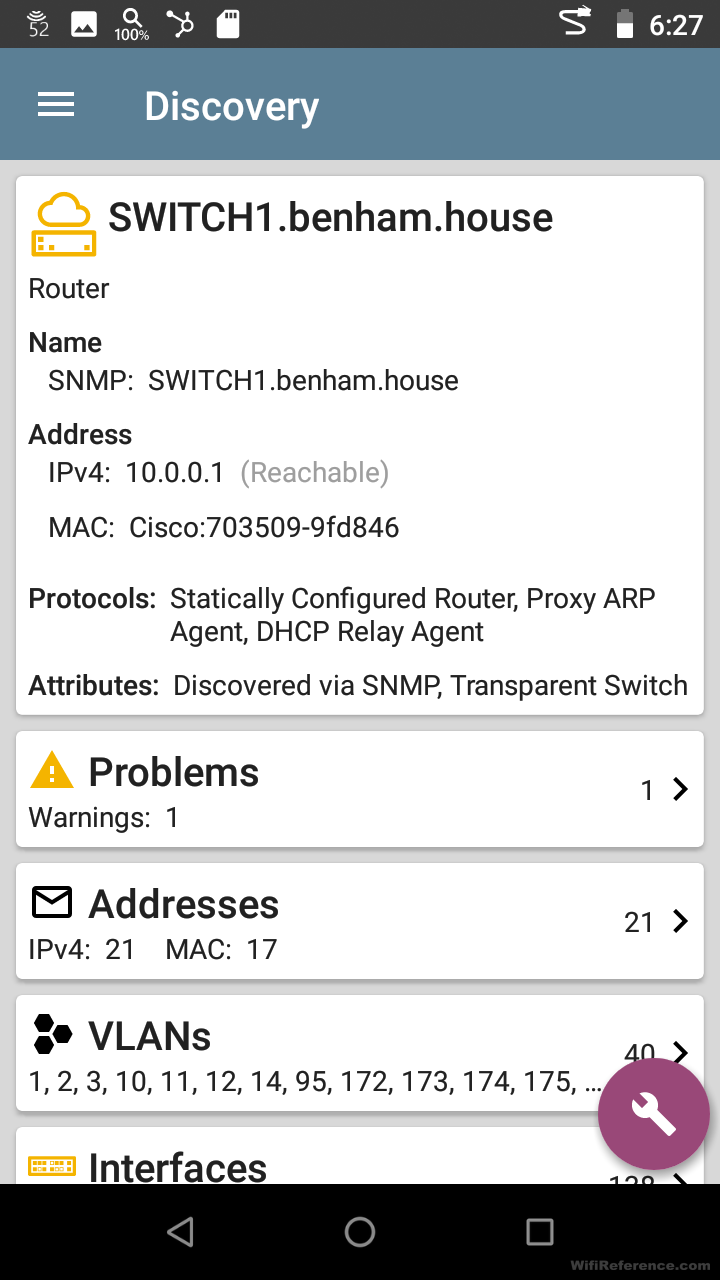
Network Discovery
I was very impressed with the network discovery function of the device. At first, I thought it was going to be a basic ping sweep and OUI match, but it is much more than that. You can specify IP ranges outside the range you are connected to and it will scan them. It uses ICMP and SNMP to scan the devices that it finds on the network. In my environment, it discovered all of my clients, servers, and even the VMs that existed on my VMware ESXi host. The discovery app combines information that it receives from the Wi-Fi network as well as the Wired network. It scans the networks very quickly, and gives you a progress report as it goes (you can run it in the background and it will show the progress in the status bar at the top of the screen). You can see in this screenshot the discovery is 60% complete, as noted by the magnifying glass in the status bar. It even goes a bit beyond basic discovery and will report if there are problems with any of the devices that it has discovered, as shown below.

Packet Capture
In addition to all the tests it can run, the EtherScope nXG is also capable of running wired and wireless packet captures! The wireless packet captures include the radio tap header, so you can see the signal strength and PHY rate of each frame, as received by the unit. While the capture is running, it gives you a count of each frame time (Management, Control, Data). Of course you can set both time and size limits for the capture, as well as the channel and channel width.
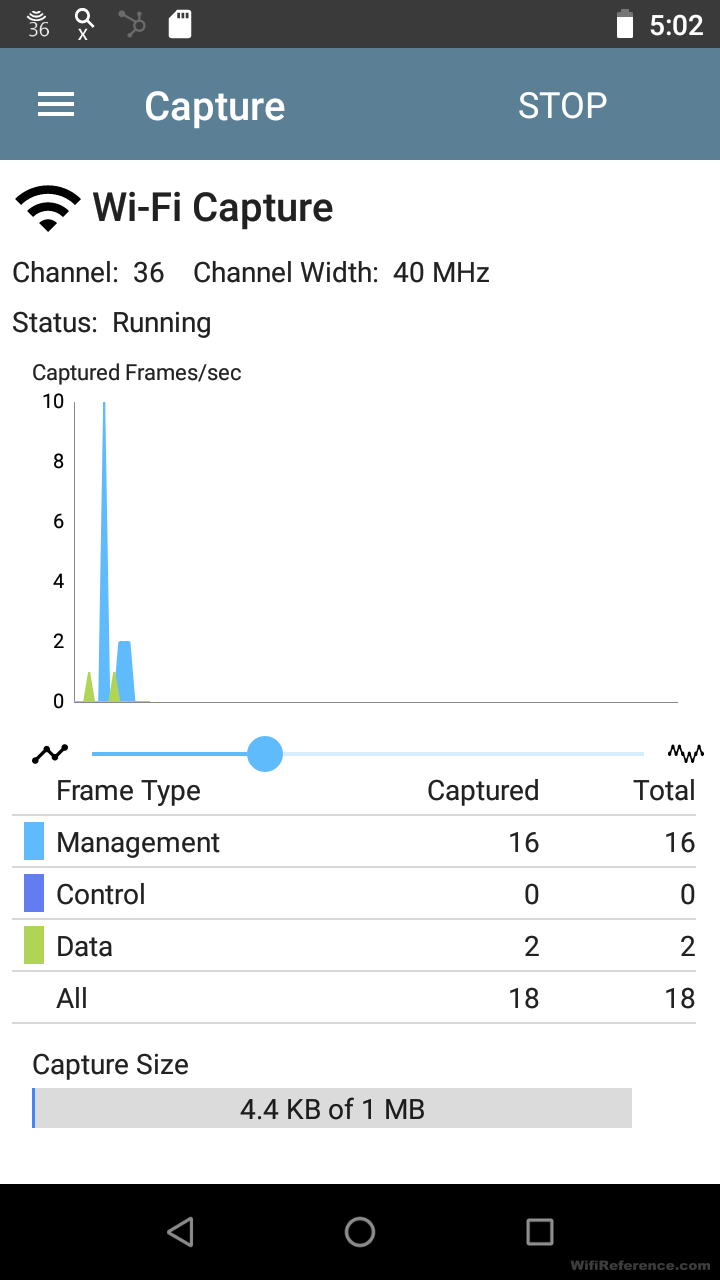
Once complete, the packet capture can be saved as a PCAP file to the on-board microSD card, and then viewed in WireShark on your workstation.
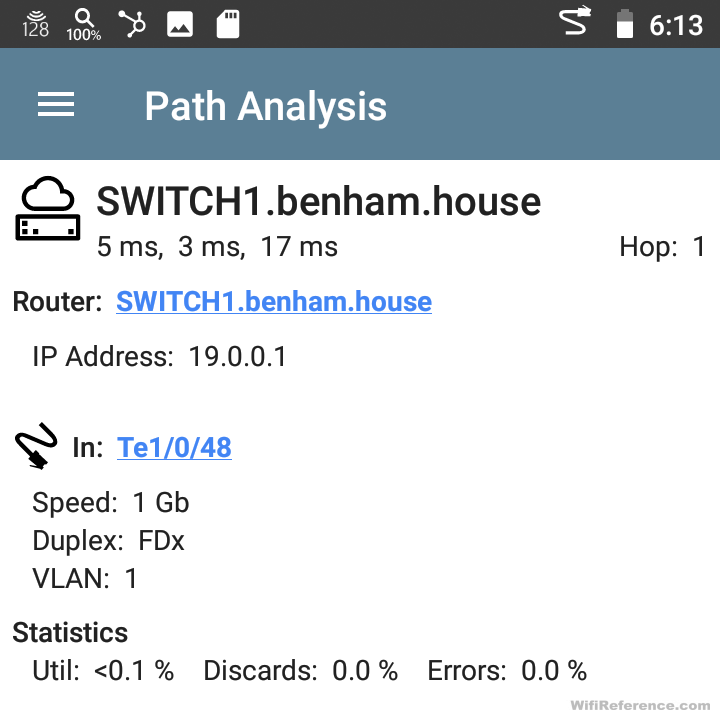
Path Analysis
I didn’t expect to be impressed by the path analysis function, as I assumed it was going to be a basic traceroute function. However, it goes well beyond a trace route. It provides you the physical path of the packet flow throughout your network. It shows each uplink switch port of every switch in the path the packet took. This is a very cool feature! Unfortunately, in my test environment I don’t have very many switches, but you can still see the switch port identified in the screenshot below.
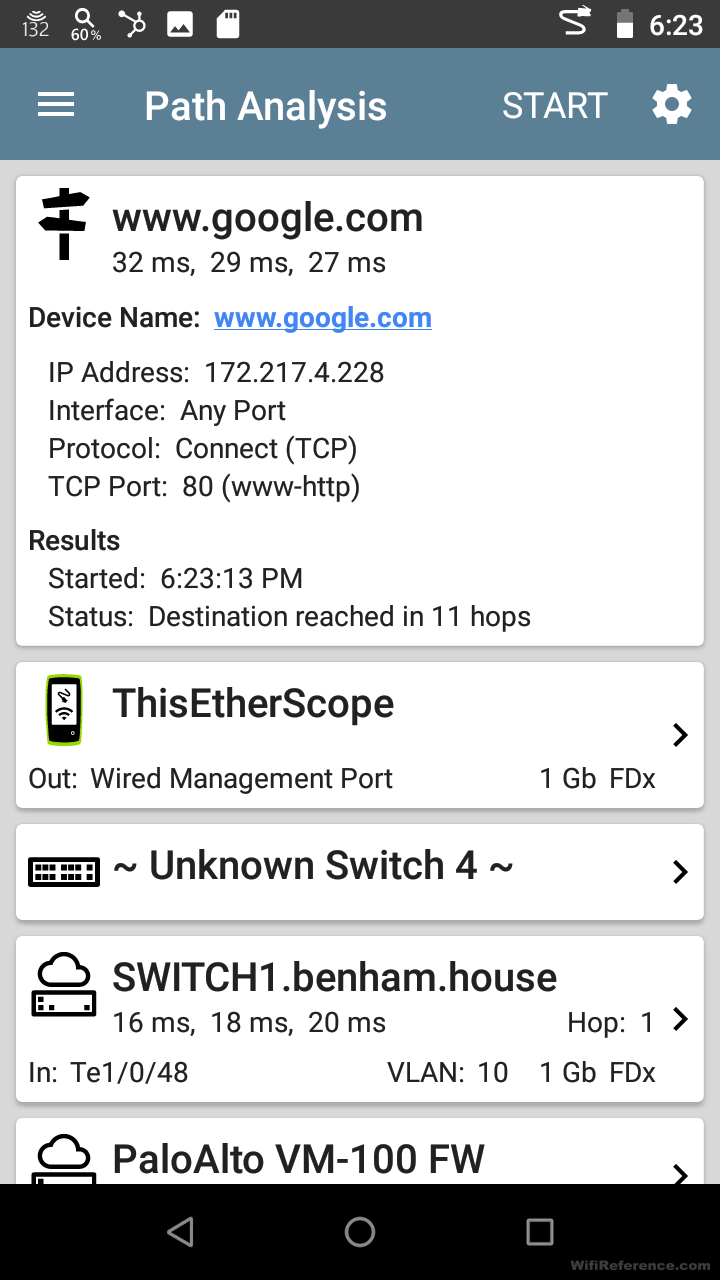
If you click on the switches in the path, it will provide more details of each linked port, as well as real-time utilization statistics for that port
Cable Tests
It may seem obvious that a device like this is capable of running cable tests, and it certainly does. However, I was surprised to see that it can also transmit tones over cables, for cable tracing purposes. The kit that I evaluated included a tone wand capable of receiving the tone and also sending a tone of its own.
I plugged the tone wand into one end of the link to my IDF switch, and plugged the other end info the EtherScope nXG to run the cable test.
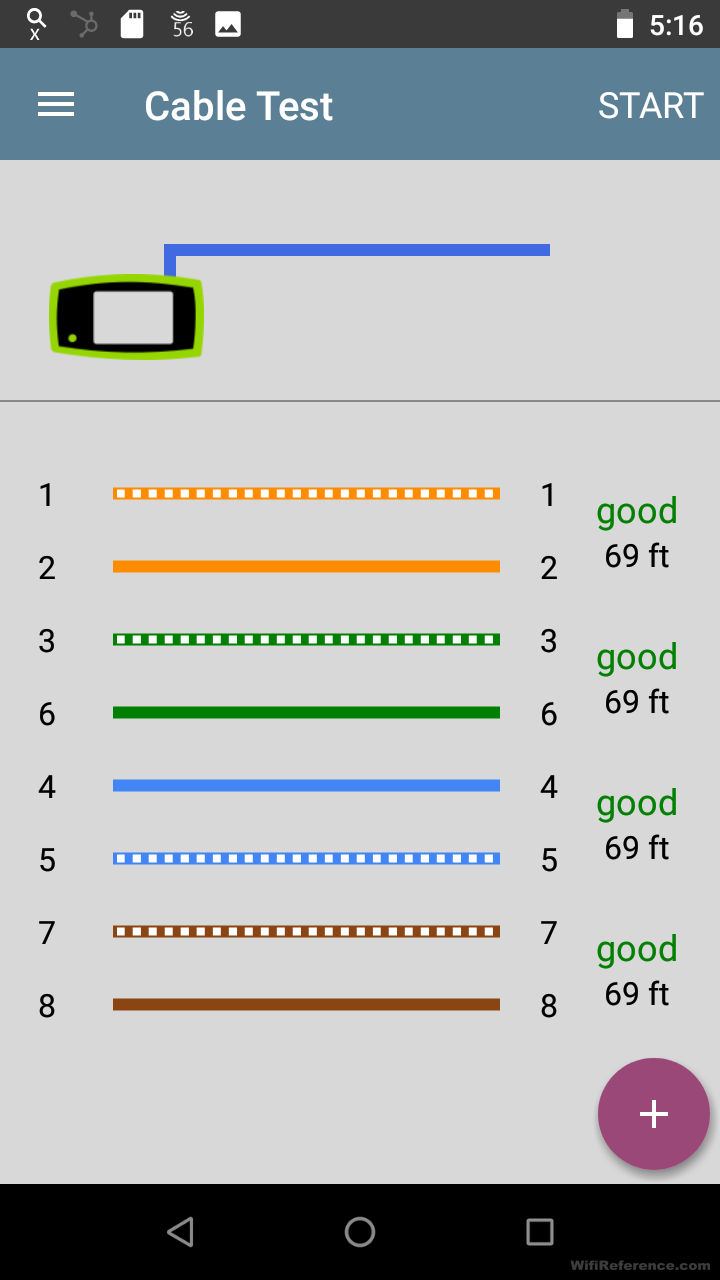
It shows the results graphically on the screen, and identifies the length of each pair within the cable.
Summary
I said it at the beginning, but I think it bears repeating. The EtherScope nXG is a beast. It will help you quickly identify just about any basic issue within a network, and may also teach you some things about your network. I really enjoyed seeing all of the details from the DHCP and DNS test results, and I was impressed with the network discovery capabilities as well. If you can swing the price tag, I think this would be a great addition to your network tool bag.
One thought on “NetAlly EtherScope nXG Review”