
Table of Contents
Overview
You may have noticed when the Catalyst 9100 Access Points were initially released, they didn’t support Mobility Express (AP as a controller) functionality. That’s because Cisco has been cooking up something much better. The Catalyst 9100 Access Points now support what Cisco is calling “Cisco Embedded Wireless Controller on Catalyst Access Points.” The name really rolls off the tongue, doesn’t it? Don’t get hung up on that though, it’s actually pretty great.
Embedded Wireless Controller (EWC for short) is basically a Catalyst 9800 Wireless Controller running inside the Catalyst 9100 Access Point. The concept is the same as Mobility Express; you load the Controller software on one (or two) APs and then the APs join that controller. The APs still need to be in FlexConnect mode, because you wouldn’t want to tunnel all of your client traffic through an AP. But this is much, much better than Mobility Express. With the Embedded Wireless Controller, you aren’t limited to a minimalist configuration interface. The EWC gives you nearly the full Catalyst 9800 experience, while running on the AP itself. However, one significant downside to the Embedded Wireless Controller vs Mobility Express is that Cisco has chosen to mandate licenses for the connected APs (Smart Licensing is Mandatory), whereas with Mobility Express the connected APs did not need licenses. The good news is Cisco is continuing the trend of offering a built-in 90-day evaluation license on the Catalyst 9800 Controller platform, including the Embedded Wireless Controller.
In this guide, I’m going to show you how to configure the AP as a Catalyst 9800 Controller by using the CLI. There is a web wizard (and an AirProvision SSID) but what’s the fun in that?
Specifications
| Max Connected APs | 100 |
| Max Connected Clients | 2000 |
| Max WLANs | 16 |
| Supported EWC (Controller) AP Models | Catalyst 9100 |
| Supported Connected AP Models | 11ac Wave2 and 9100 |
| Supported Connected AP Modes | FlexConnect |
Installing the EWC Software
The process of installing the Embedded Wireless Controller software on the AP is similar to manual AP upgrades that you’ve probably done in the past, but there are a few nuances that you must pay attention to:
- Your AP must already be in CAPWAP mode, or you must convert it to CAPWAP mode prior to proceeding
- The AP must be a production AP (many pre-production APs don’t have the necessary certificate installed for this to work).
- The CAPWAP image must be upgraded to at least IOS-XE 16.12.1s (or AireOS 8.10.105.0) prior to proceeding
- You must then install at least IOS-XE EWC Version 16.12.2 (will be available very soon on cisco.com)
Note: The command to install the EWC code is slightly different from what you’ve probably used in the past:archive download-sw ewc-ap tftp://x.x.x.x/C9800-EWC.bin
If you want to see more details about the process of loading the software on the AP, you should check out Sam’s blog on that topic: https://sc-wifi.com/2019/12/03/cisco-802-11ax-site-survey-single-ap-method/. At the time of this writing, the EWC software is not quite yet available for public consumption.
Learn more about Catalyst 9100 Access Points or the Catalyst 9800 Wireless Controller.
Provisioning the Embedded Wireless Controller
Initial Connection
Connect to the console port and power on the AP. There is a banner with information on how to configure the AP, and you will miss it if you don’t have the console cable plugged in before the AP completes booting.
Read the banner!
Once the AP boots, you will be presented with this banner. Read it and pay attention to it! Especially pay attention to the “DO NOT save the configuration unless all the steps are completed” portion.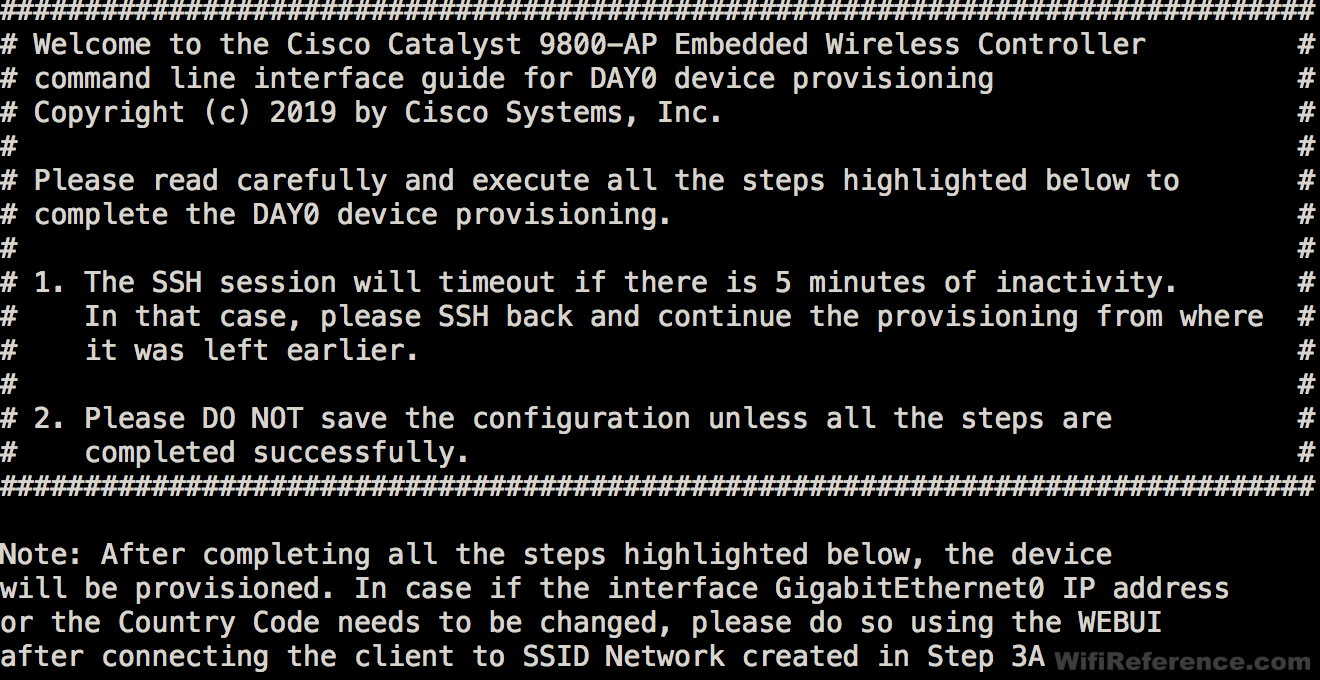
Configure the EWC IP address (or record the address, if it is connected to a network with DHCP)
Note: This is so that you know what IP address to use when connecting to the web interface later on
DHCP:
C9800-EWC# show ip interface brief
Interface              IP-Address
GigabitEthernet0       10.0.0.140

Manual:
WLC7069.1122.3344#conf t
WLC7069.1122.3344(config)#interface GigabitEthernet0
WLC7069.1122.3344(config-if)#ip address x.x.x.x y.y.y.y
WLC7069.1122.3344(config-if)#exit
WLC7069.1122.3344(config-if)#ip default-gateway z.z.z.z
Configure the Hostname
WLC7069.1122.3344#conf t
WLC7069.1122.3344(config)#hostname <hostname>
C9800-EWC(config)#end
Create the administrative user
C9800-EWC(config)# username <username> privilege 15 password <password>
Configure the AP Profile
Note: You must use the same user/password you created in the previous step
C9800-EWC(config)#ap profile default-ap-profile
C9800-EWC(config-ap-profile)#mgmtuser username <username> password 0 <password> secret 0 <password>
C9800-EWC(config-ap-profile)#exit
Add a simple PSK WLAN
C9800-EWC(config)#wlan <#wlan-profile-name> <#wlan-id> <#ssid-network-name>
C9800-EWC(config-wlan)# no security wpa akm dot1x
C9800-EWC(config-wlan)# security wpa psk set-key ascii 0 <#pre-shared-key>
C9800-EWC(config-wlan)# security wpa akm psk
C9800-EWC(config-wlan)# no shutdown
Configure the Wireless Profile Policy
C9800-EWC(config)#wireless profile policy <#wlan-profile-name>
C9800-EWC(config-wireless-policy)#no central association
C9800-EWC(config-wireless-policy)#no central dhcp
C9800-EWC(config-wireless-policy)#no central switching
C9800-EWC(config-wireless-policy)#http-tlv-caching
C9800-EWC(config-wireless-policy)#session-timeout 86400
C9800-EWC(config-wireless-policy)#no shutdown
Add the Default Policy Tag
C9800-EWC(config)#wireless tag policy default-policy-tag
C9800-EWC(config-policy-tag)#wlan <#wlan-profile-name> policy <#wlan-profile-name>
Note: You must use the <#wlan-profile-name> you used in the previous step
Enable password encryption
While this step is not required, it is strongly recommended. Without configuring password encryption, your passwords will be stored in plain text. It is recommended to use the same password here that you used for the administrative user
C9800-EWC(config)#service password-encryption
C9800-EWC(config)#password encryption aes
C9800-EWC(config)#key config-key newpass <#password>
Save the configuration
Note: You will lose connectivity at this point if you are not connected via console cable. Connect to the web interface after it reboots
Configure the Embedded Wireless Controller via the Web Interface
Initial configuration
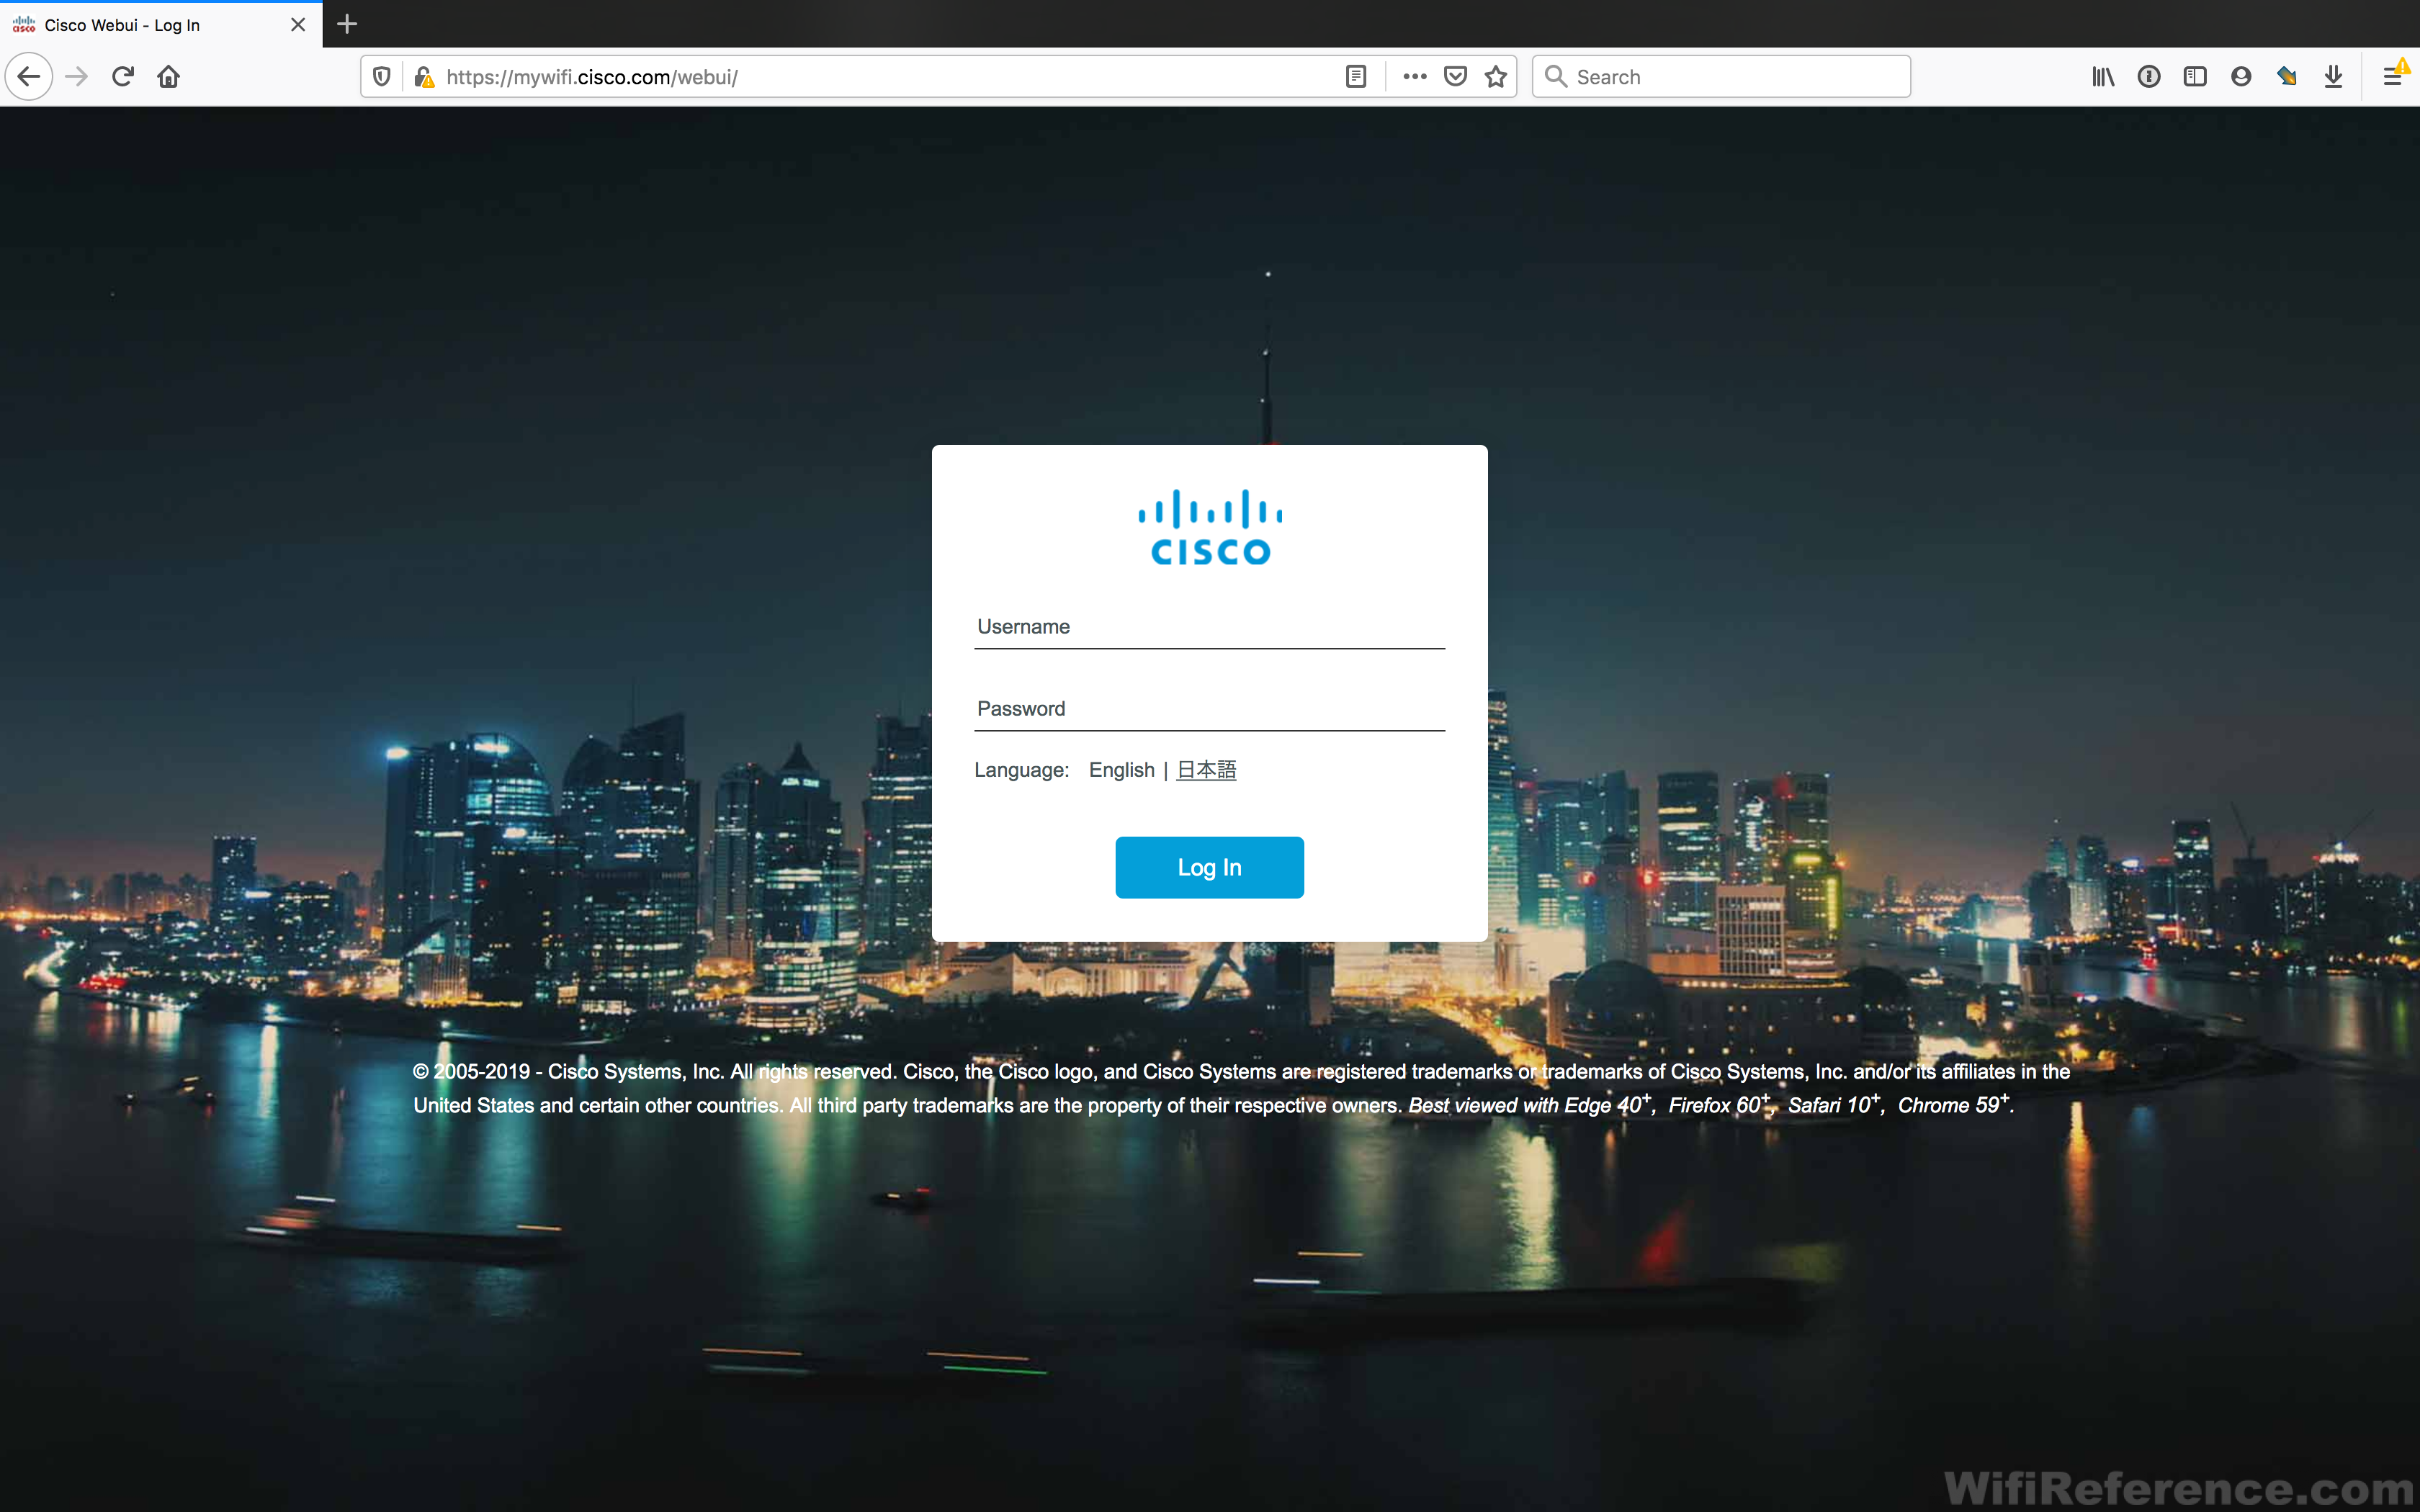
Connect to the PSK WLAN that you created earlier
Connect to https://mywifi.cisco.com with your browser. This should automatically redirect you to the management interface of the EWC. If it doesn’t, you can alternatively just https:// to the IP address you noted earlier.
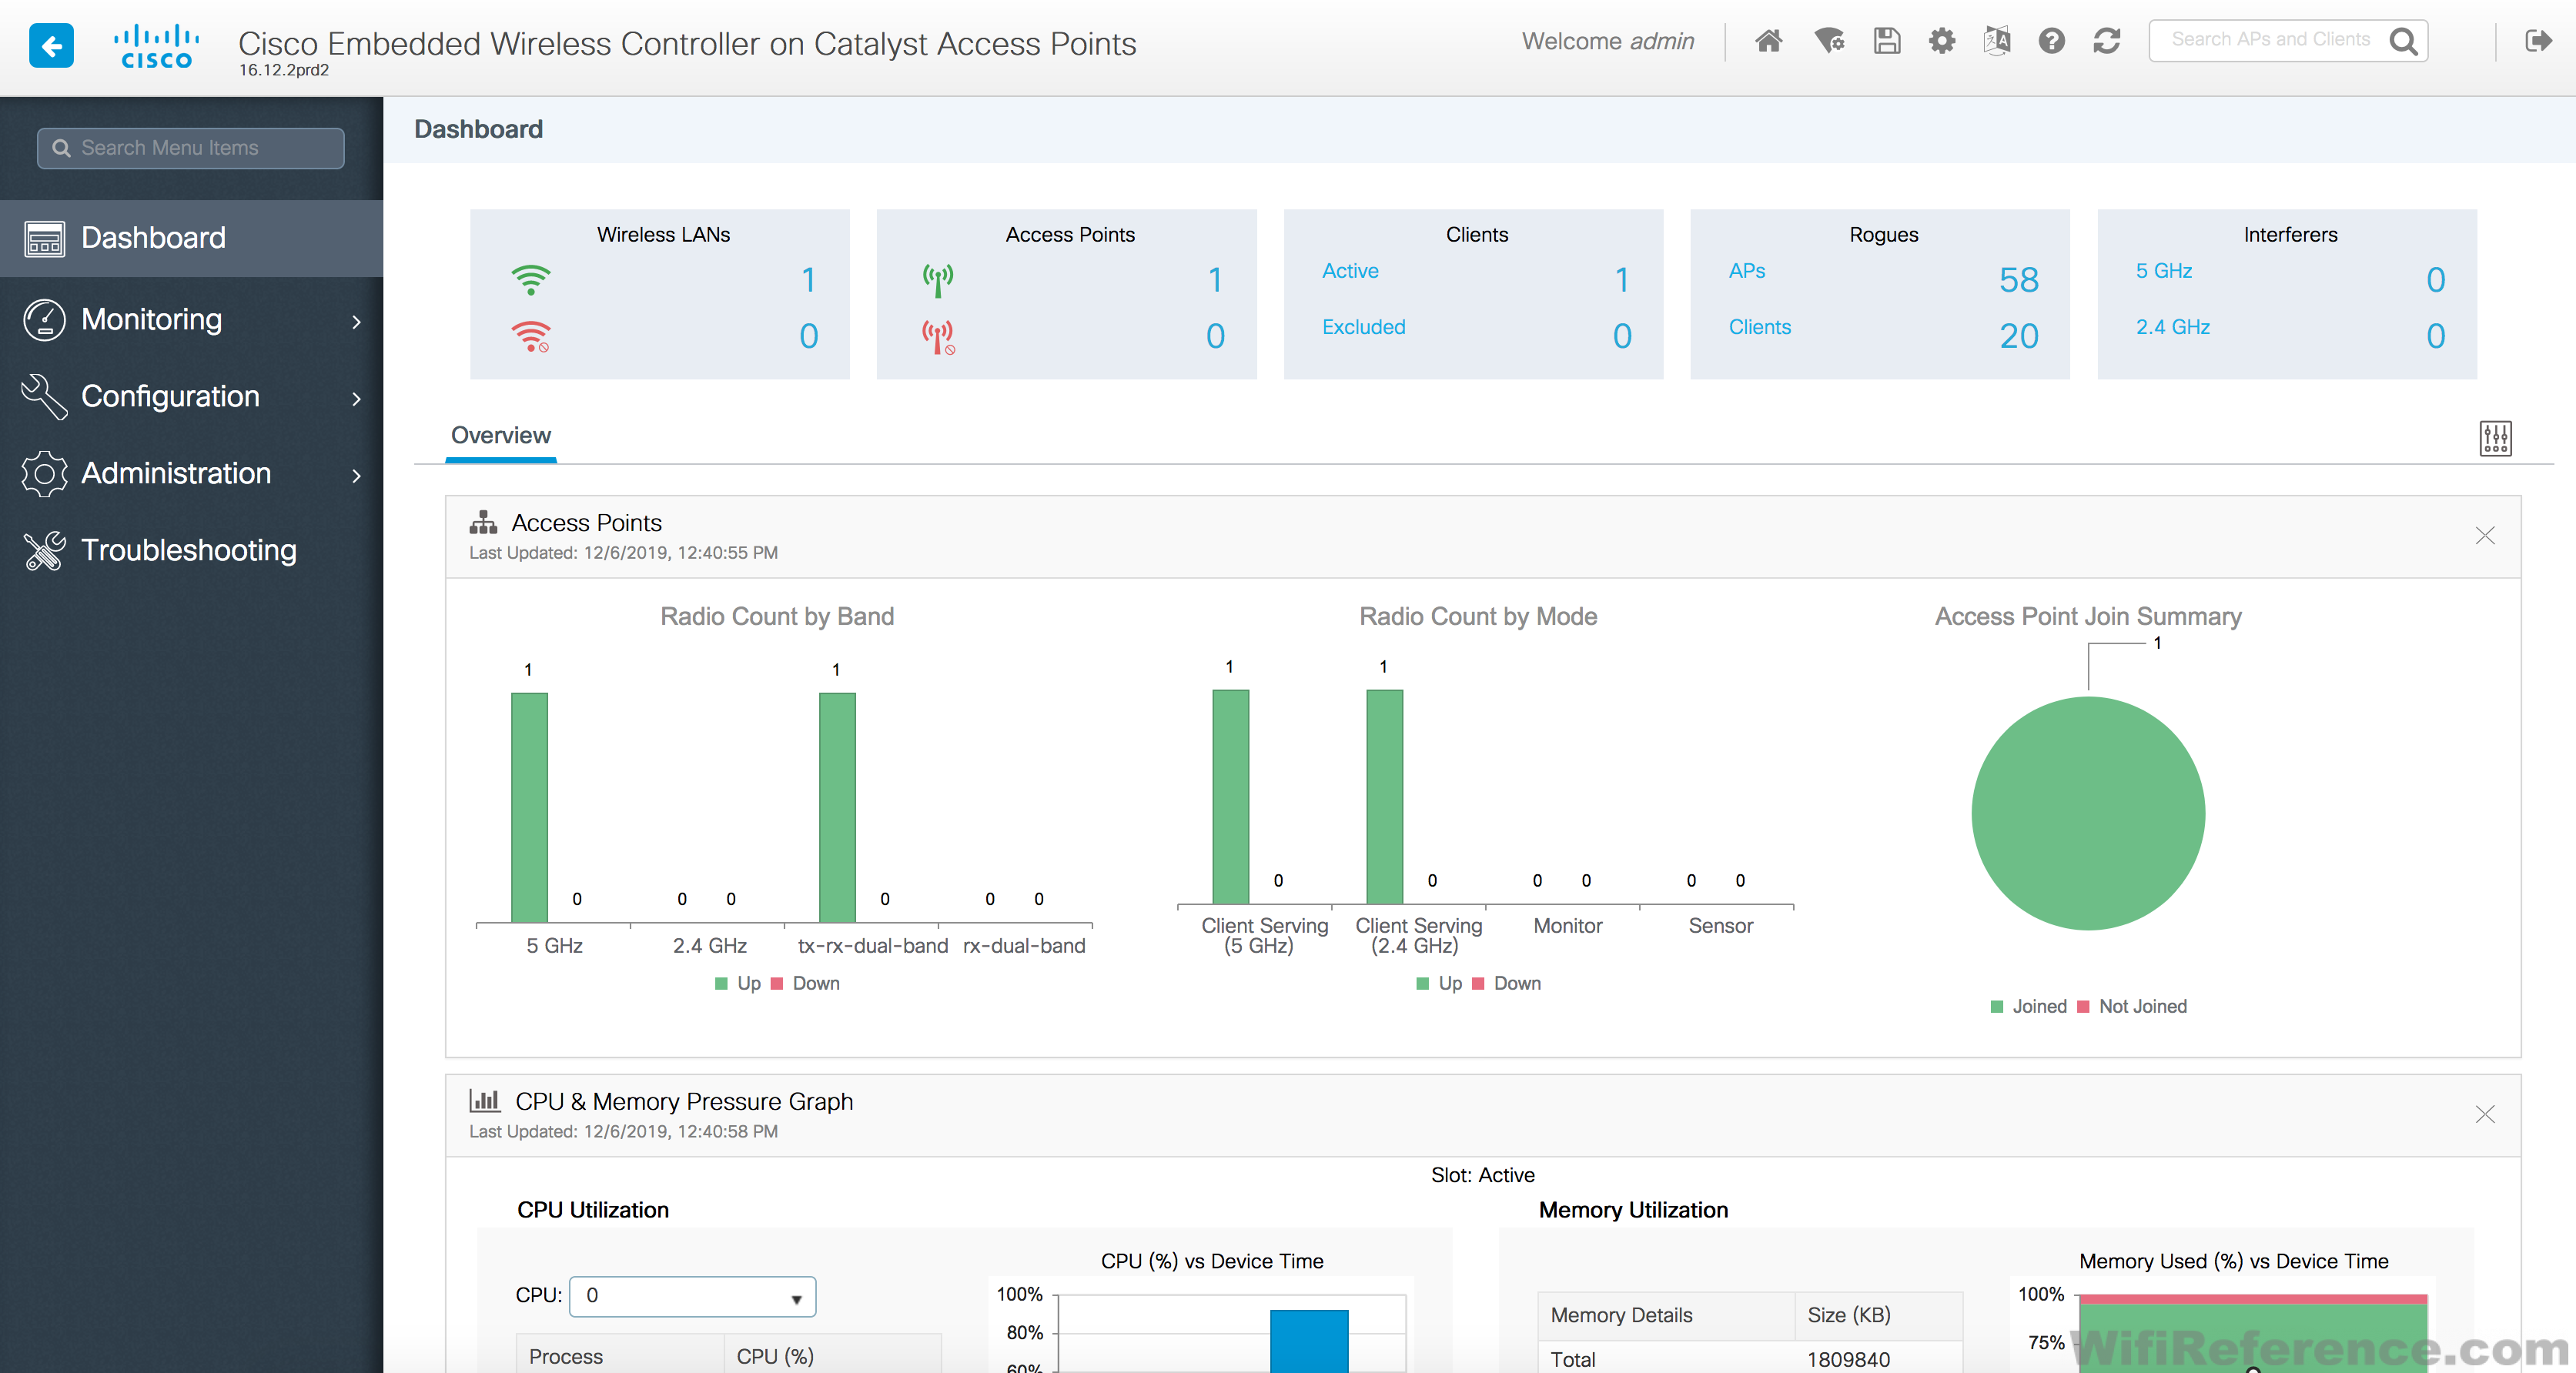
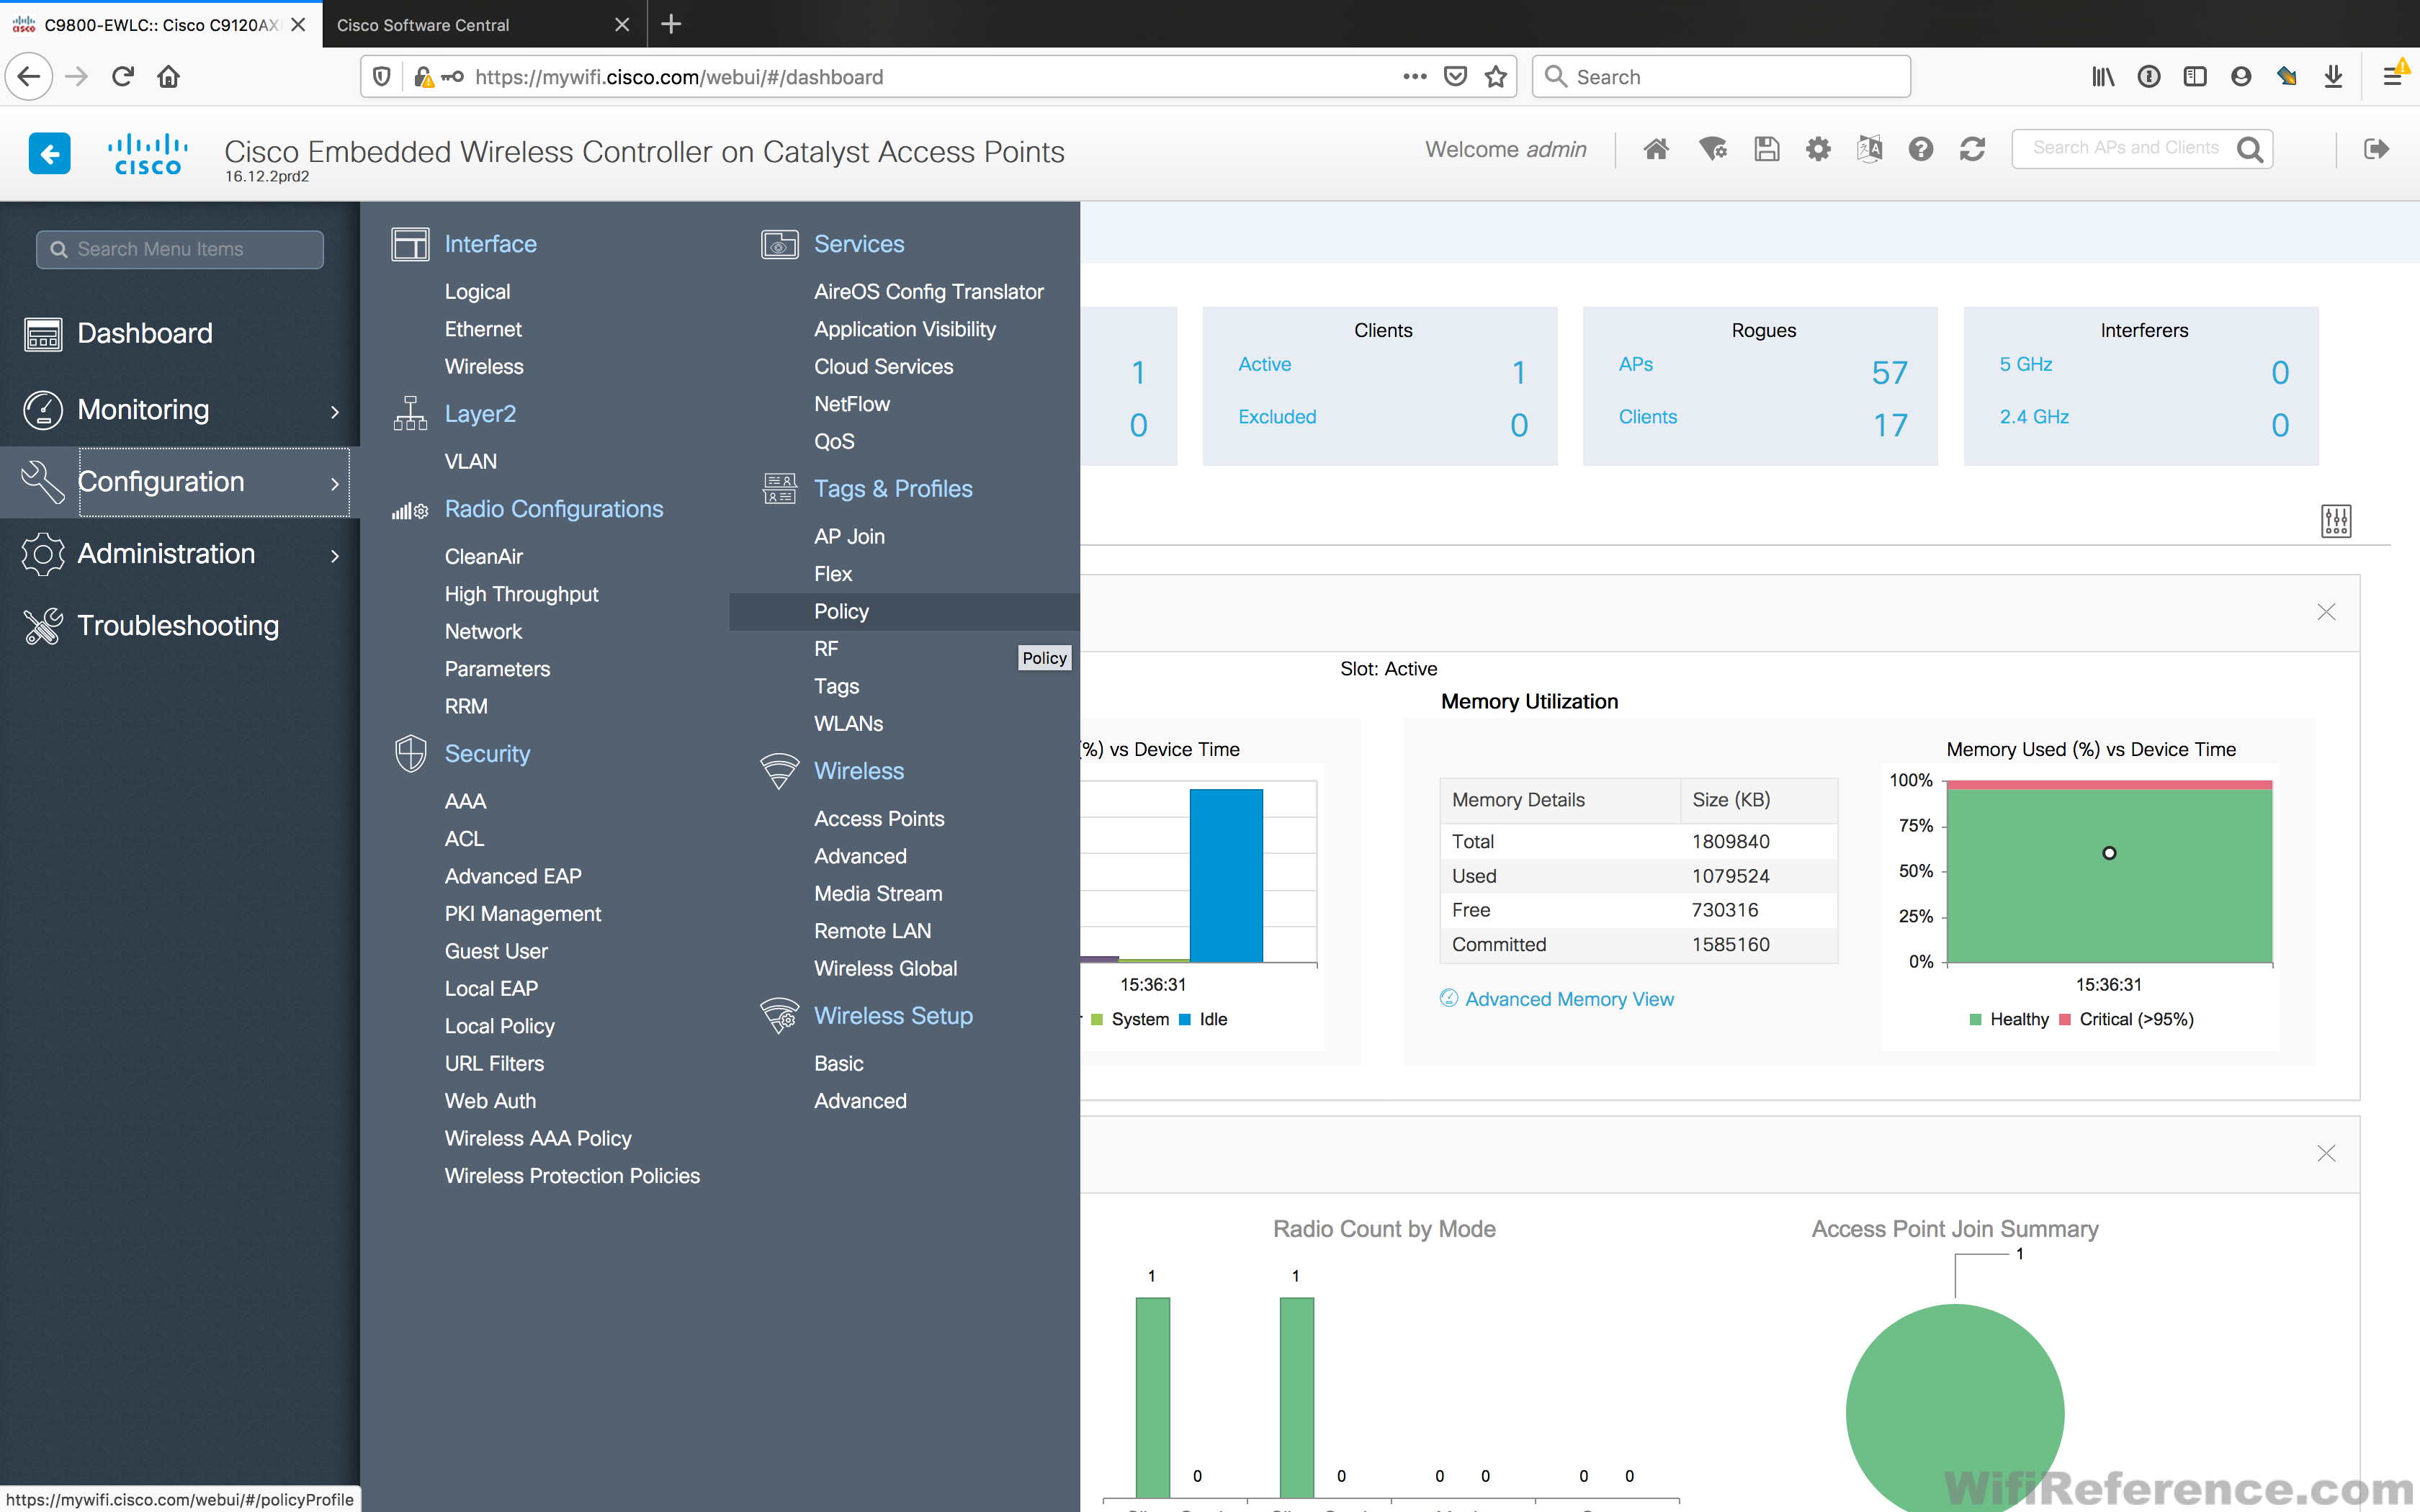
Login with the administrator credentials you configured earlier. You’ll be presented with the main management dashboard of the Catalyst 9800 Embedded Wireless Controller.
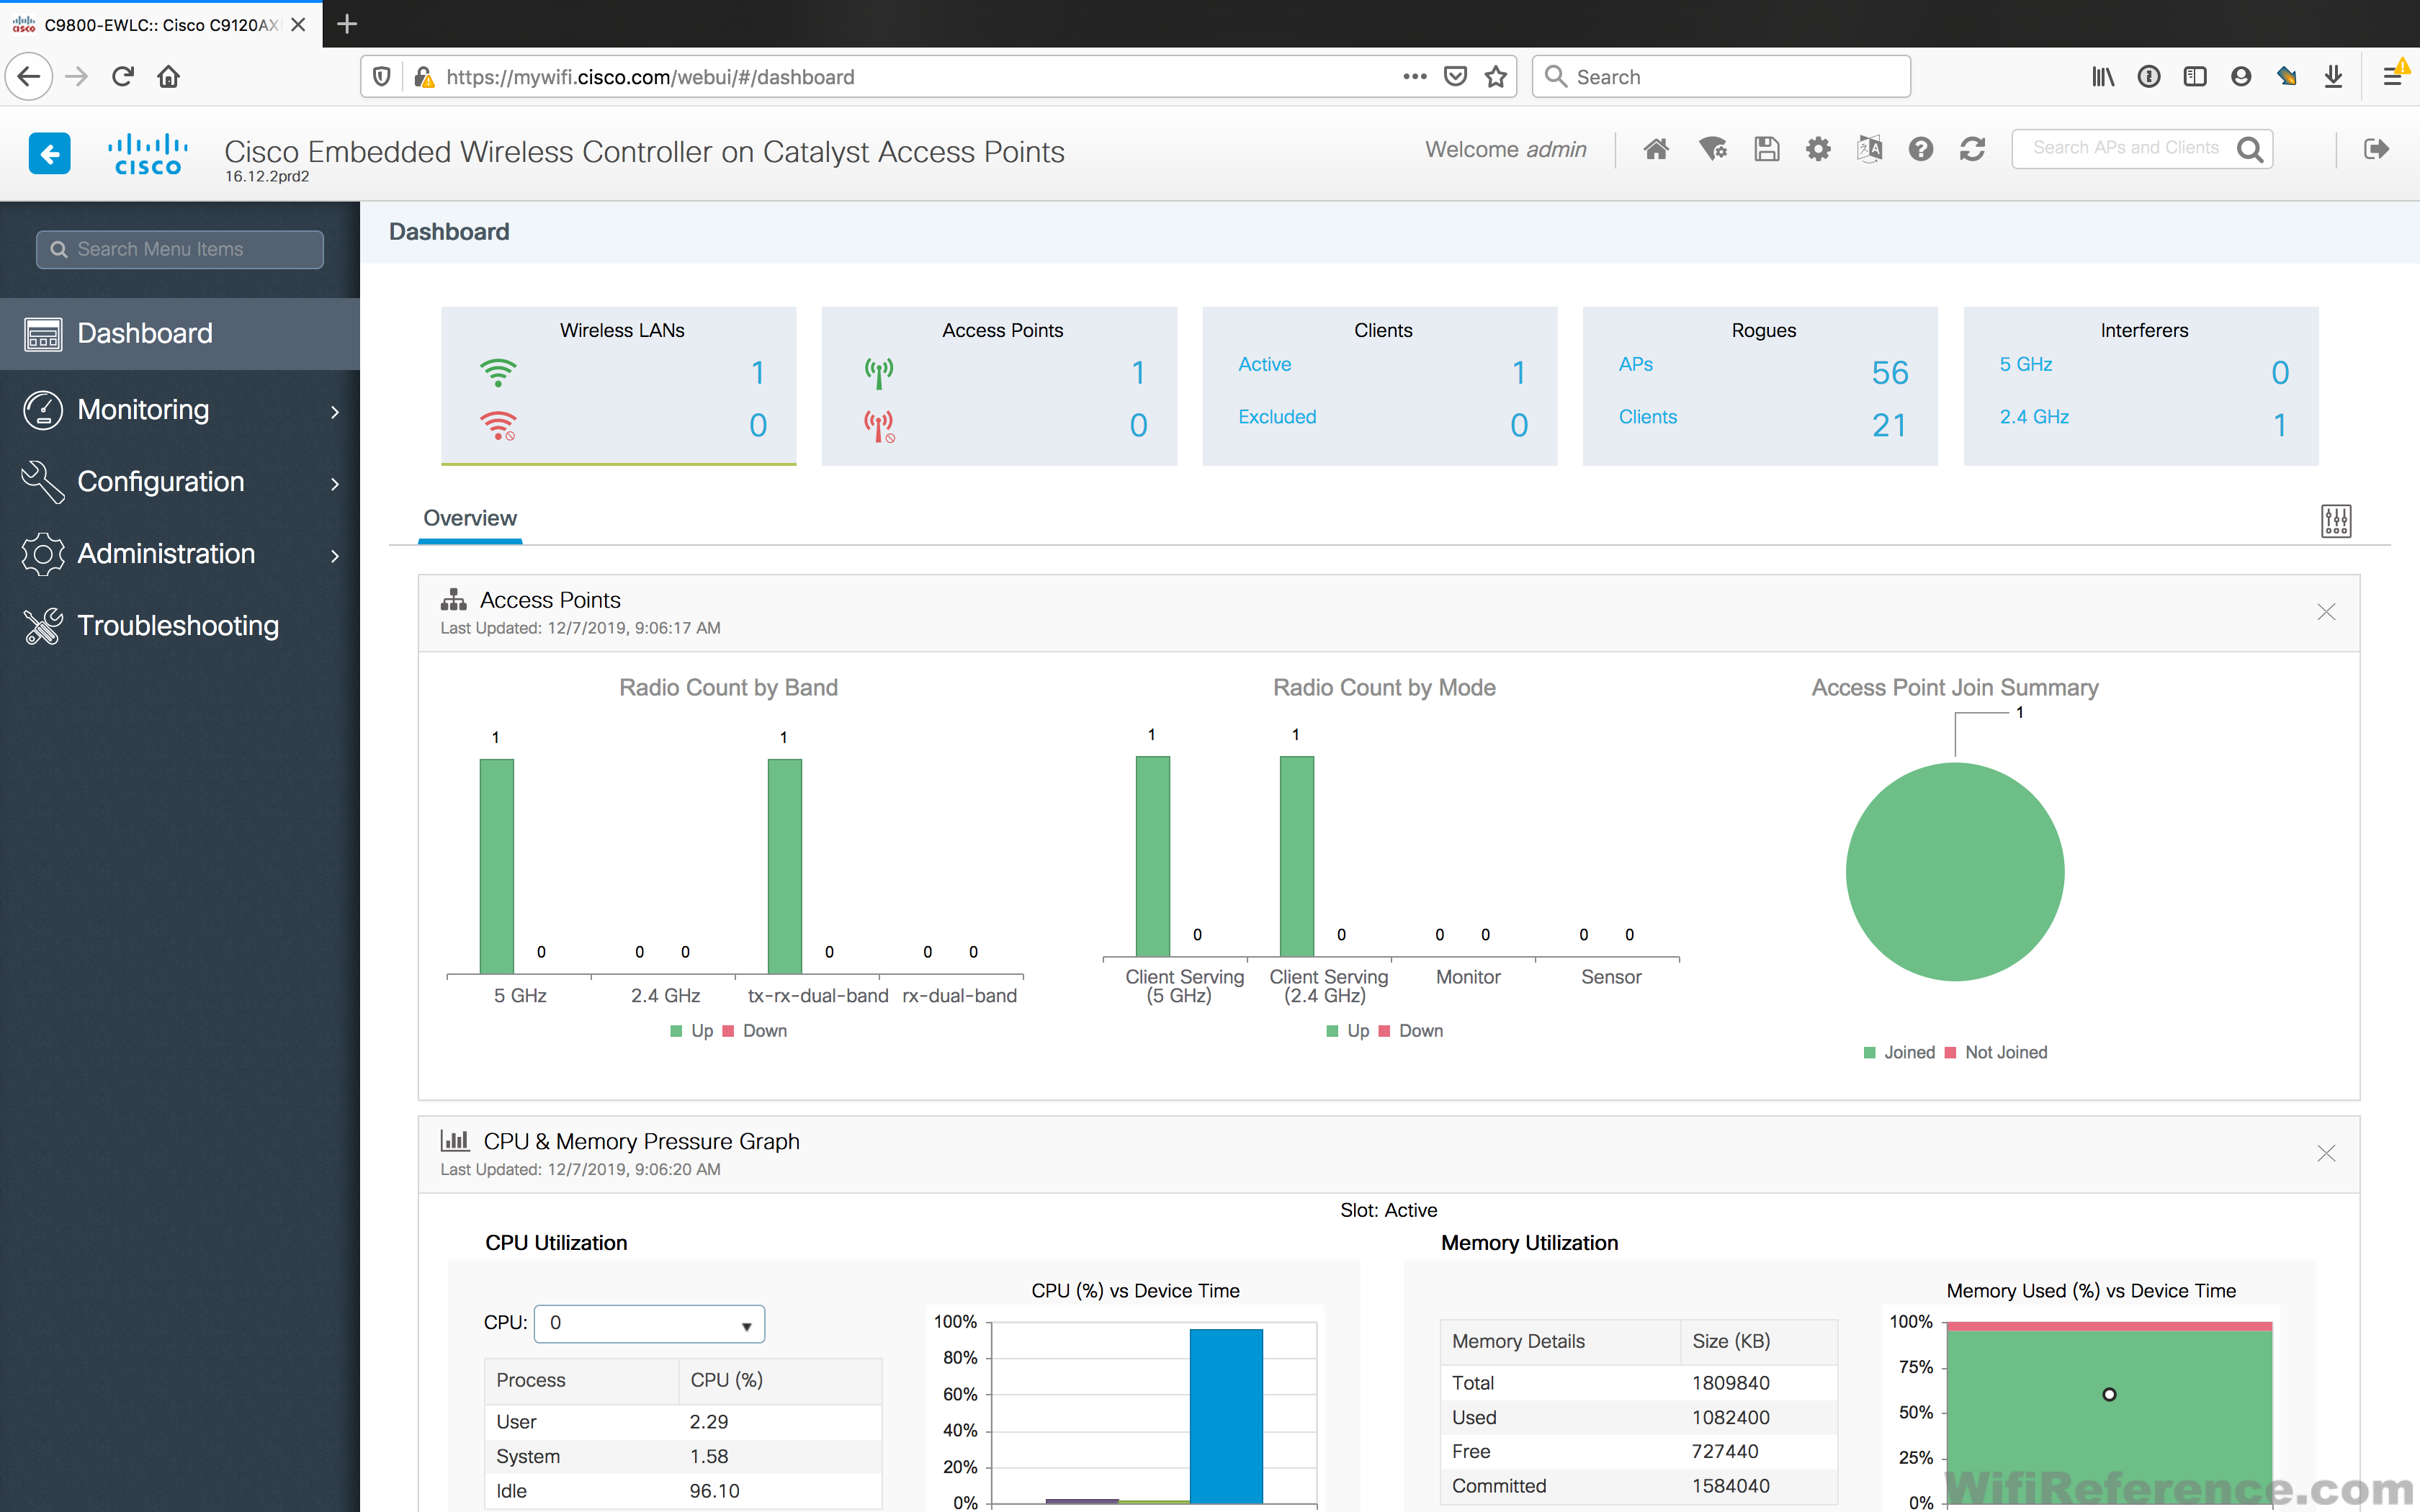
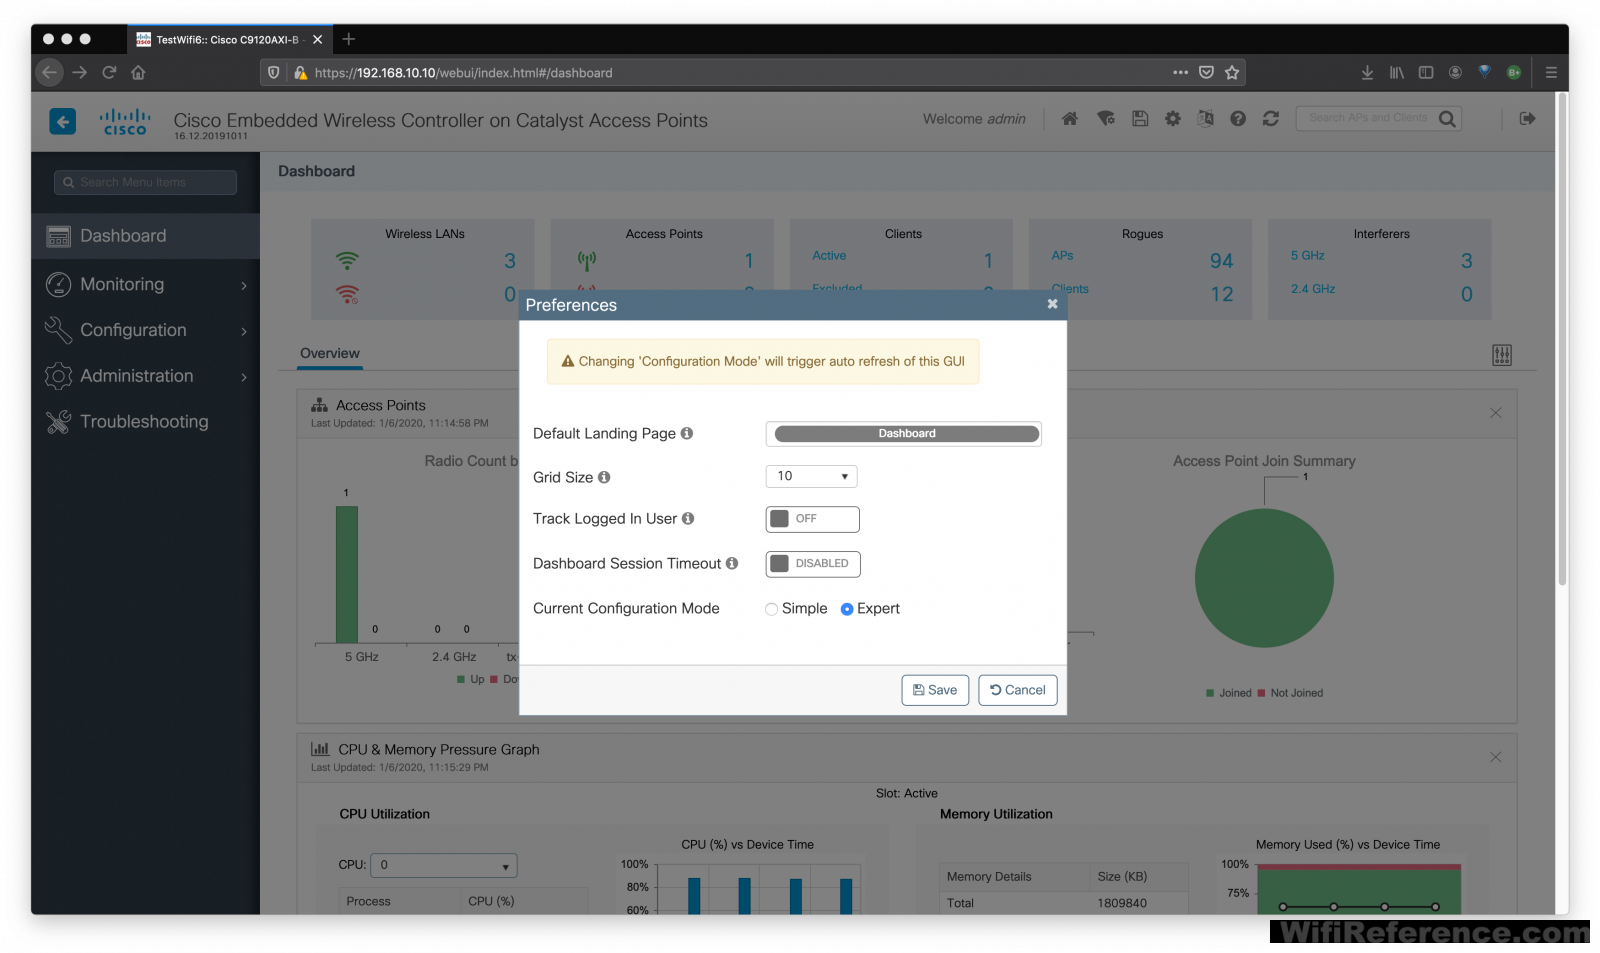
One of the first things you’ll likely want to do is switch to “Expert” view for the GUI. Click the gear icon in the title bar and choose Expert Configuration Mode. I don’t know why Cisco continues to feel the need to attempt to simplify these interfaces. Ironically, it tends to complicate/frustrate the experience when you can’t find a configuration option that you know should be there, only to find out it was hidden because you were in the “Simple” mode.
Things unique to the Embedded Wireless Controller
Before going over more configuration items, I will show you a few things unique to the EWC (vs. a standard Catalyst 9800 Controller):
Primary/Standby and Preferred Master
These are the names of the APs running as EWCs in a redundant configuration.
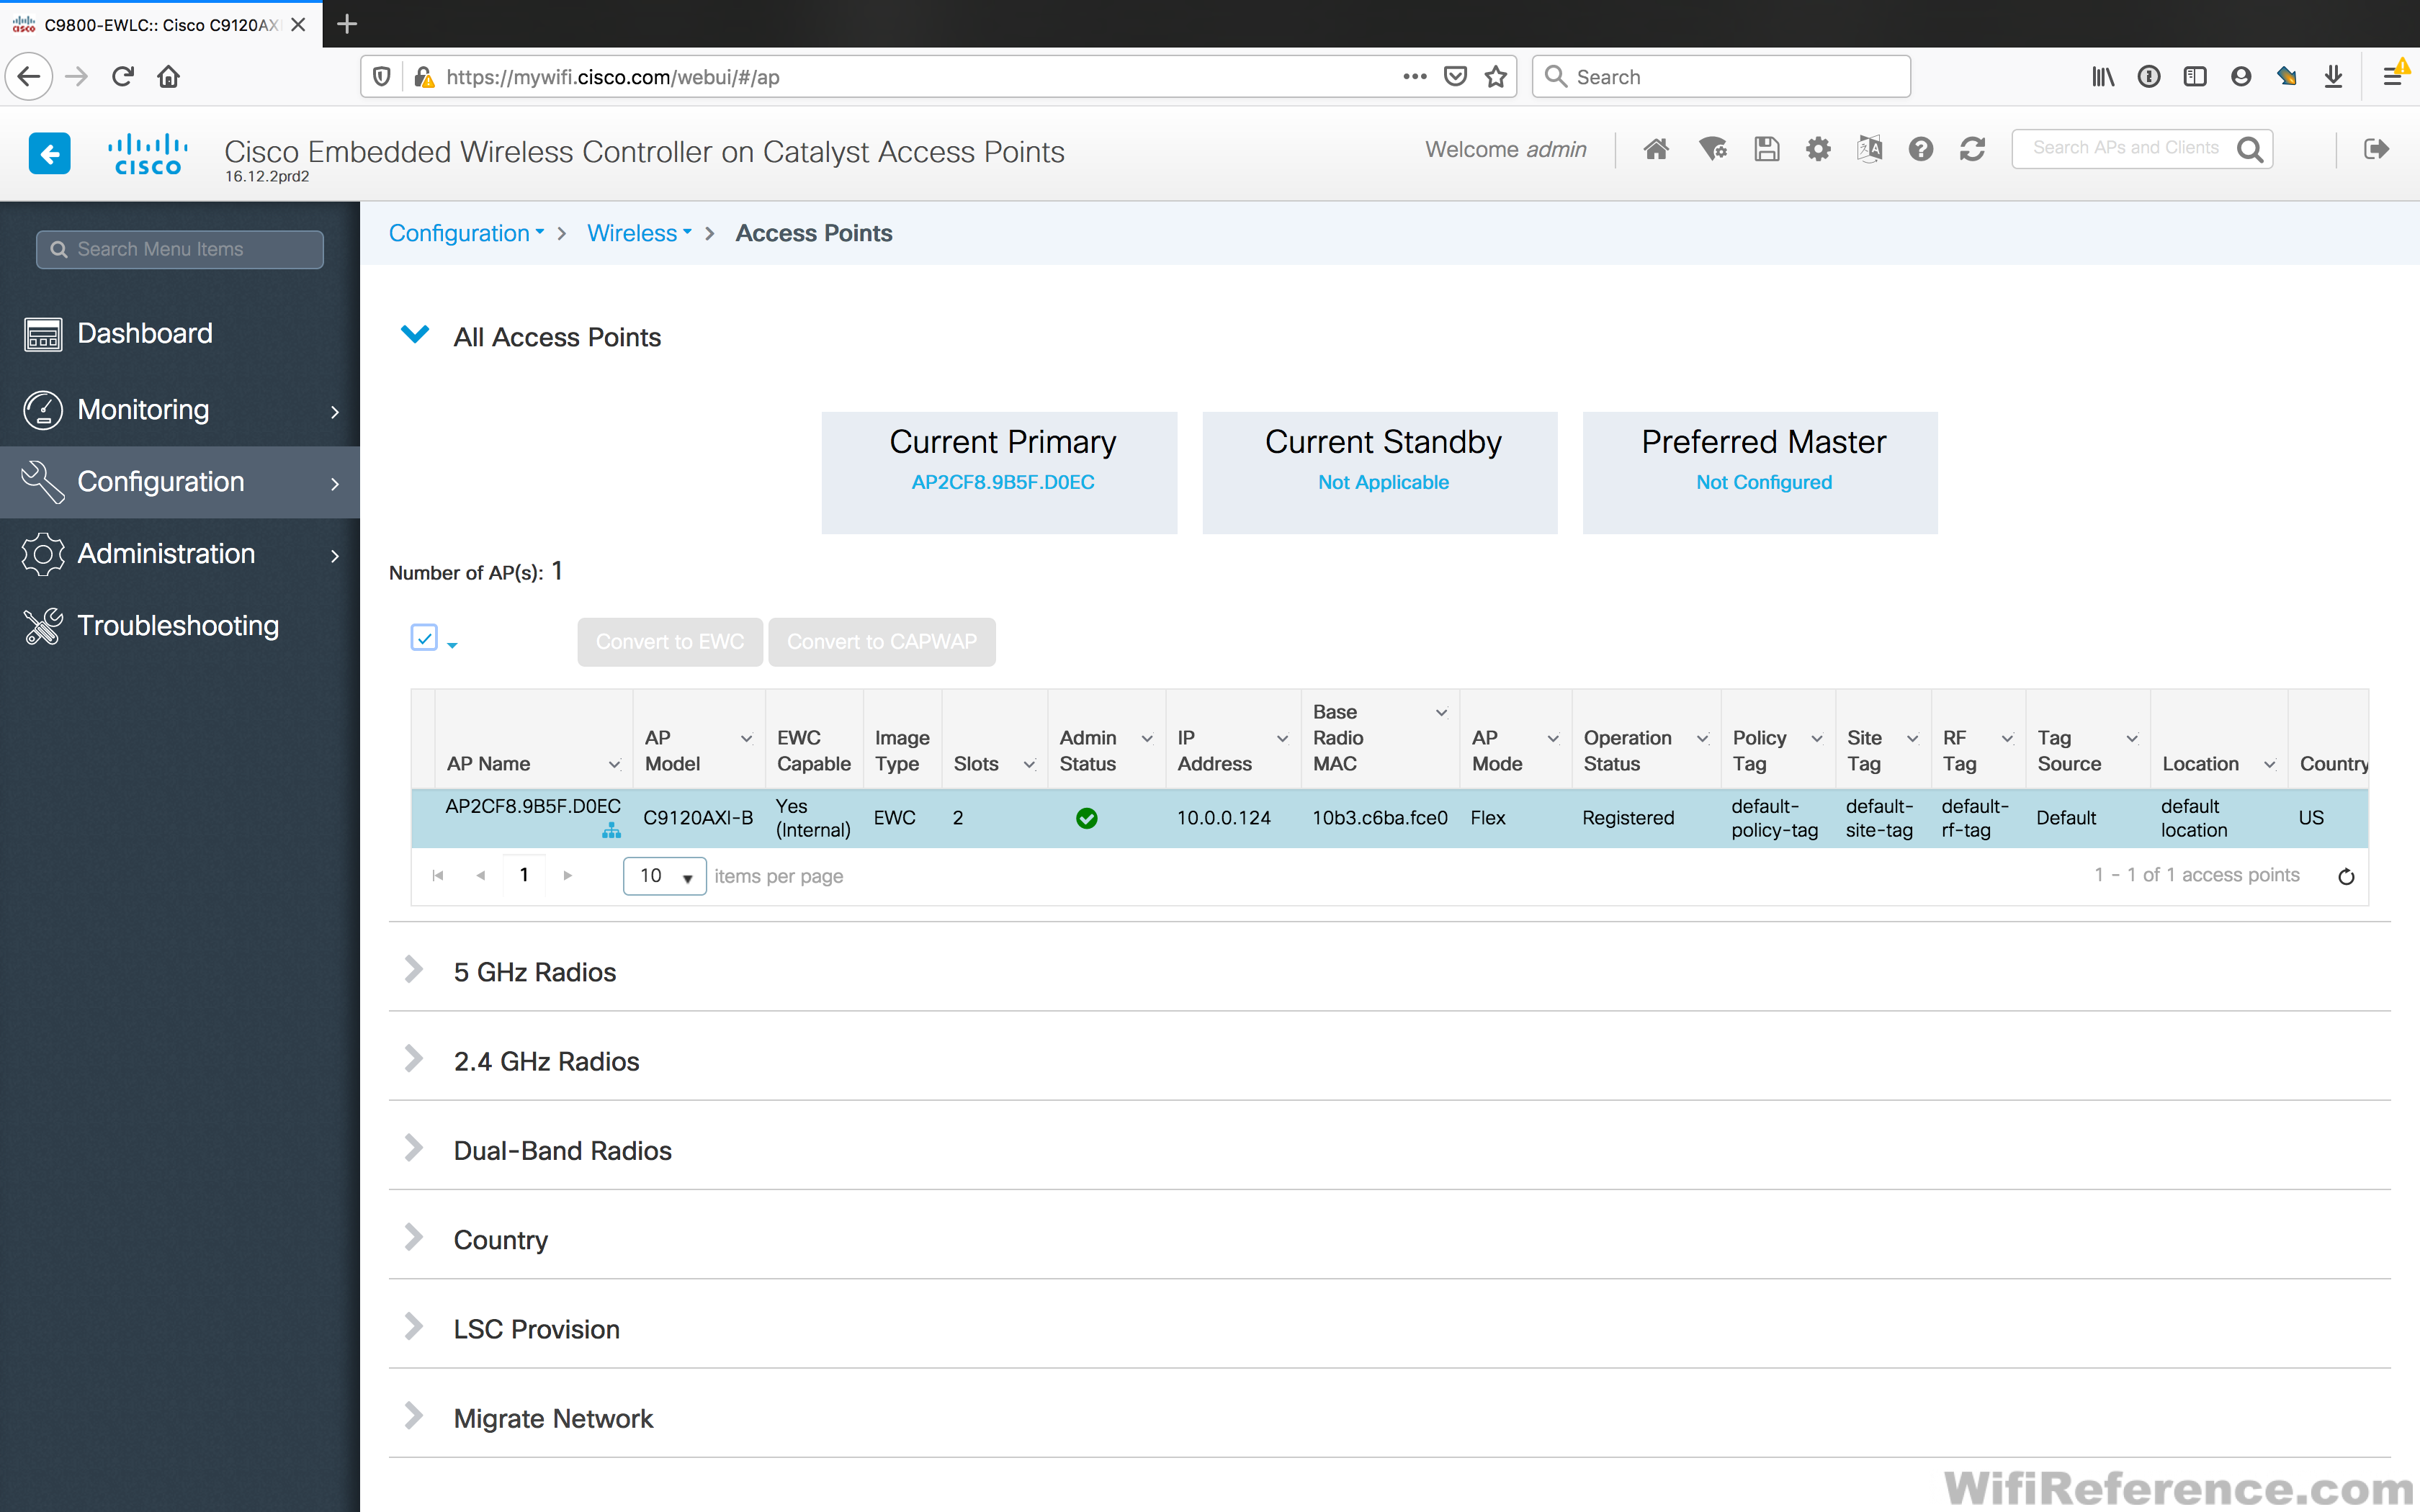
You’ll also notice the “Convert to EWC” “Convert to CAPWAP” buttons. This allows you to change the mode of the attached APs. You can easily “promote” an attached AP to be a standby EWC by converting it to an EWC and then configuring it as a standby.
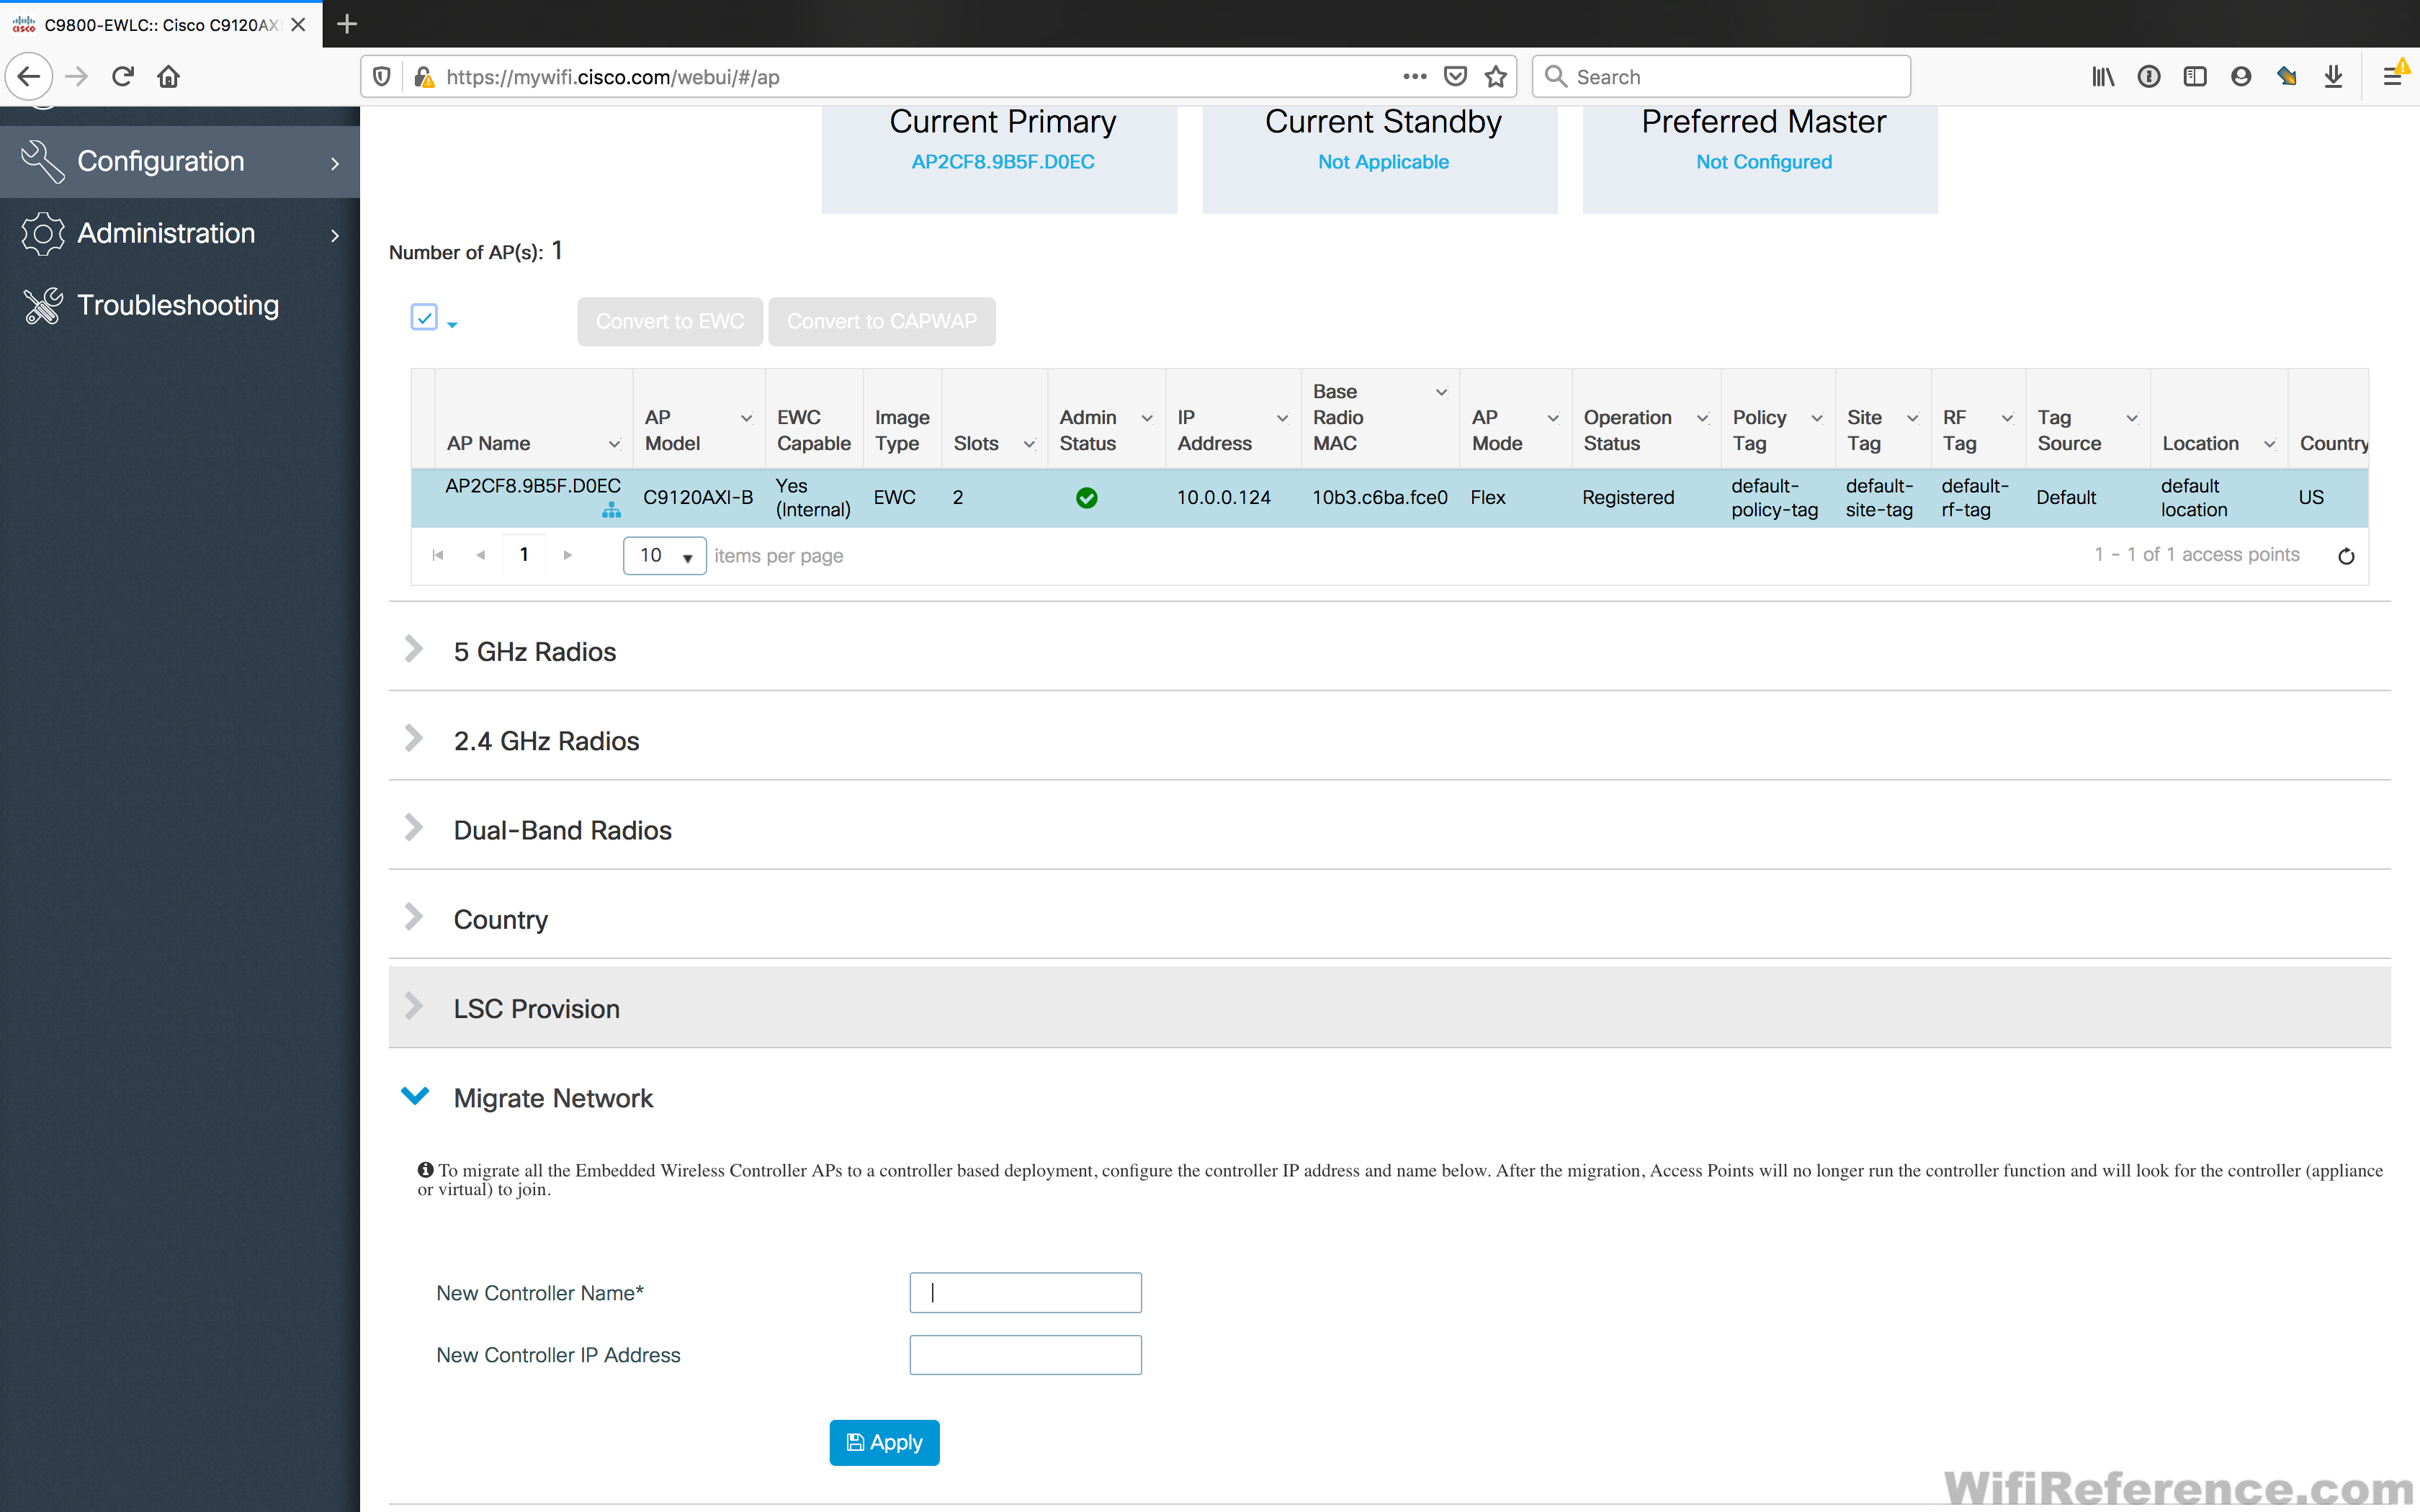
Migrate Network
This allows you to easily migrate the entire mass of APs connected to your EWC AP to a traditional controller. This could be very helpful if the environment scales beyond the limit of APs supported in an EWC environment.
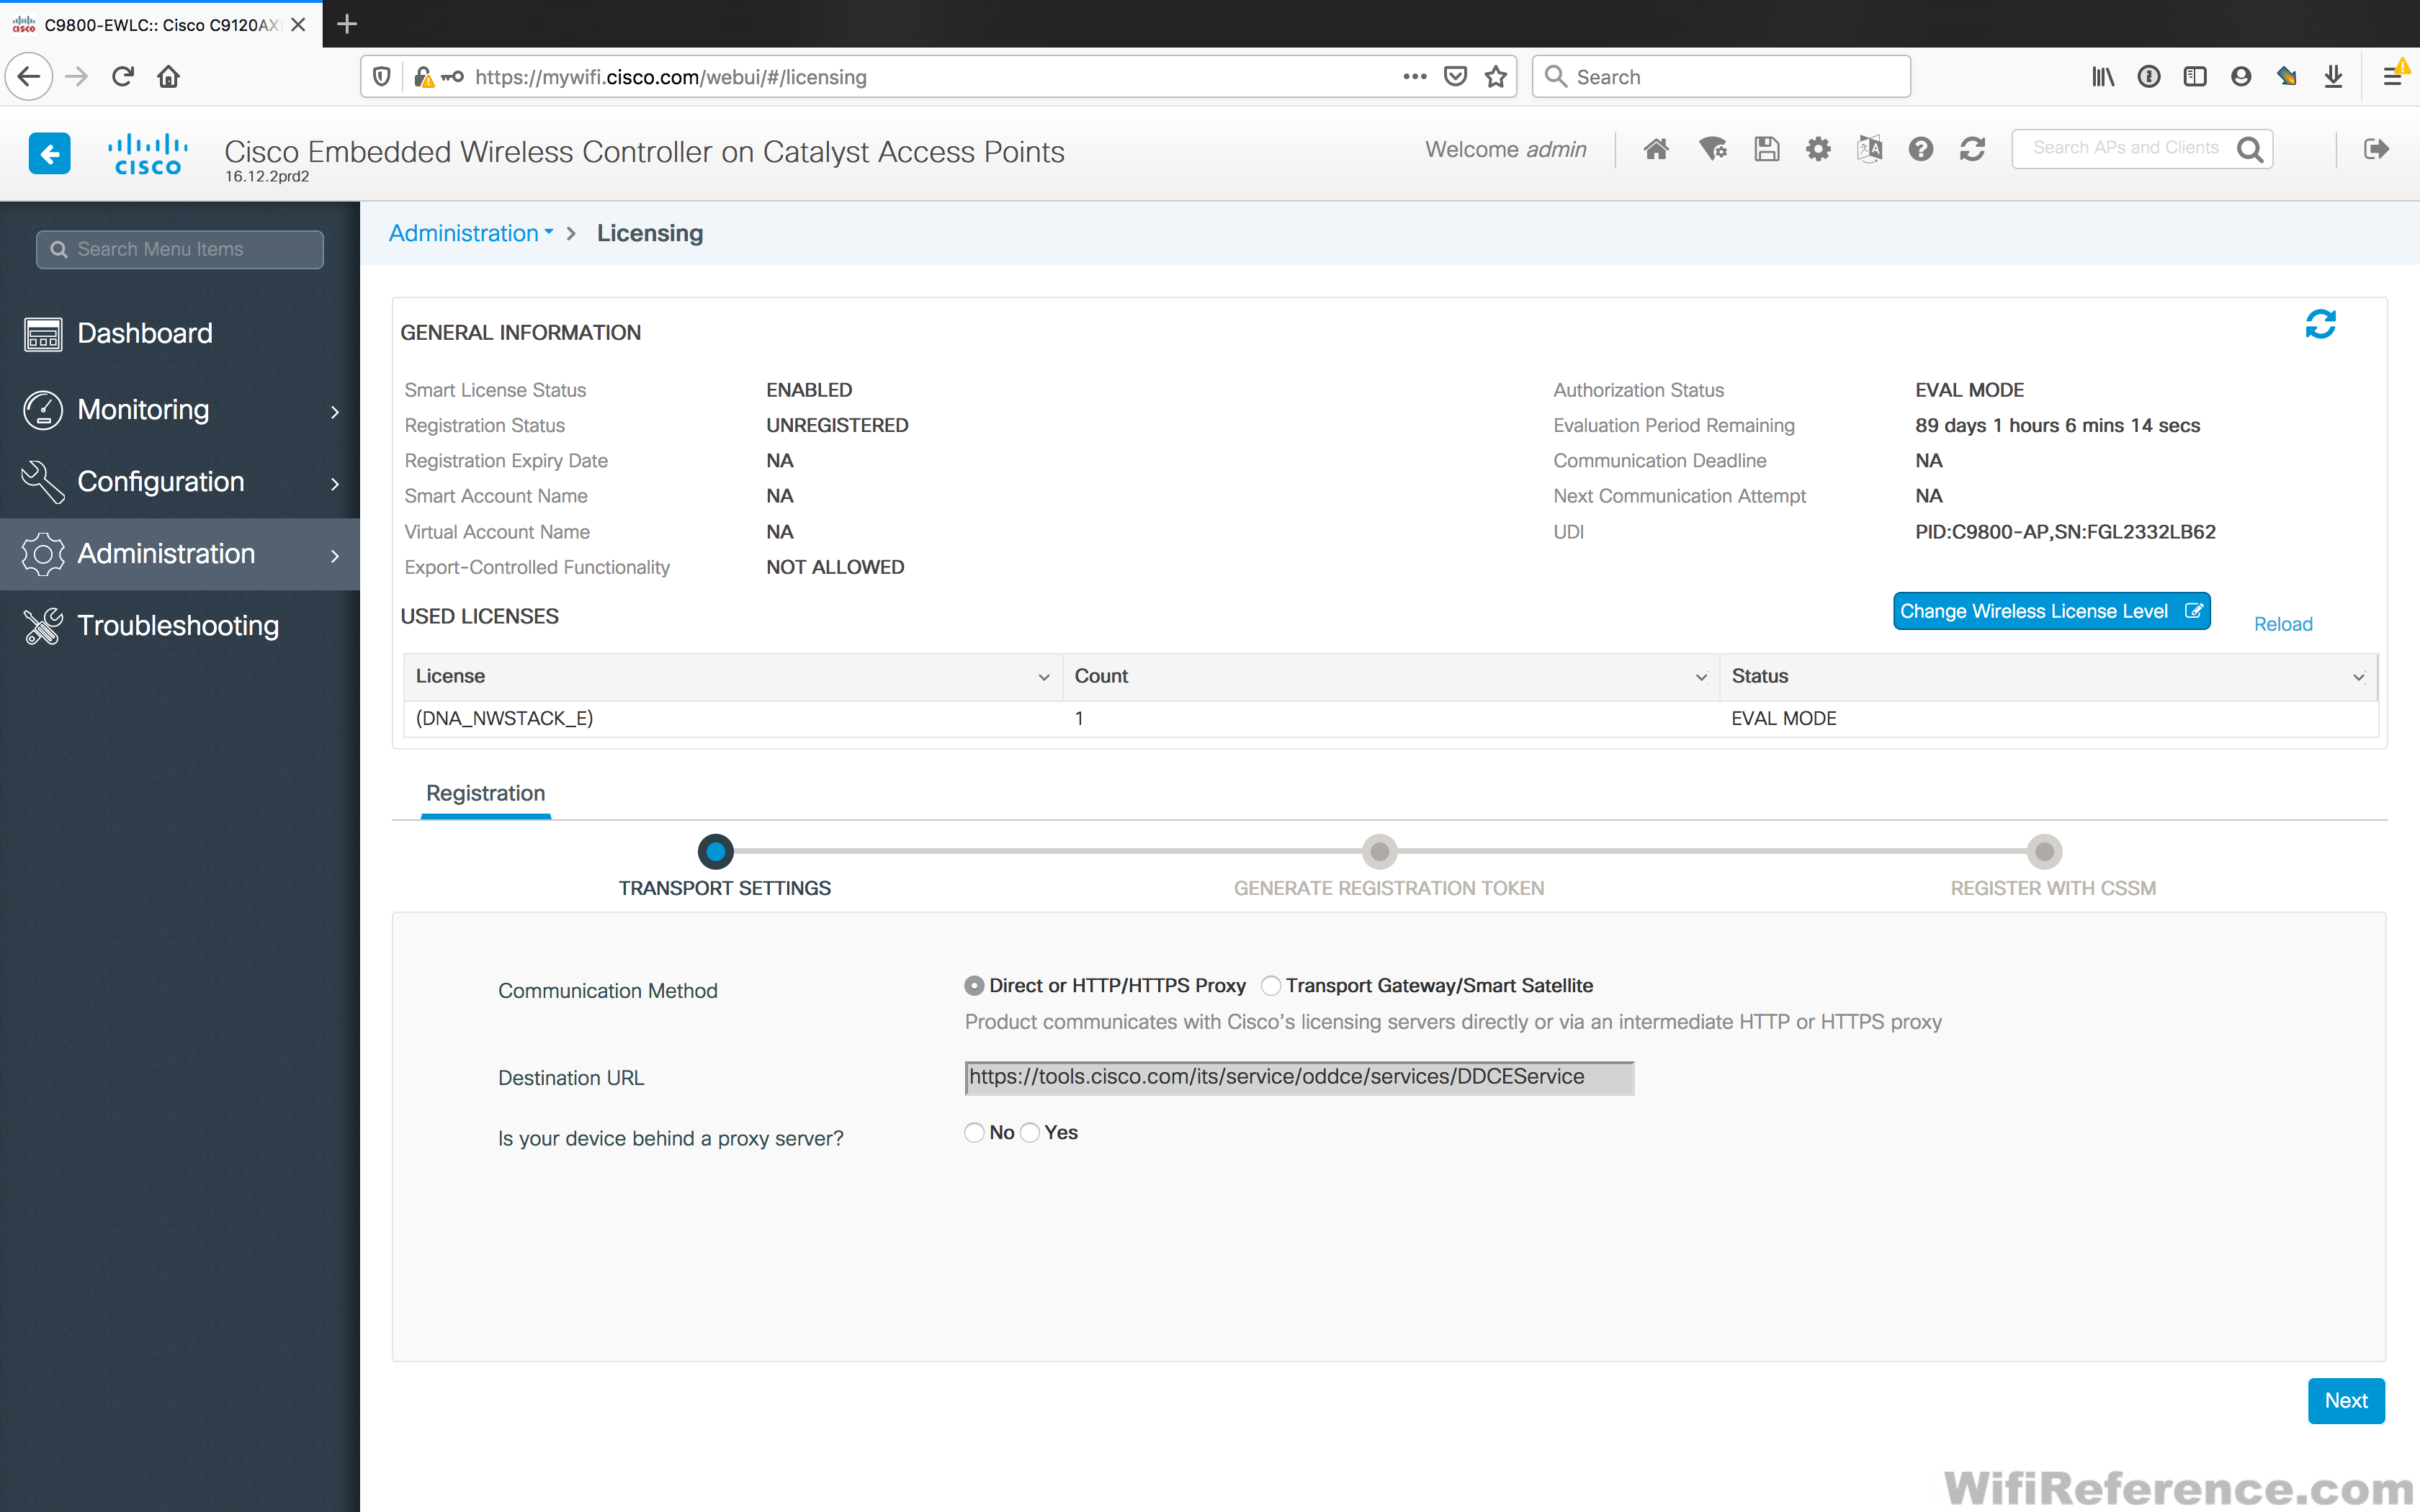
Enabling Smart Licensing (required)
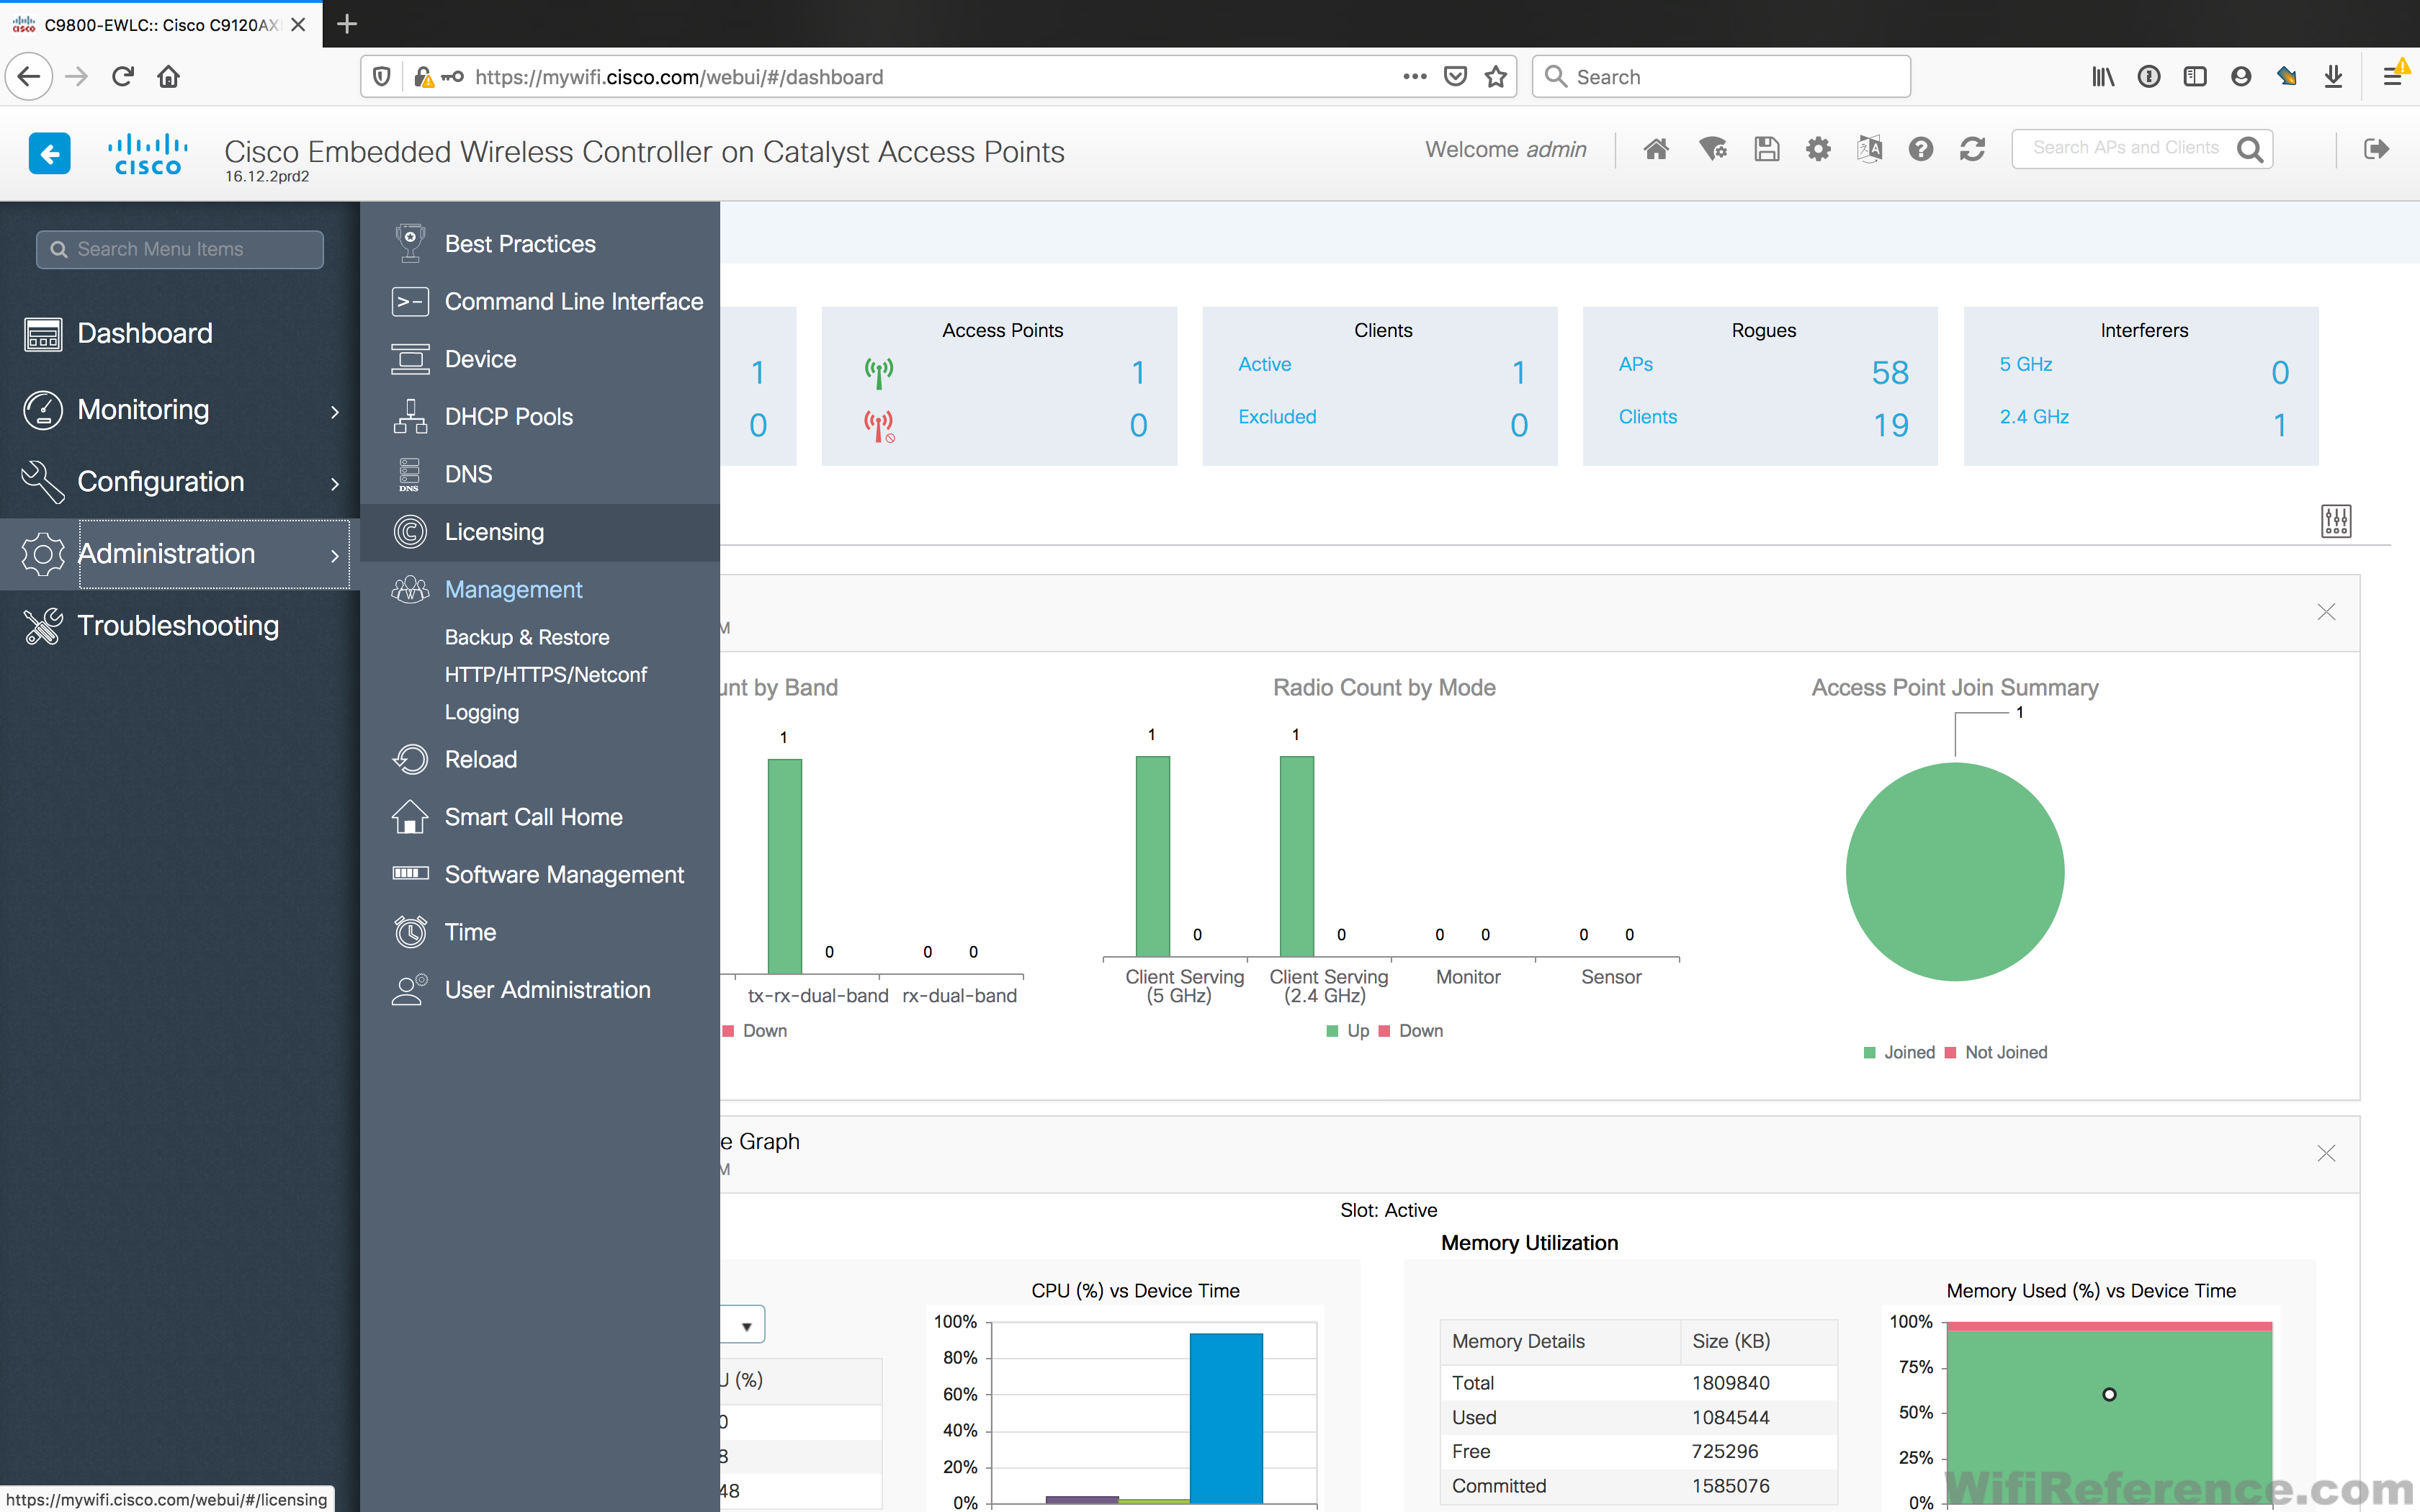
To connect the Embedded Wireless Controller to your Smart Licensing account, Navigate to Administration > Licensing in the menu
Specify whether or not the EWC is behind a proxy server and click Next
Follow the instructions on this page to generate a registration token in your smart licensing portal. This involves clicking the link on the page to be taken to your smart licensing portal, logging in with your CCO account, navigating to your Smart Licensing Inventory and generating a token.
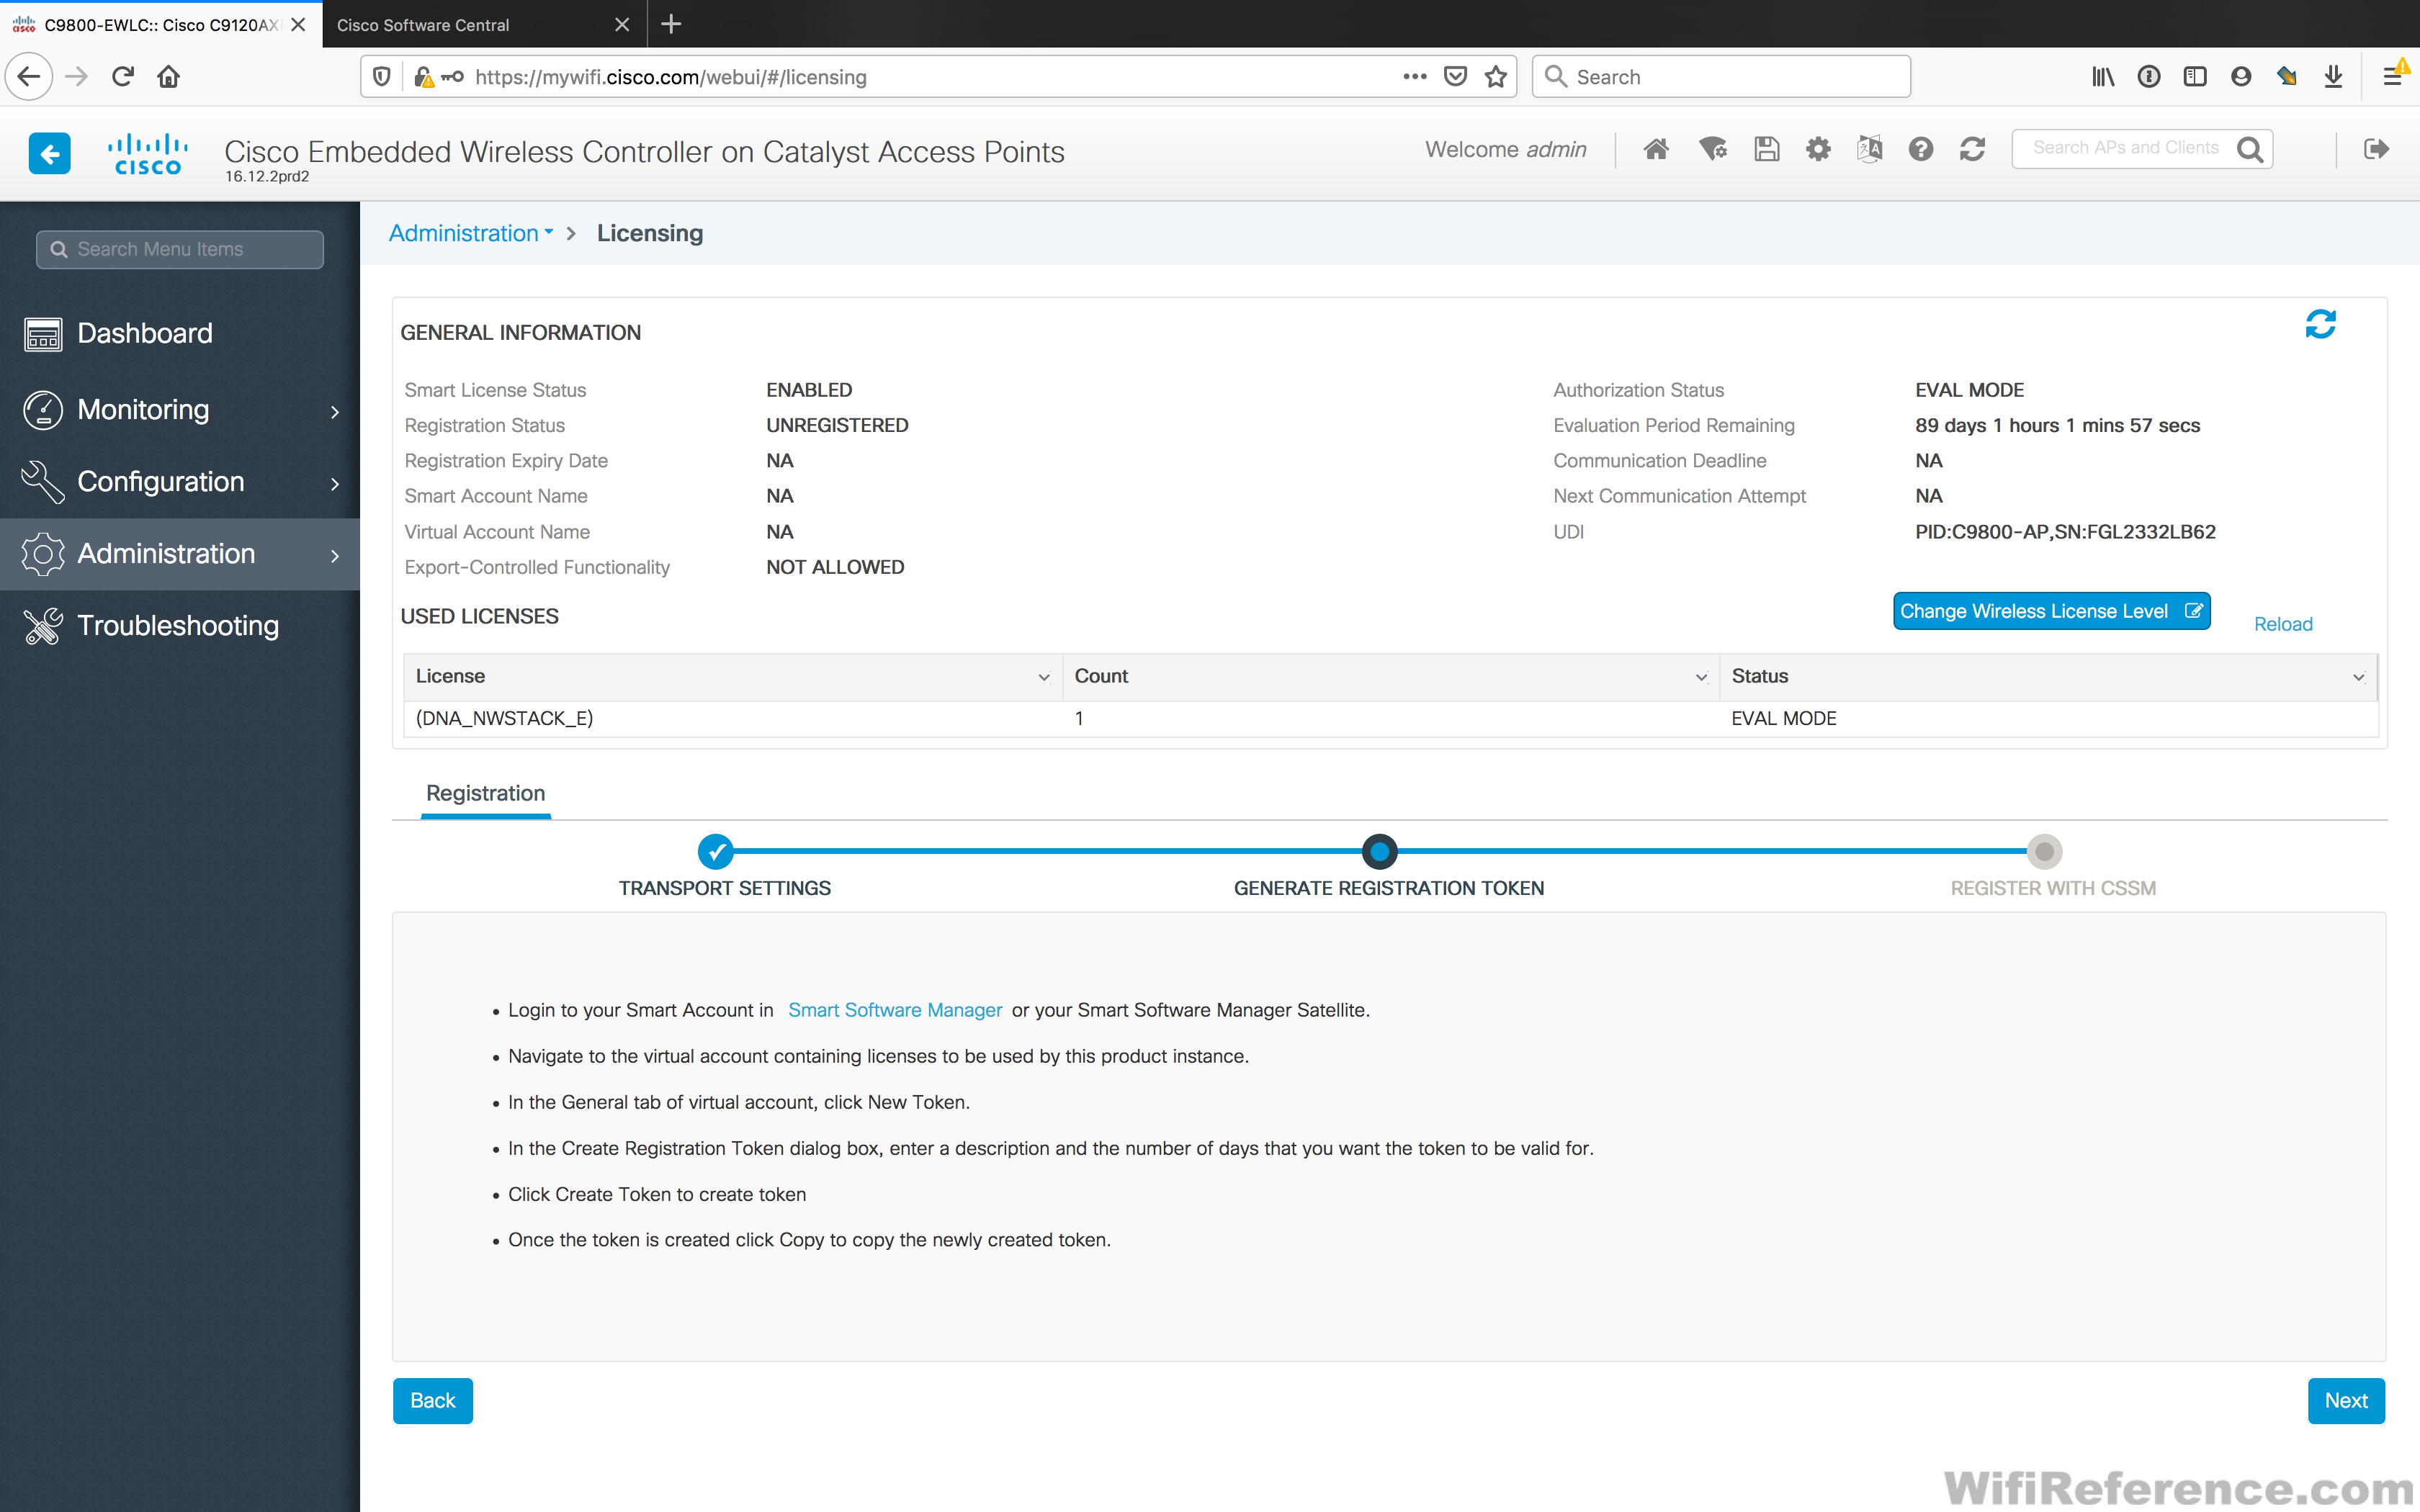
Now that you have your token, you can click Next and paste it into the EWC

The EWC will then connect to the cloud and register itself with your Smart Licensing Portal, using the token you generated for registration authentication.
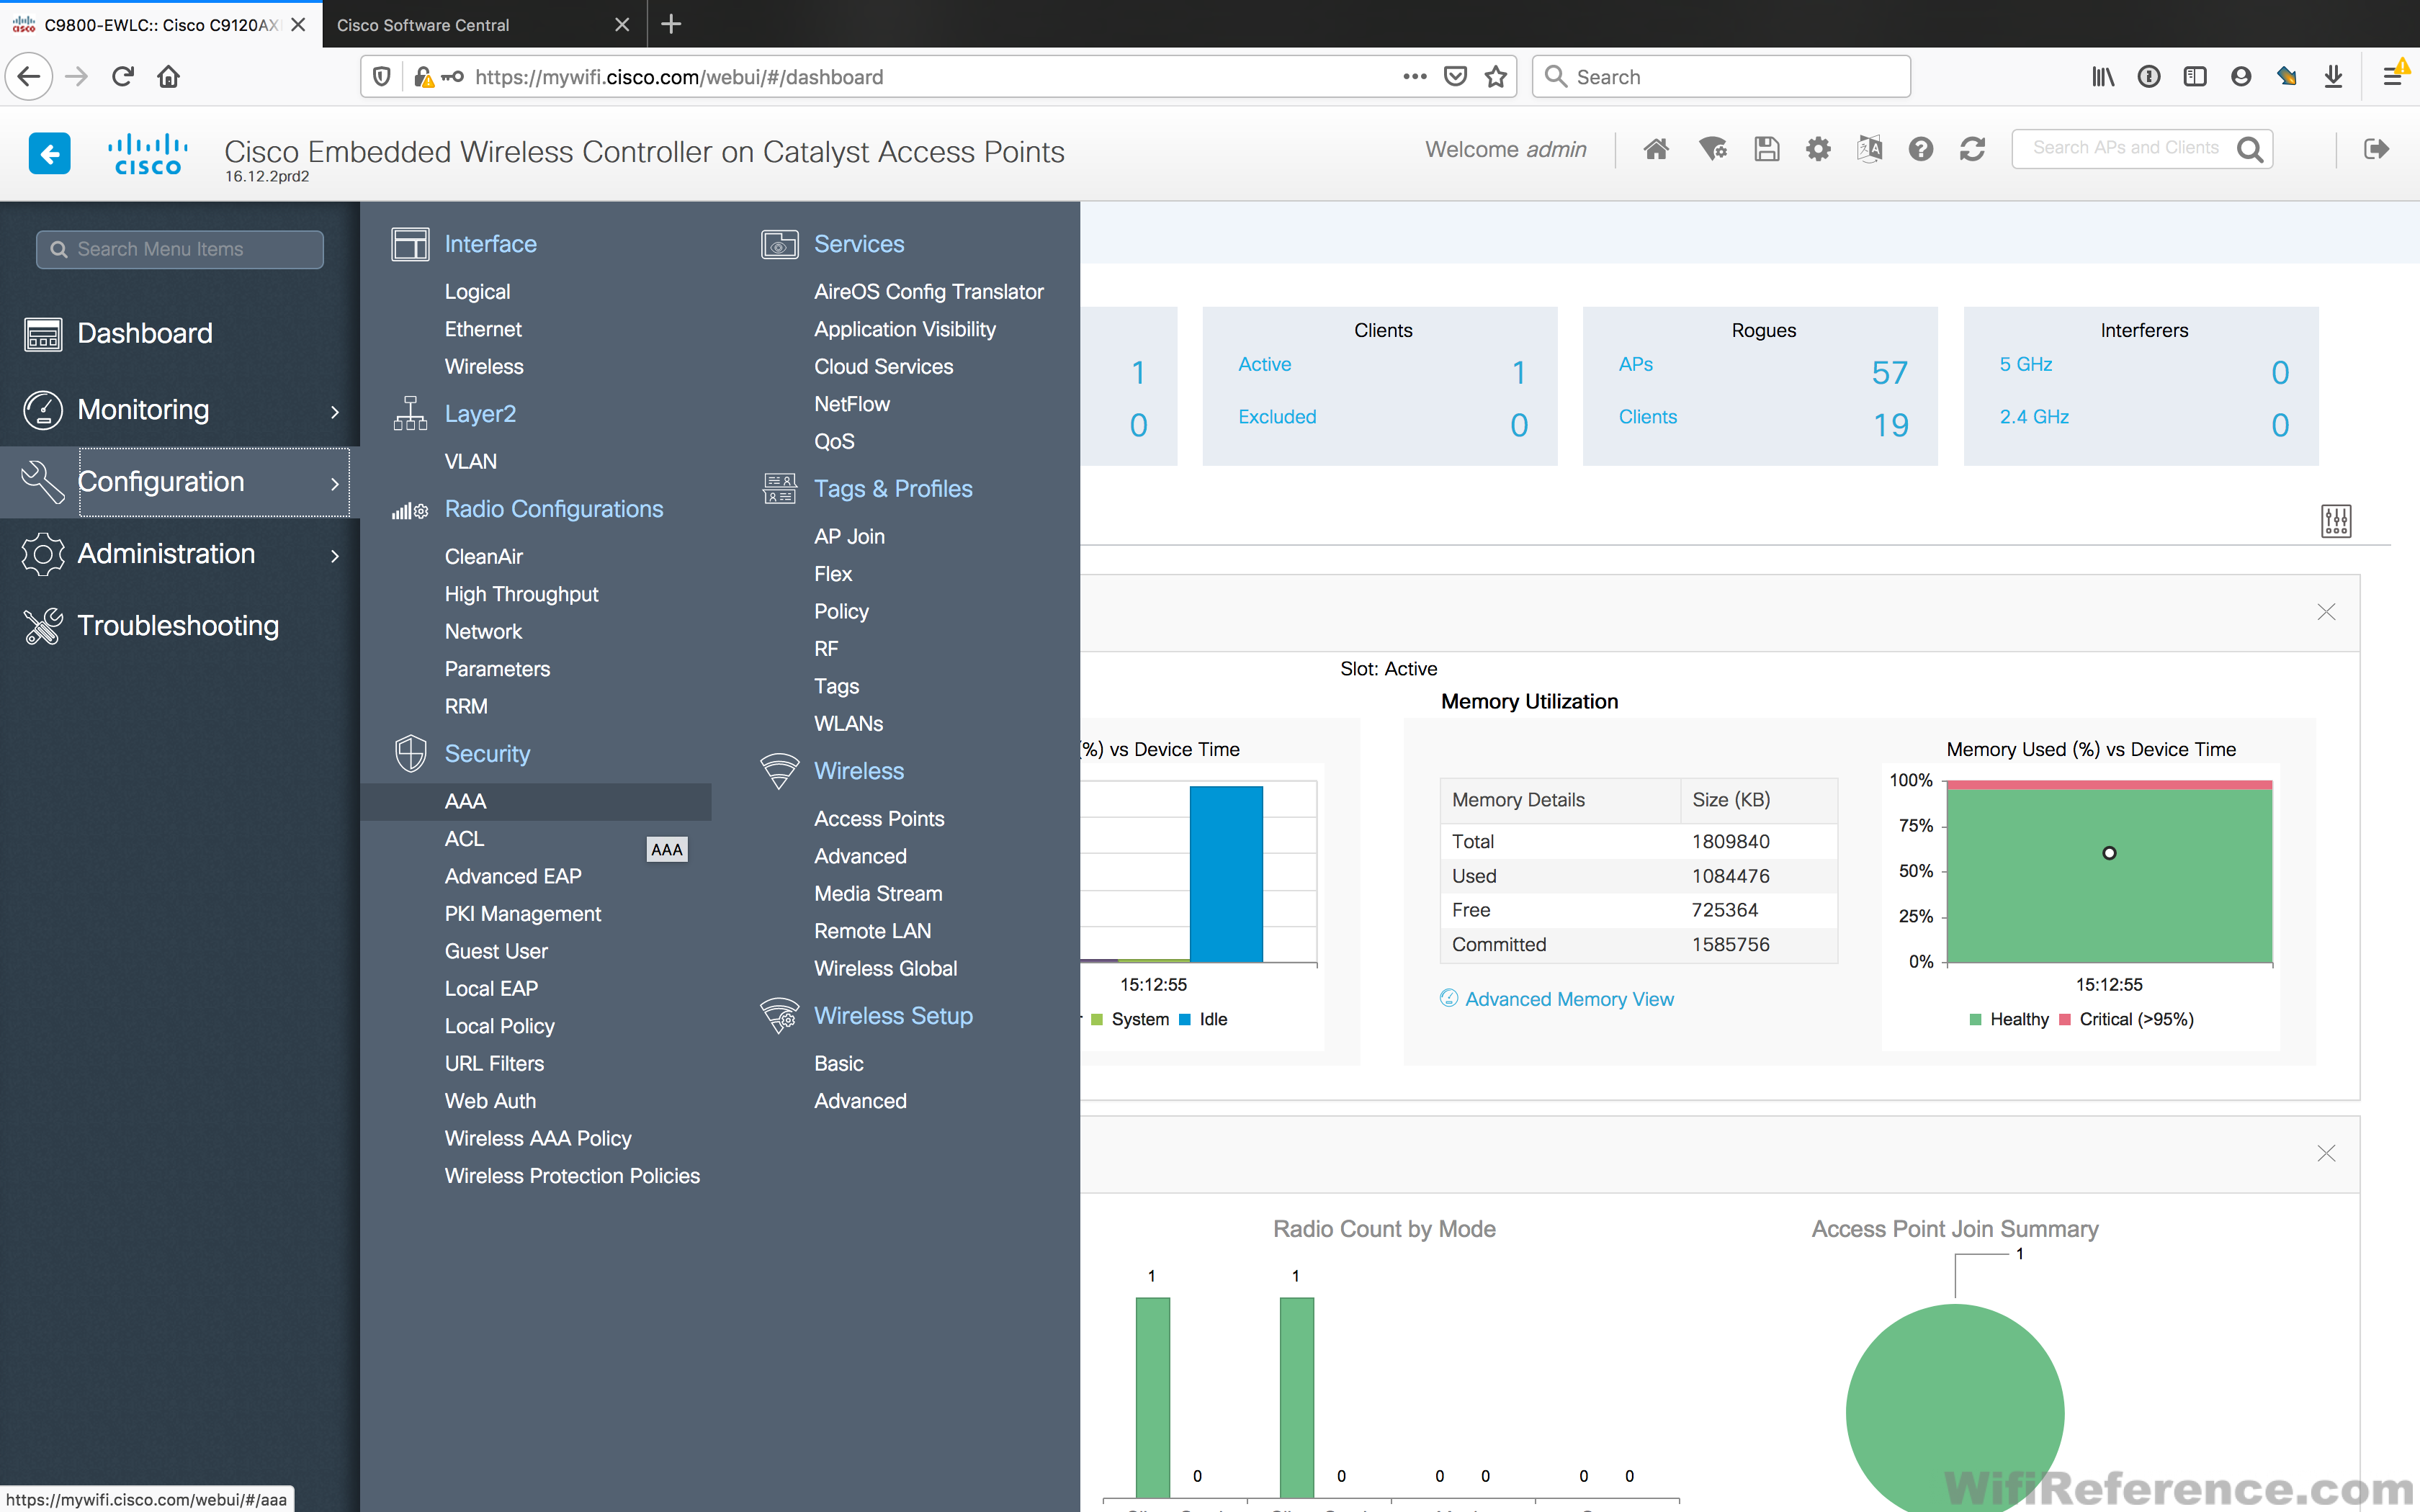
Configure the EWC for use with a RADIUS server
Navigate to the Configuration > AAA menu, where we will follow the wizard to configure the EWC to send 802.1x wireless traffic to a RADIUS server
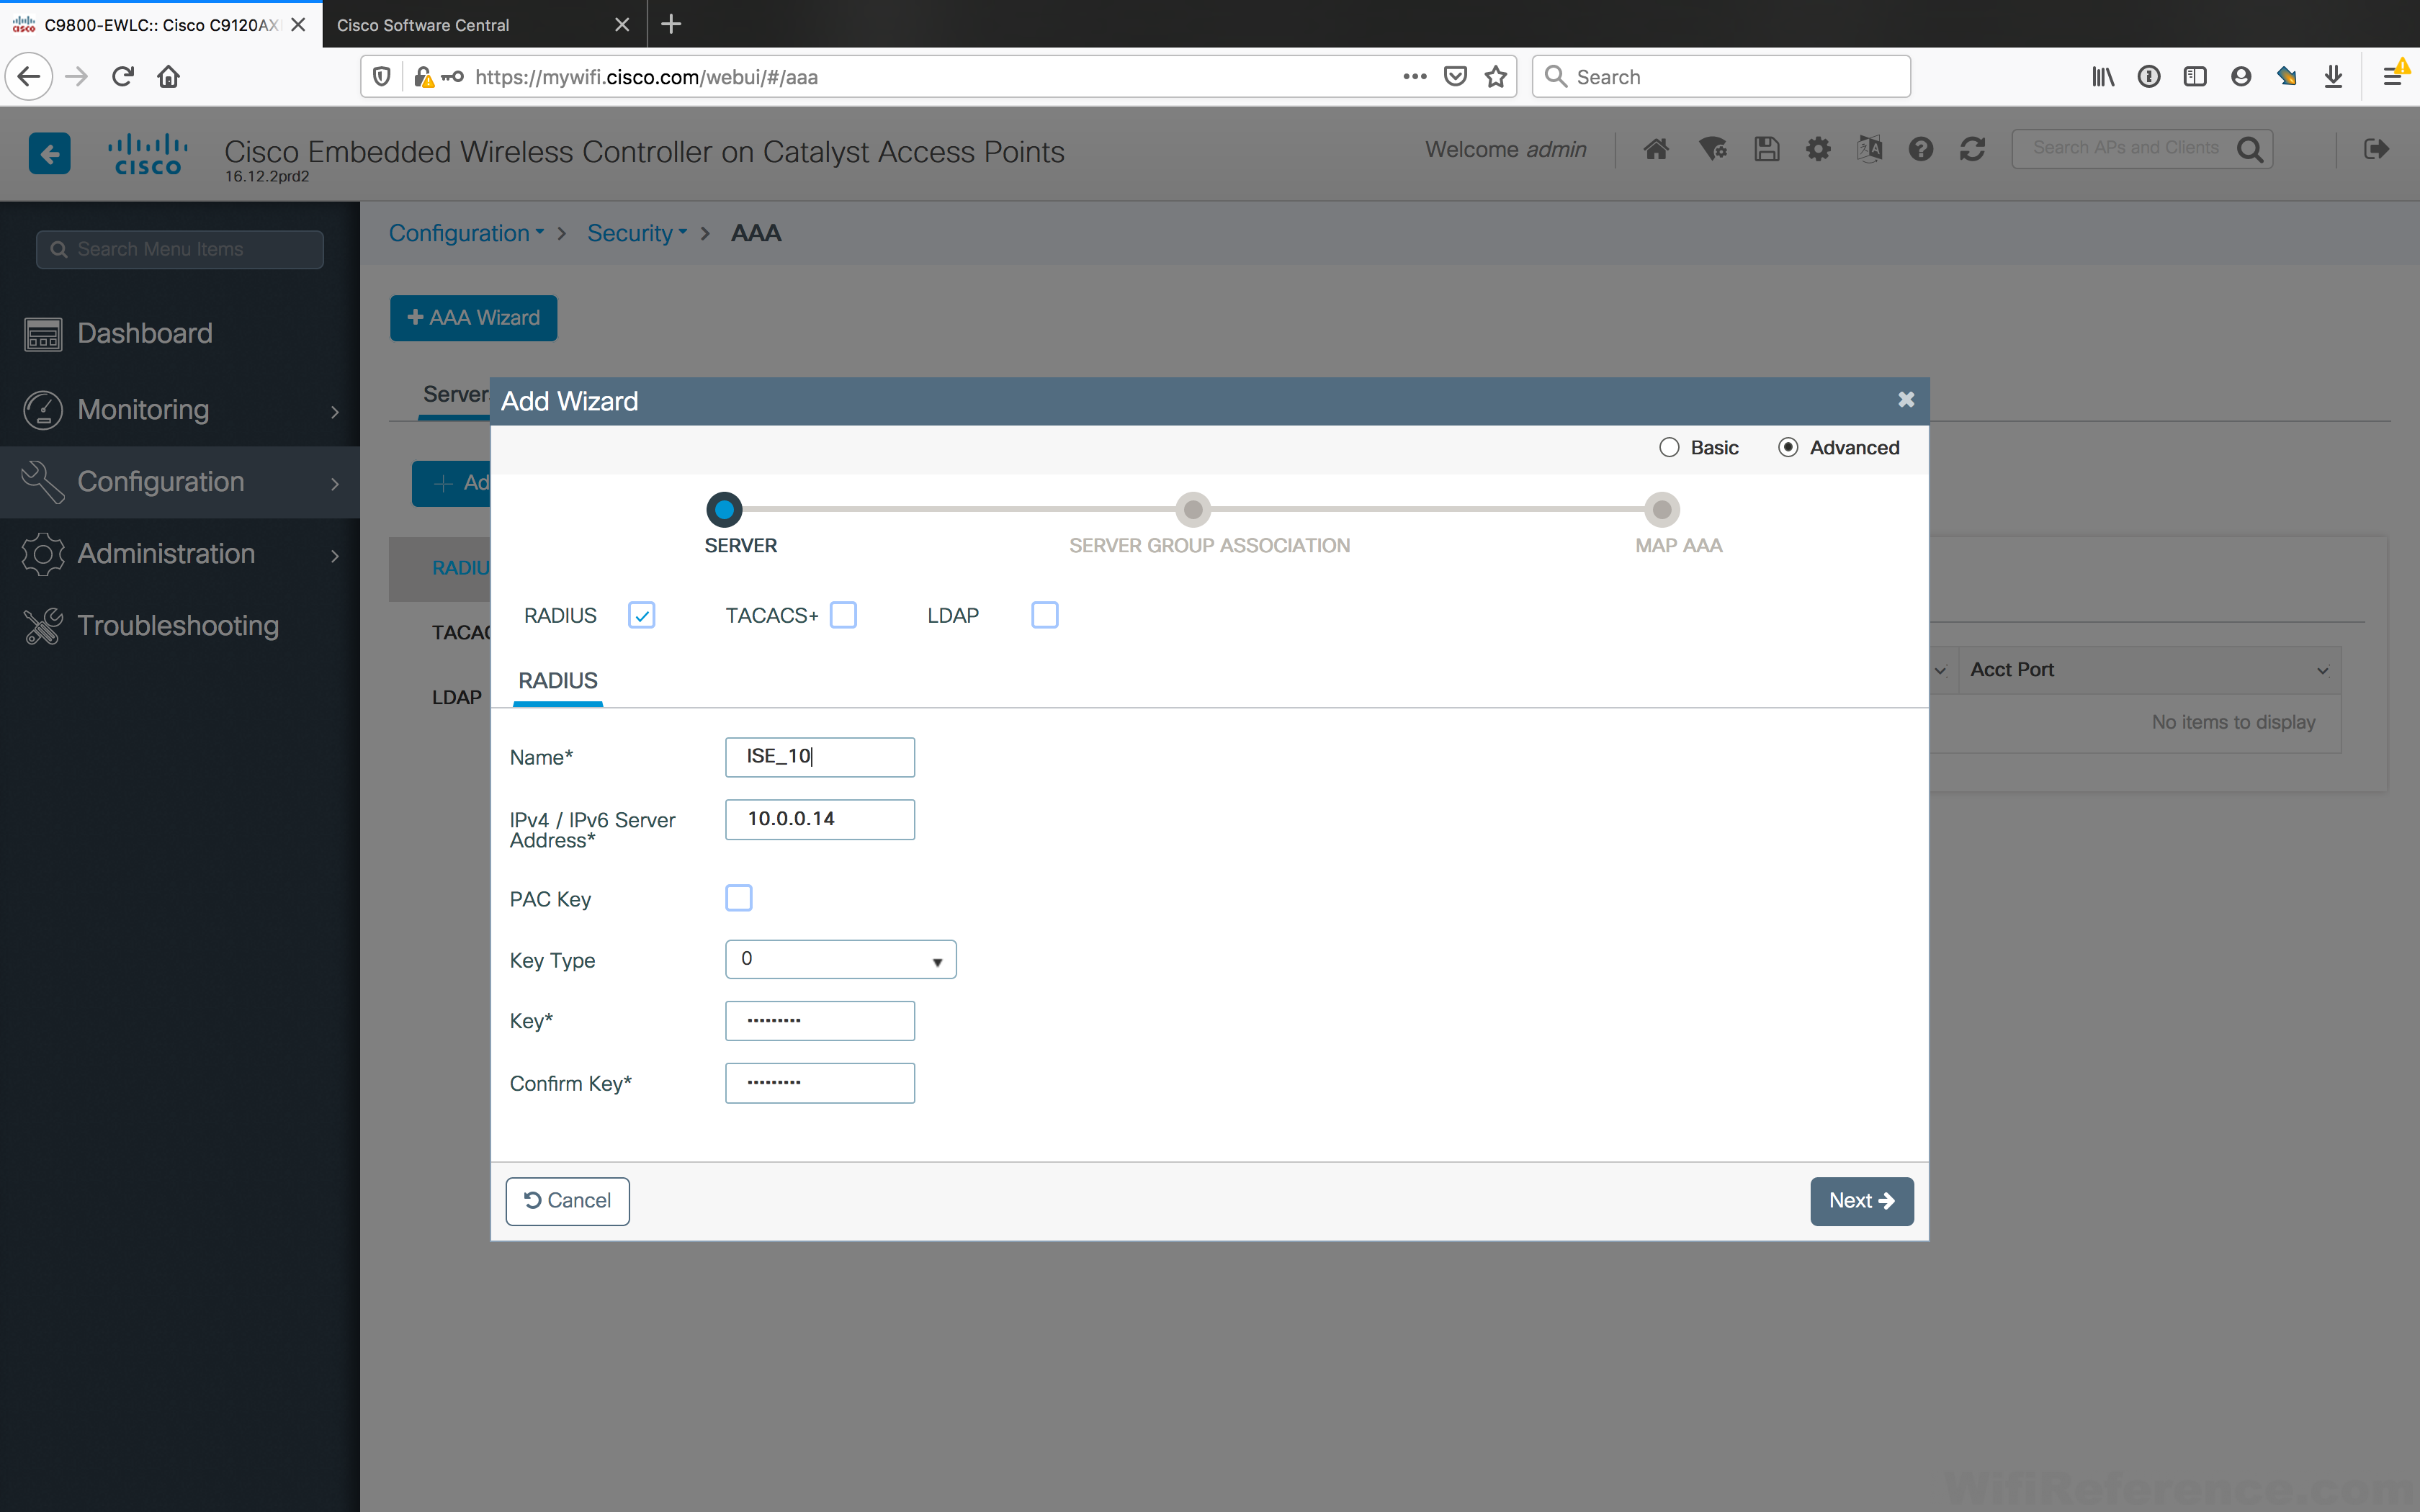
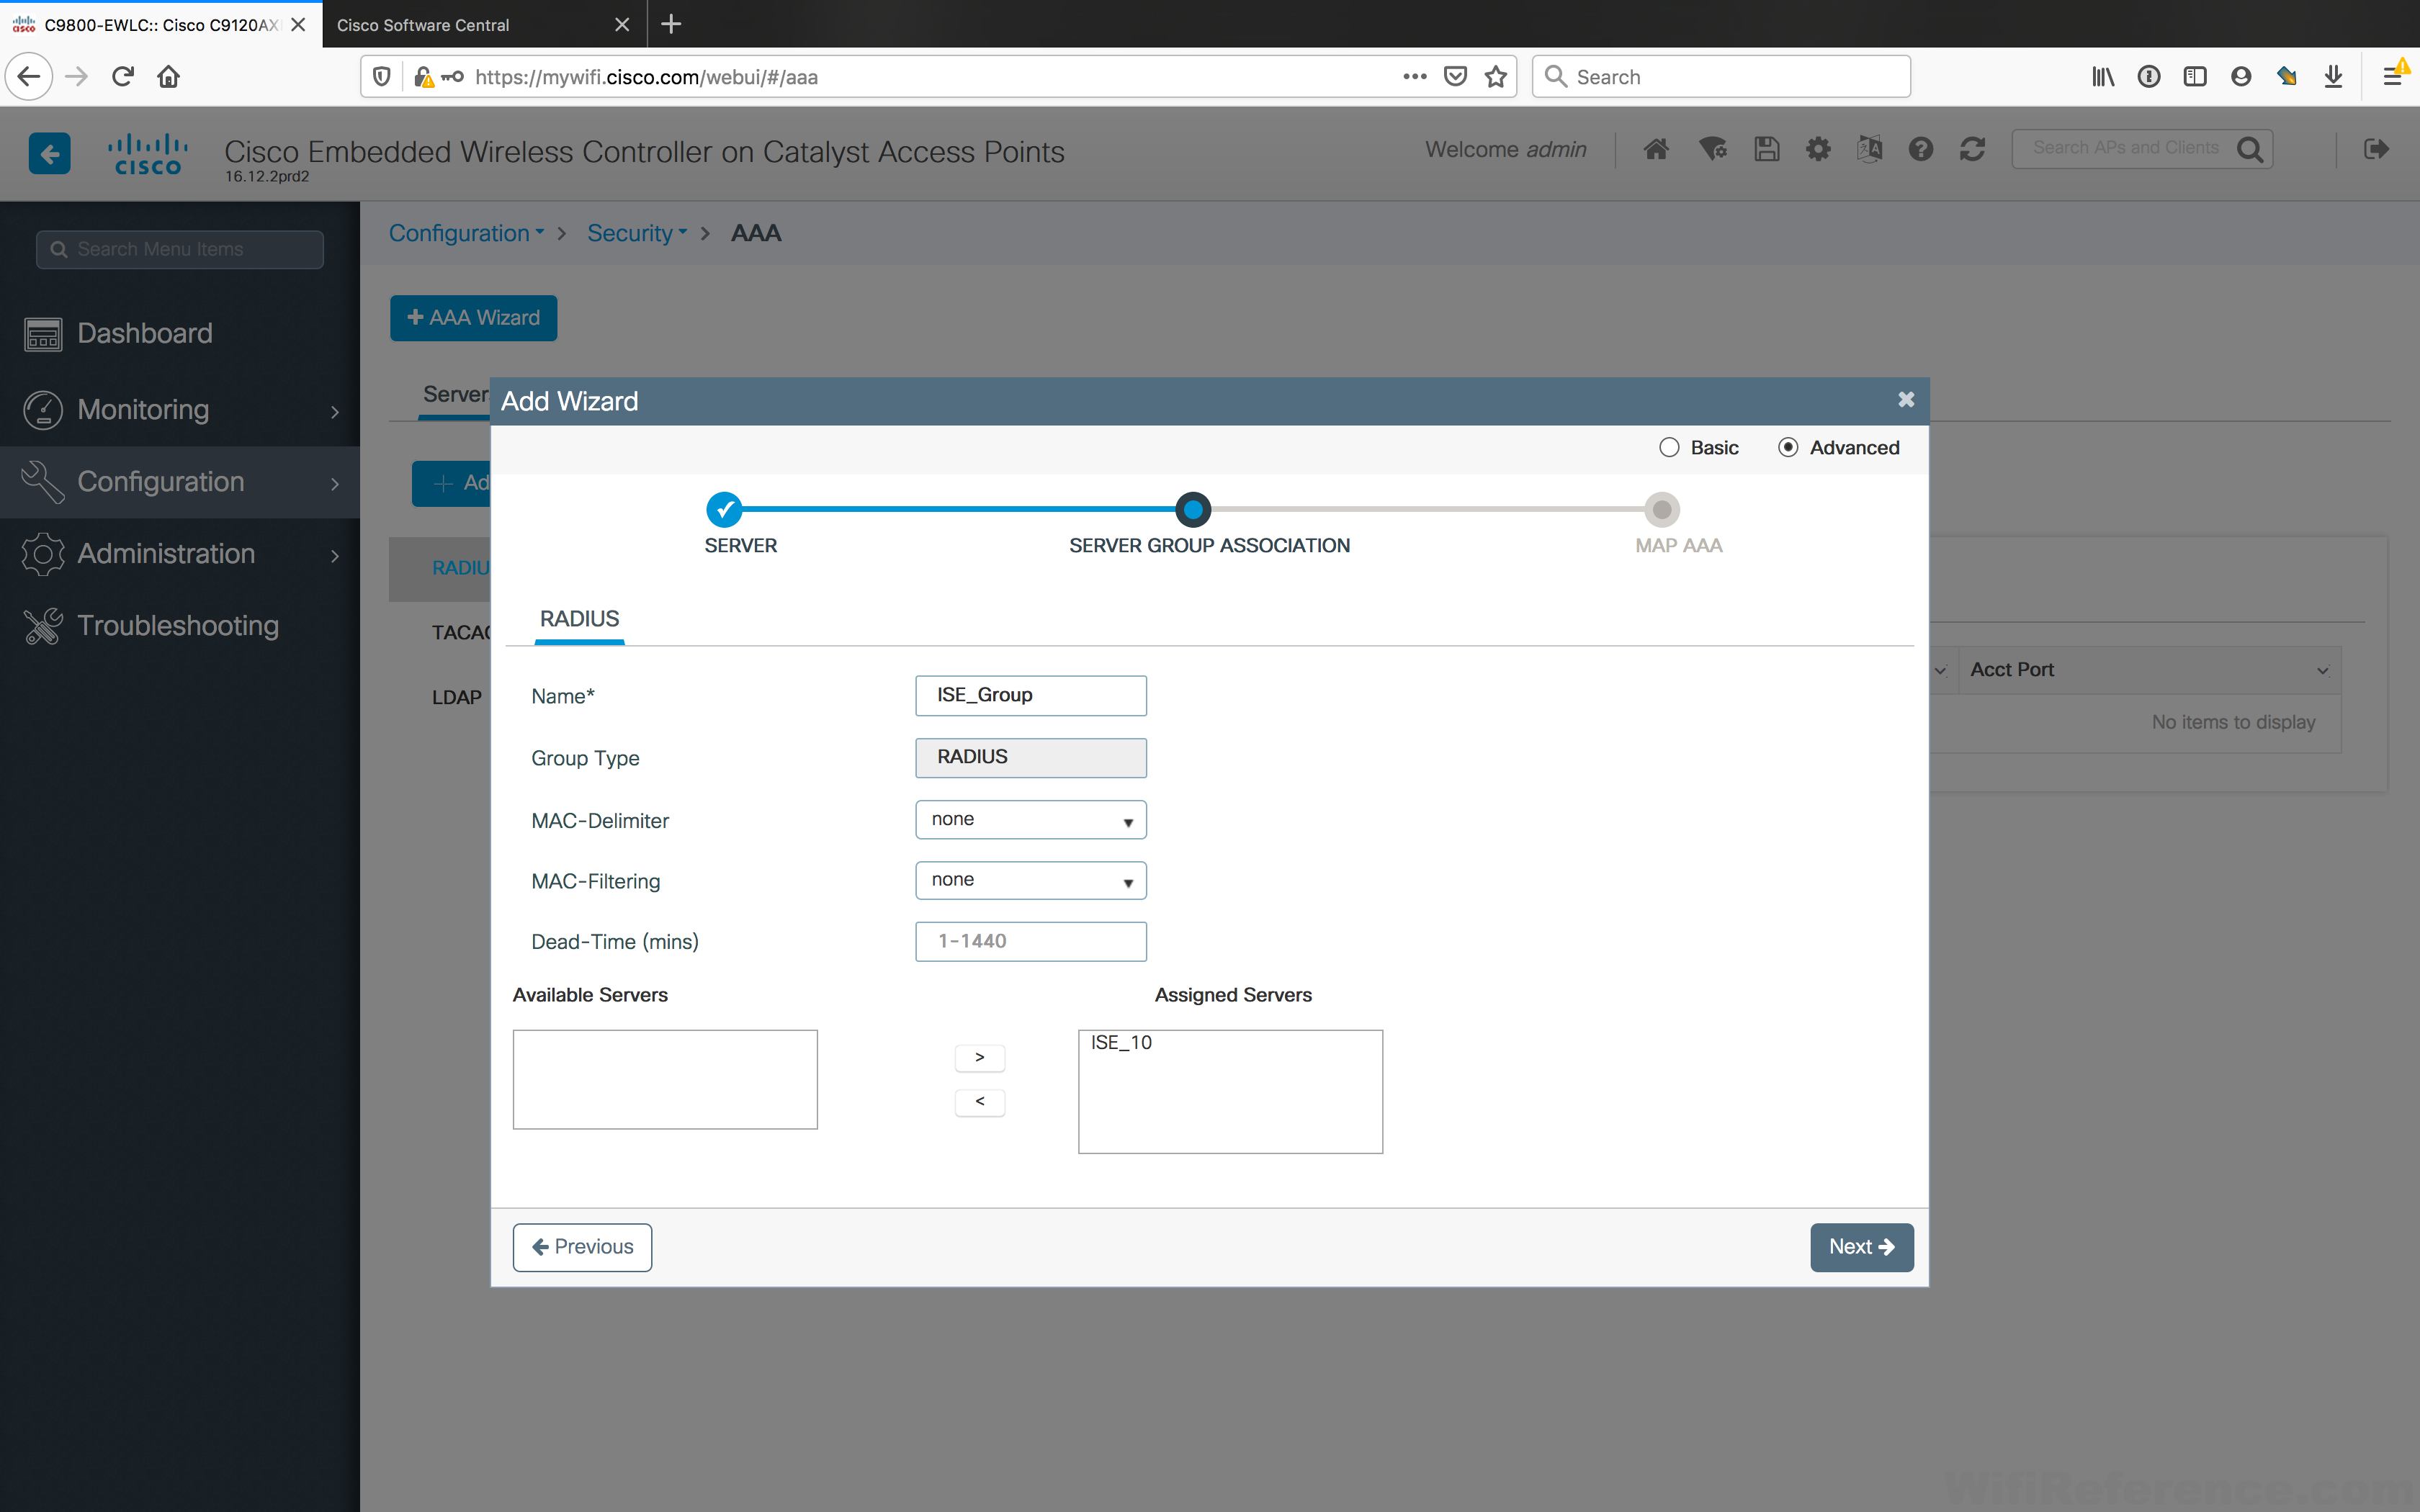
Click the AAA Wizard button in the upper left corner of the screen

Fill out the details of your RADIUS server on this page and click Next
Create a RADIUS Server Group. Include the word “Group” in the title of the group for your own sanity. As you are navigating through the configuration it really helps make sense of the hierarchy of the RADIUS configuration if you do this. Also, move your RADIUS server from the list of Available Servers to the list of Assigned Servers. Click Next.
Ensure you are on the Authentication tab. Enter a name of the Method List. Include “AuthC” in the name of the list for your own sanity. Select “dot1x” as the Type and move your Server group to the Assigned Groups box. Do not yet click “Apply to device.” You should first click the Authorization tab.
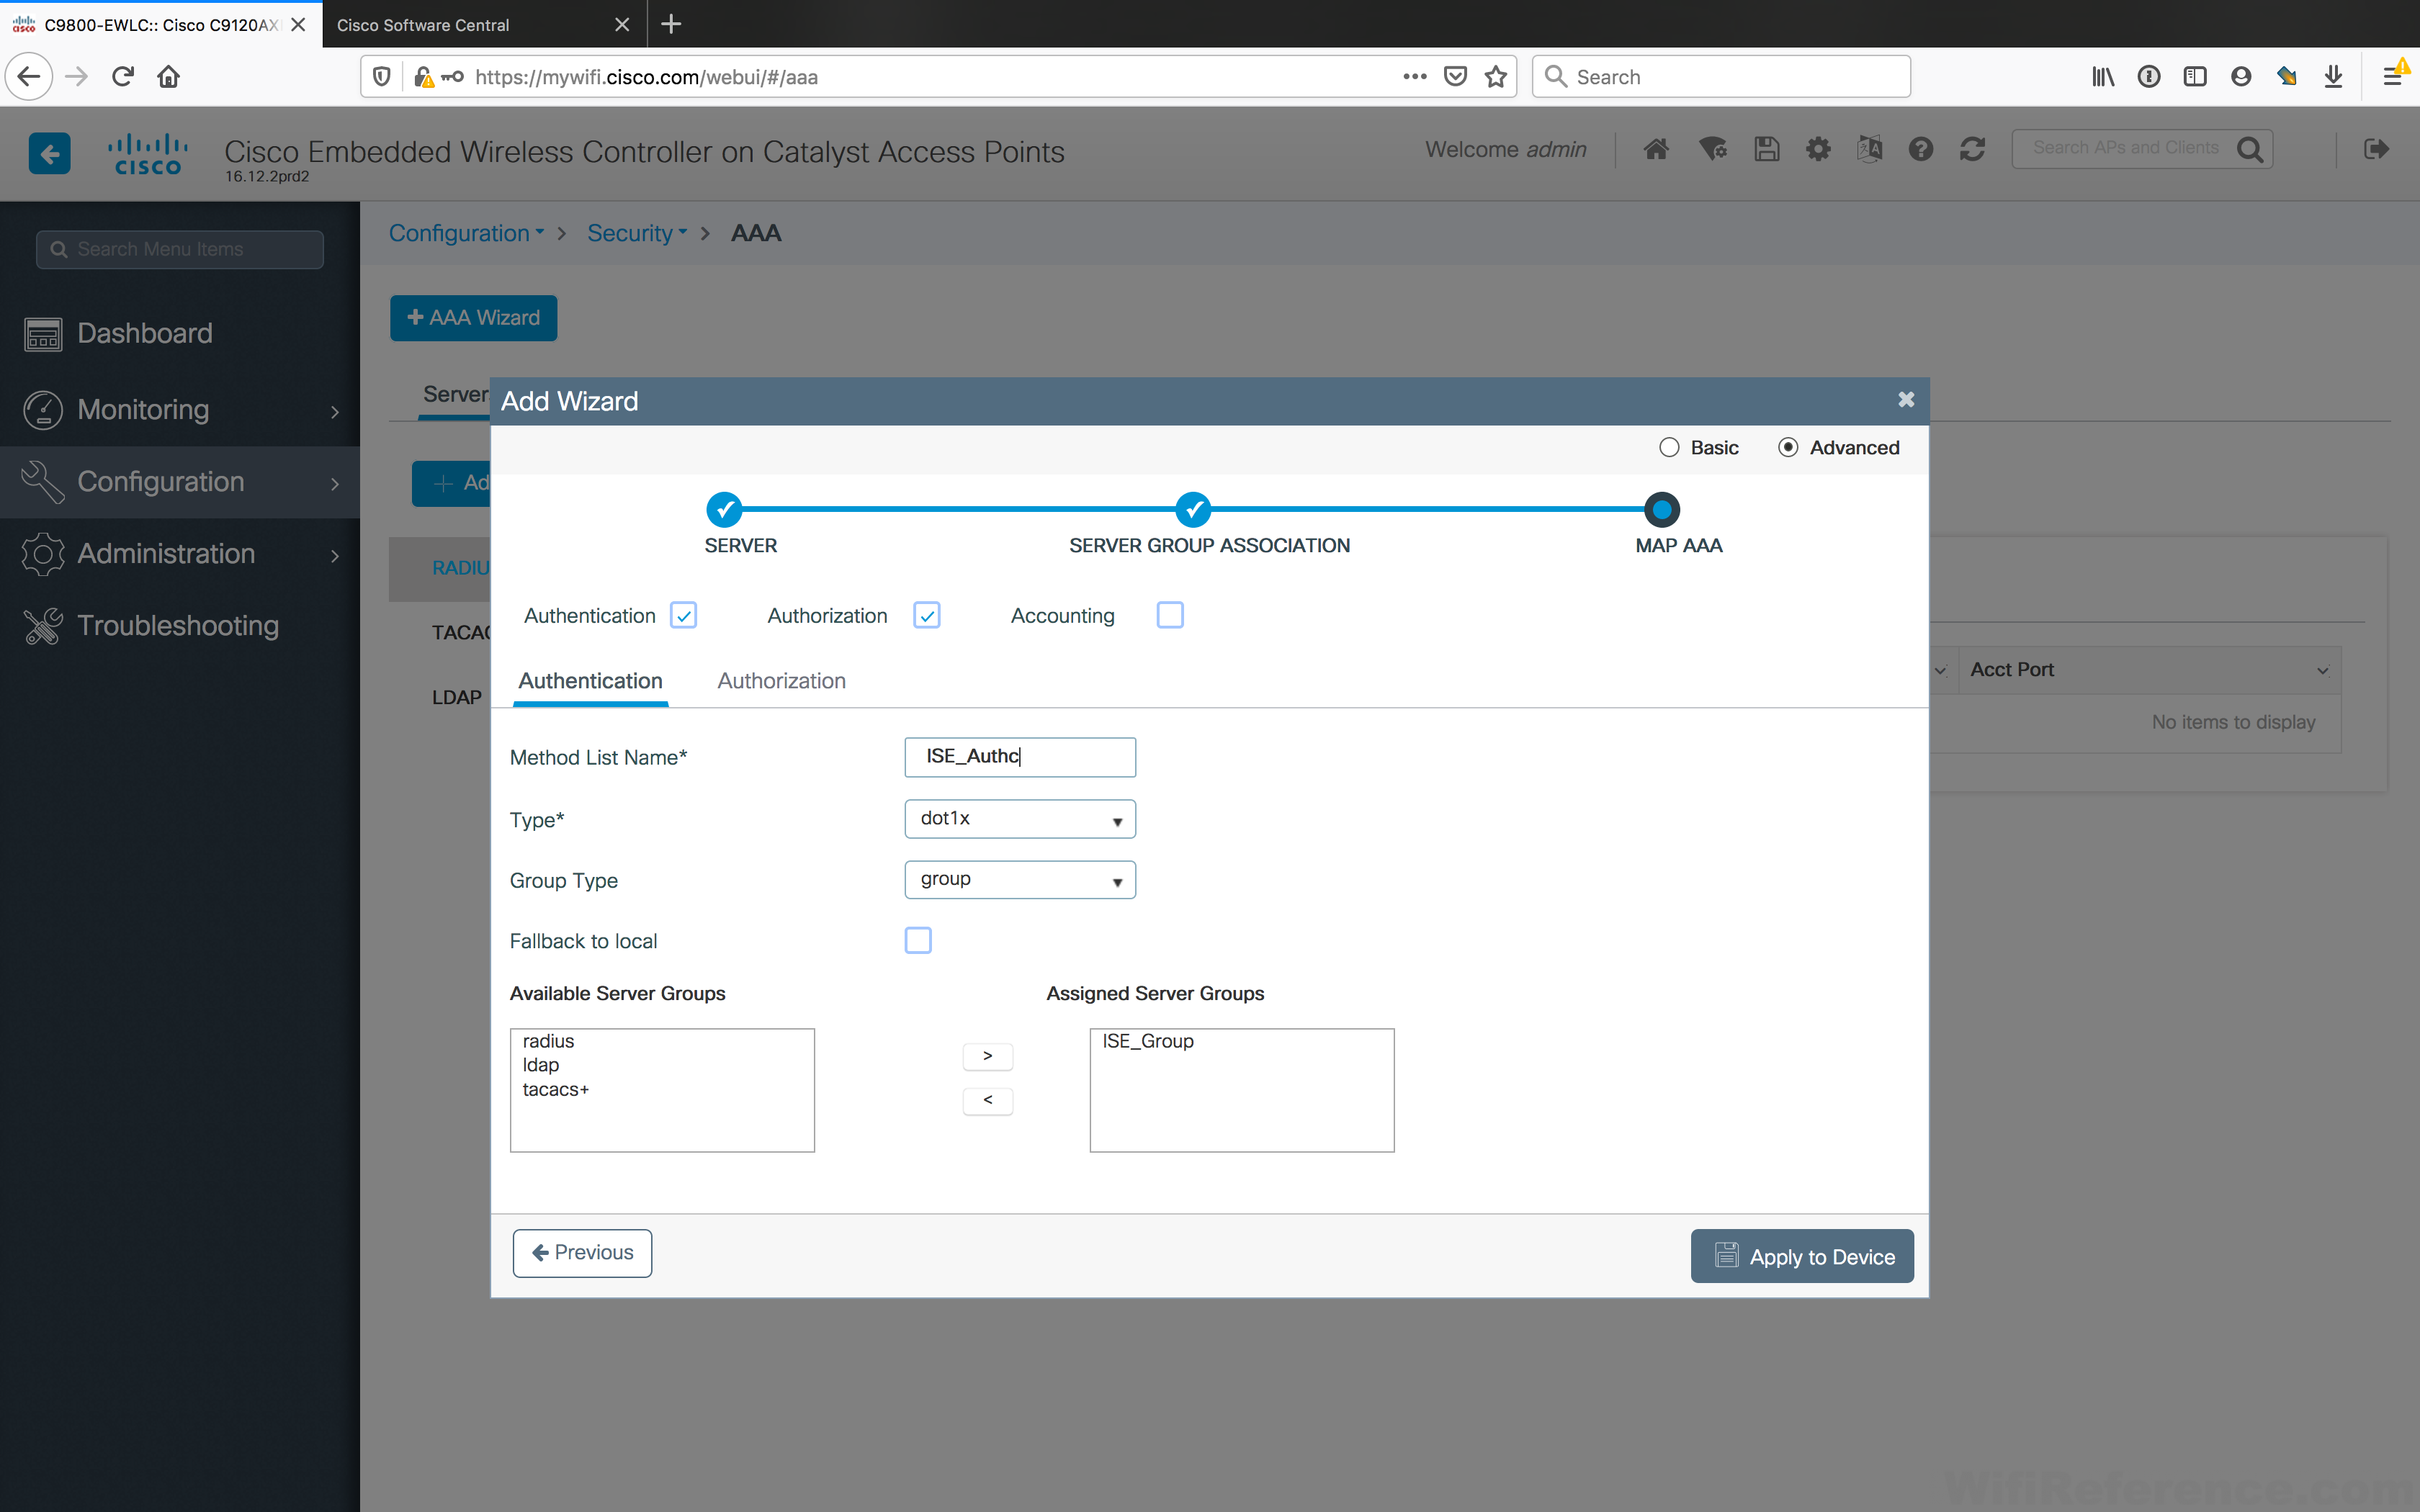
Click the Authorization tab. Give the method list a name. This time, include “AuthZ” in the name for your own sanity. Set the type to “network” and move your server group to the list of Assigned Server Groups. If you don’t need to setup RADIUS Accounting, click Apply to Device.
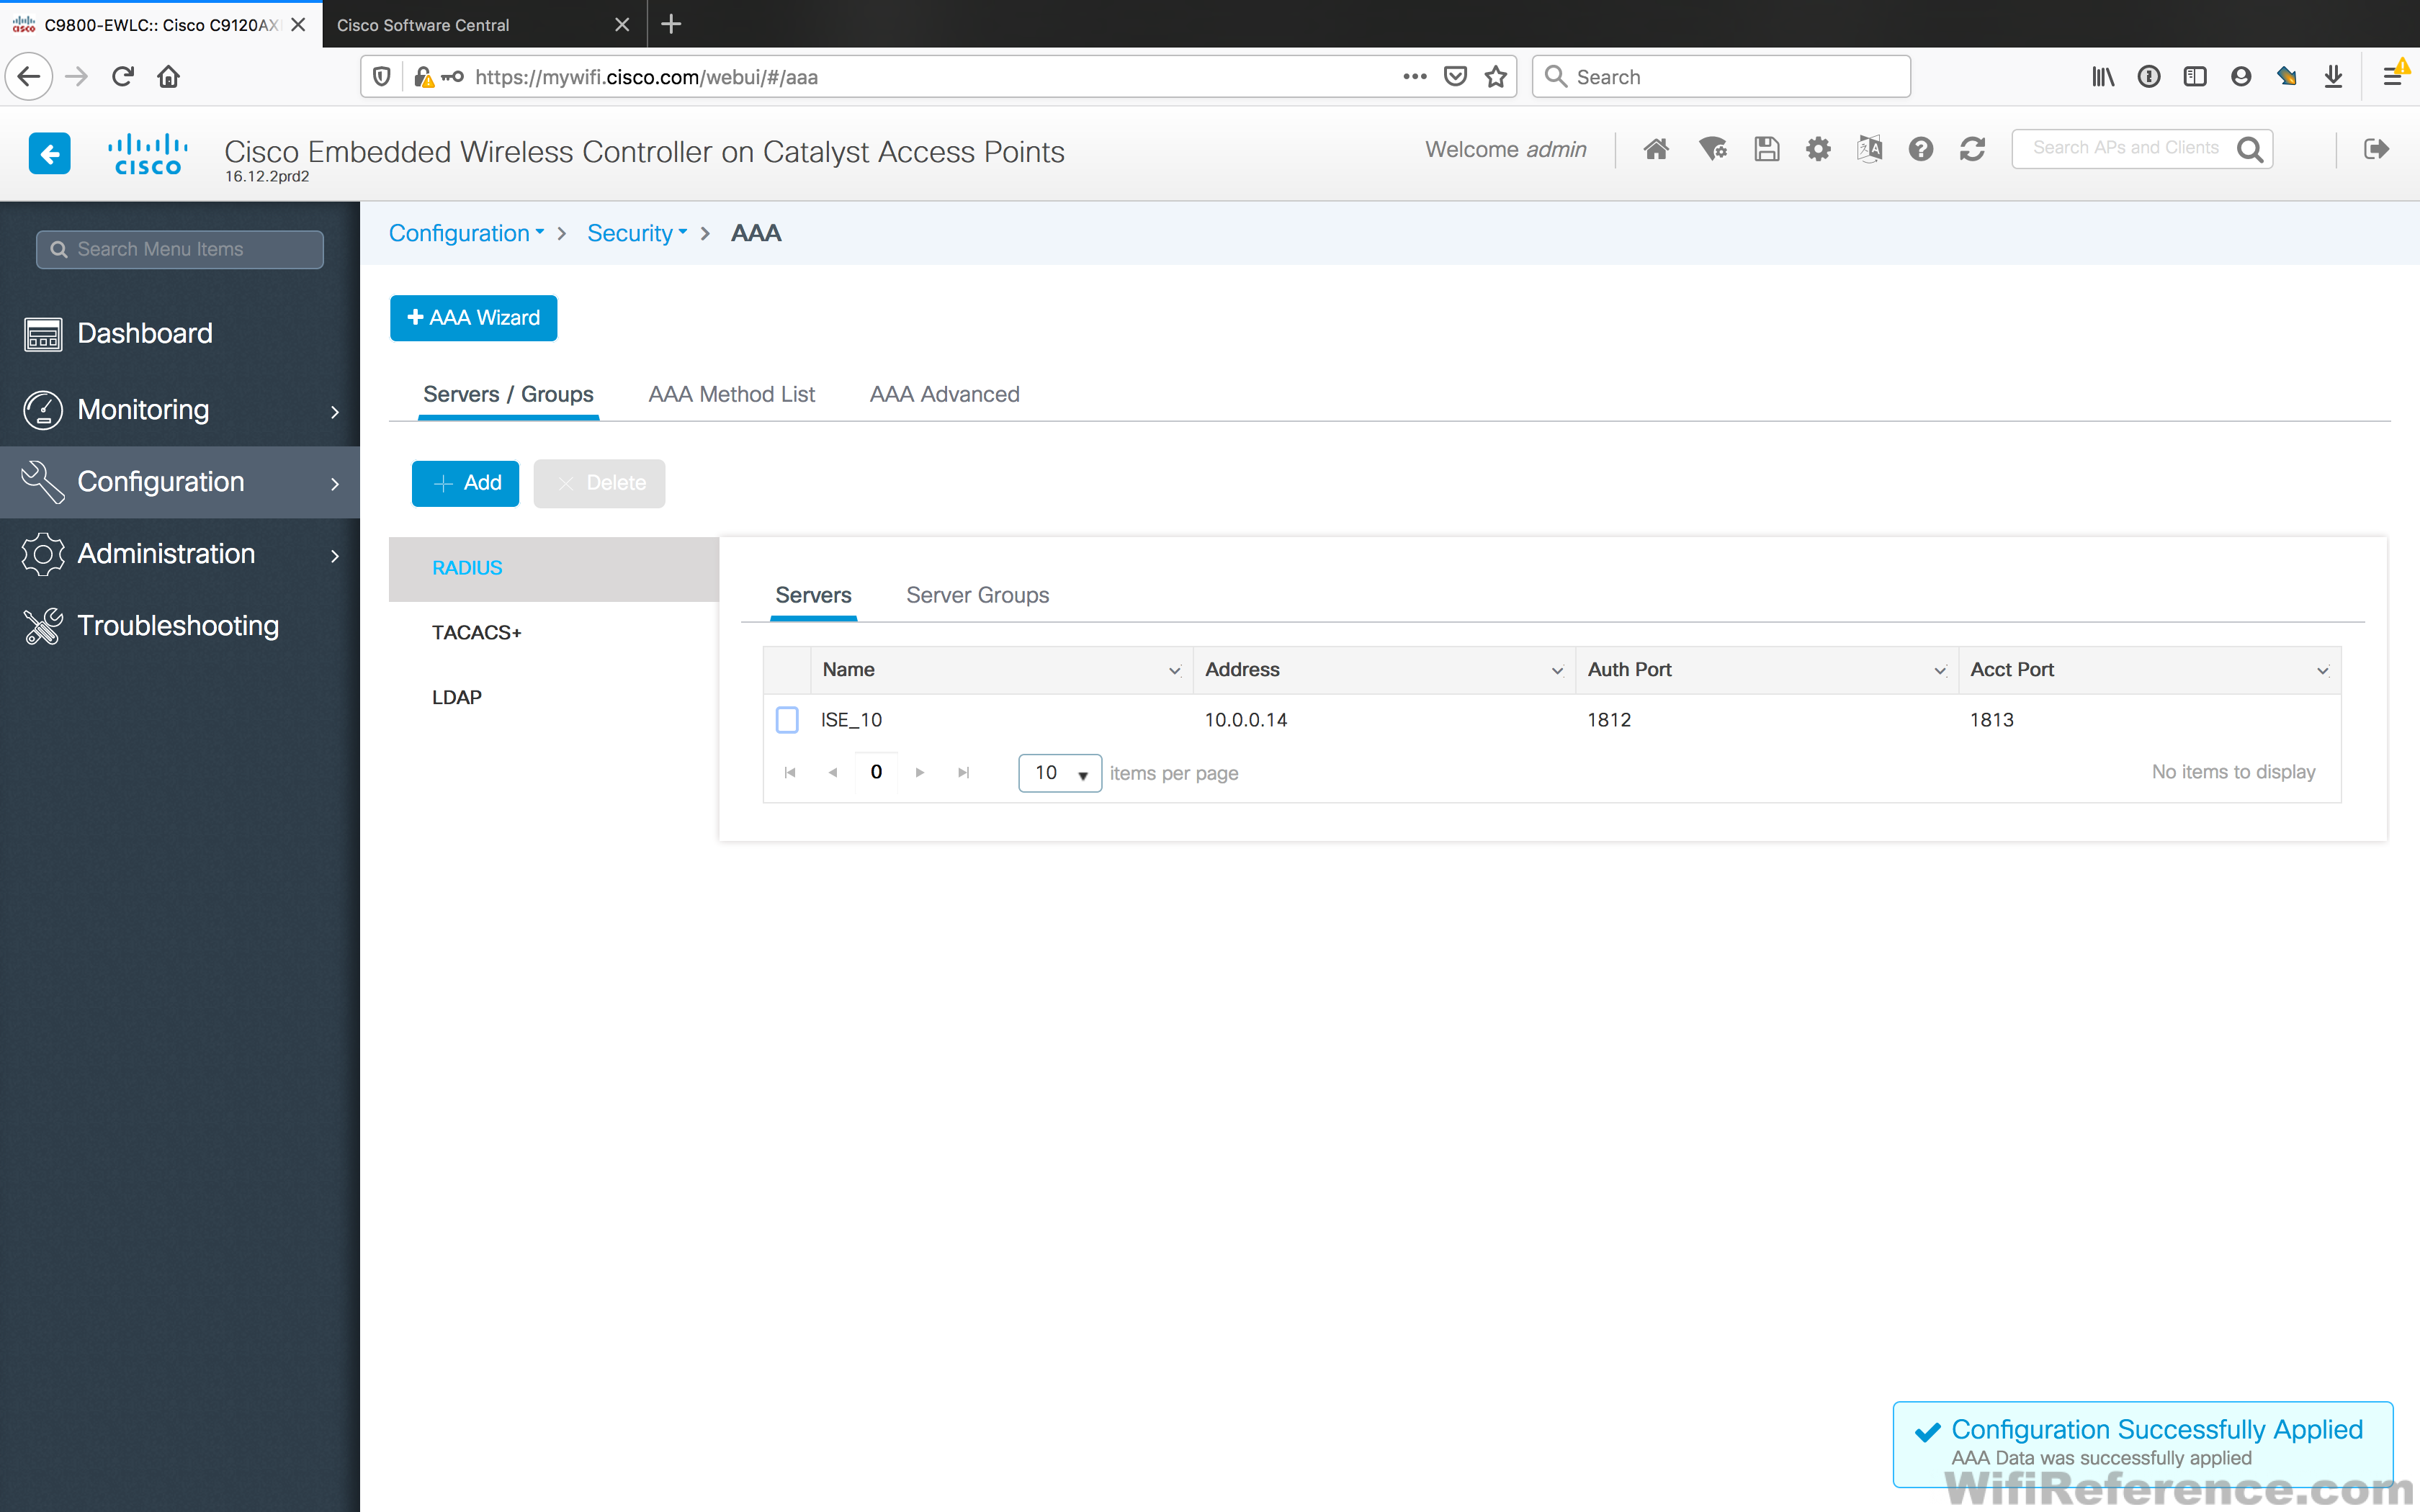
You have now successfully configured your Embedded Wireless Controller to talk to a RADIUS Server for 802.1x WLAN Authentication! The wizard makes this process much easier than it was in AireOS.
Create a 802.1x WLAN using your RADIUS configuration
Ordinarily, I would recommend creating unique Tags and Profiles instead of using the defaults, but for the purposes of this guide we are going to keep things as simple as possible. I would expect a network using an Embedded Wireless Controller would have a simpler configuration than a typical Enterprise wireless network.
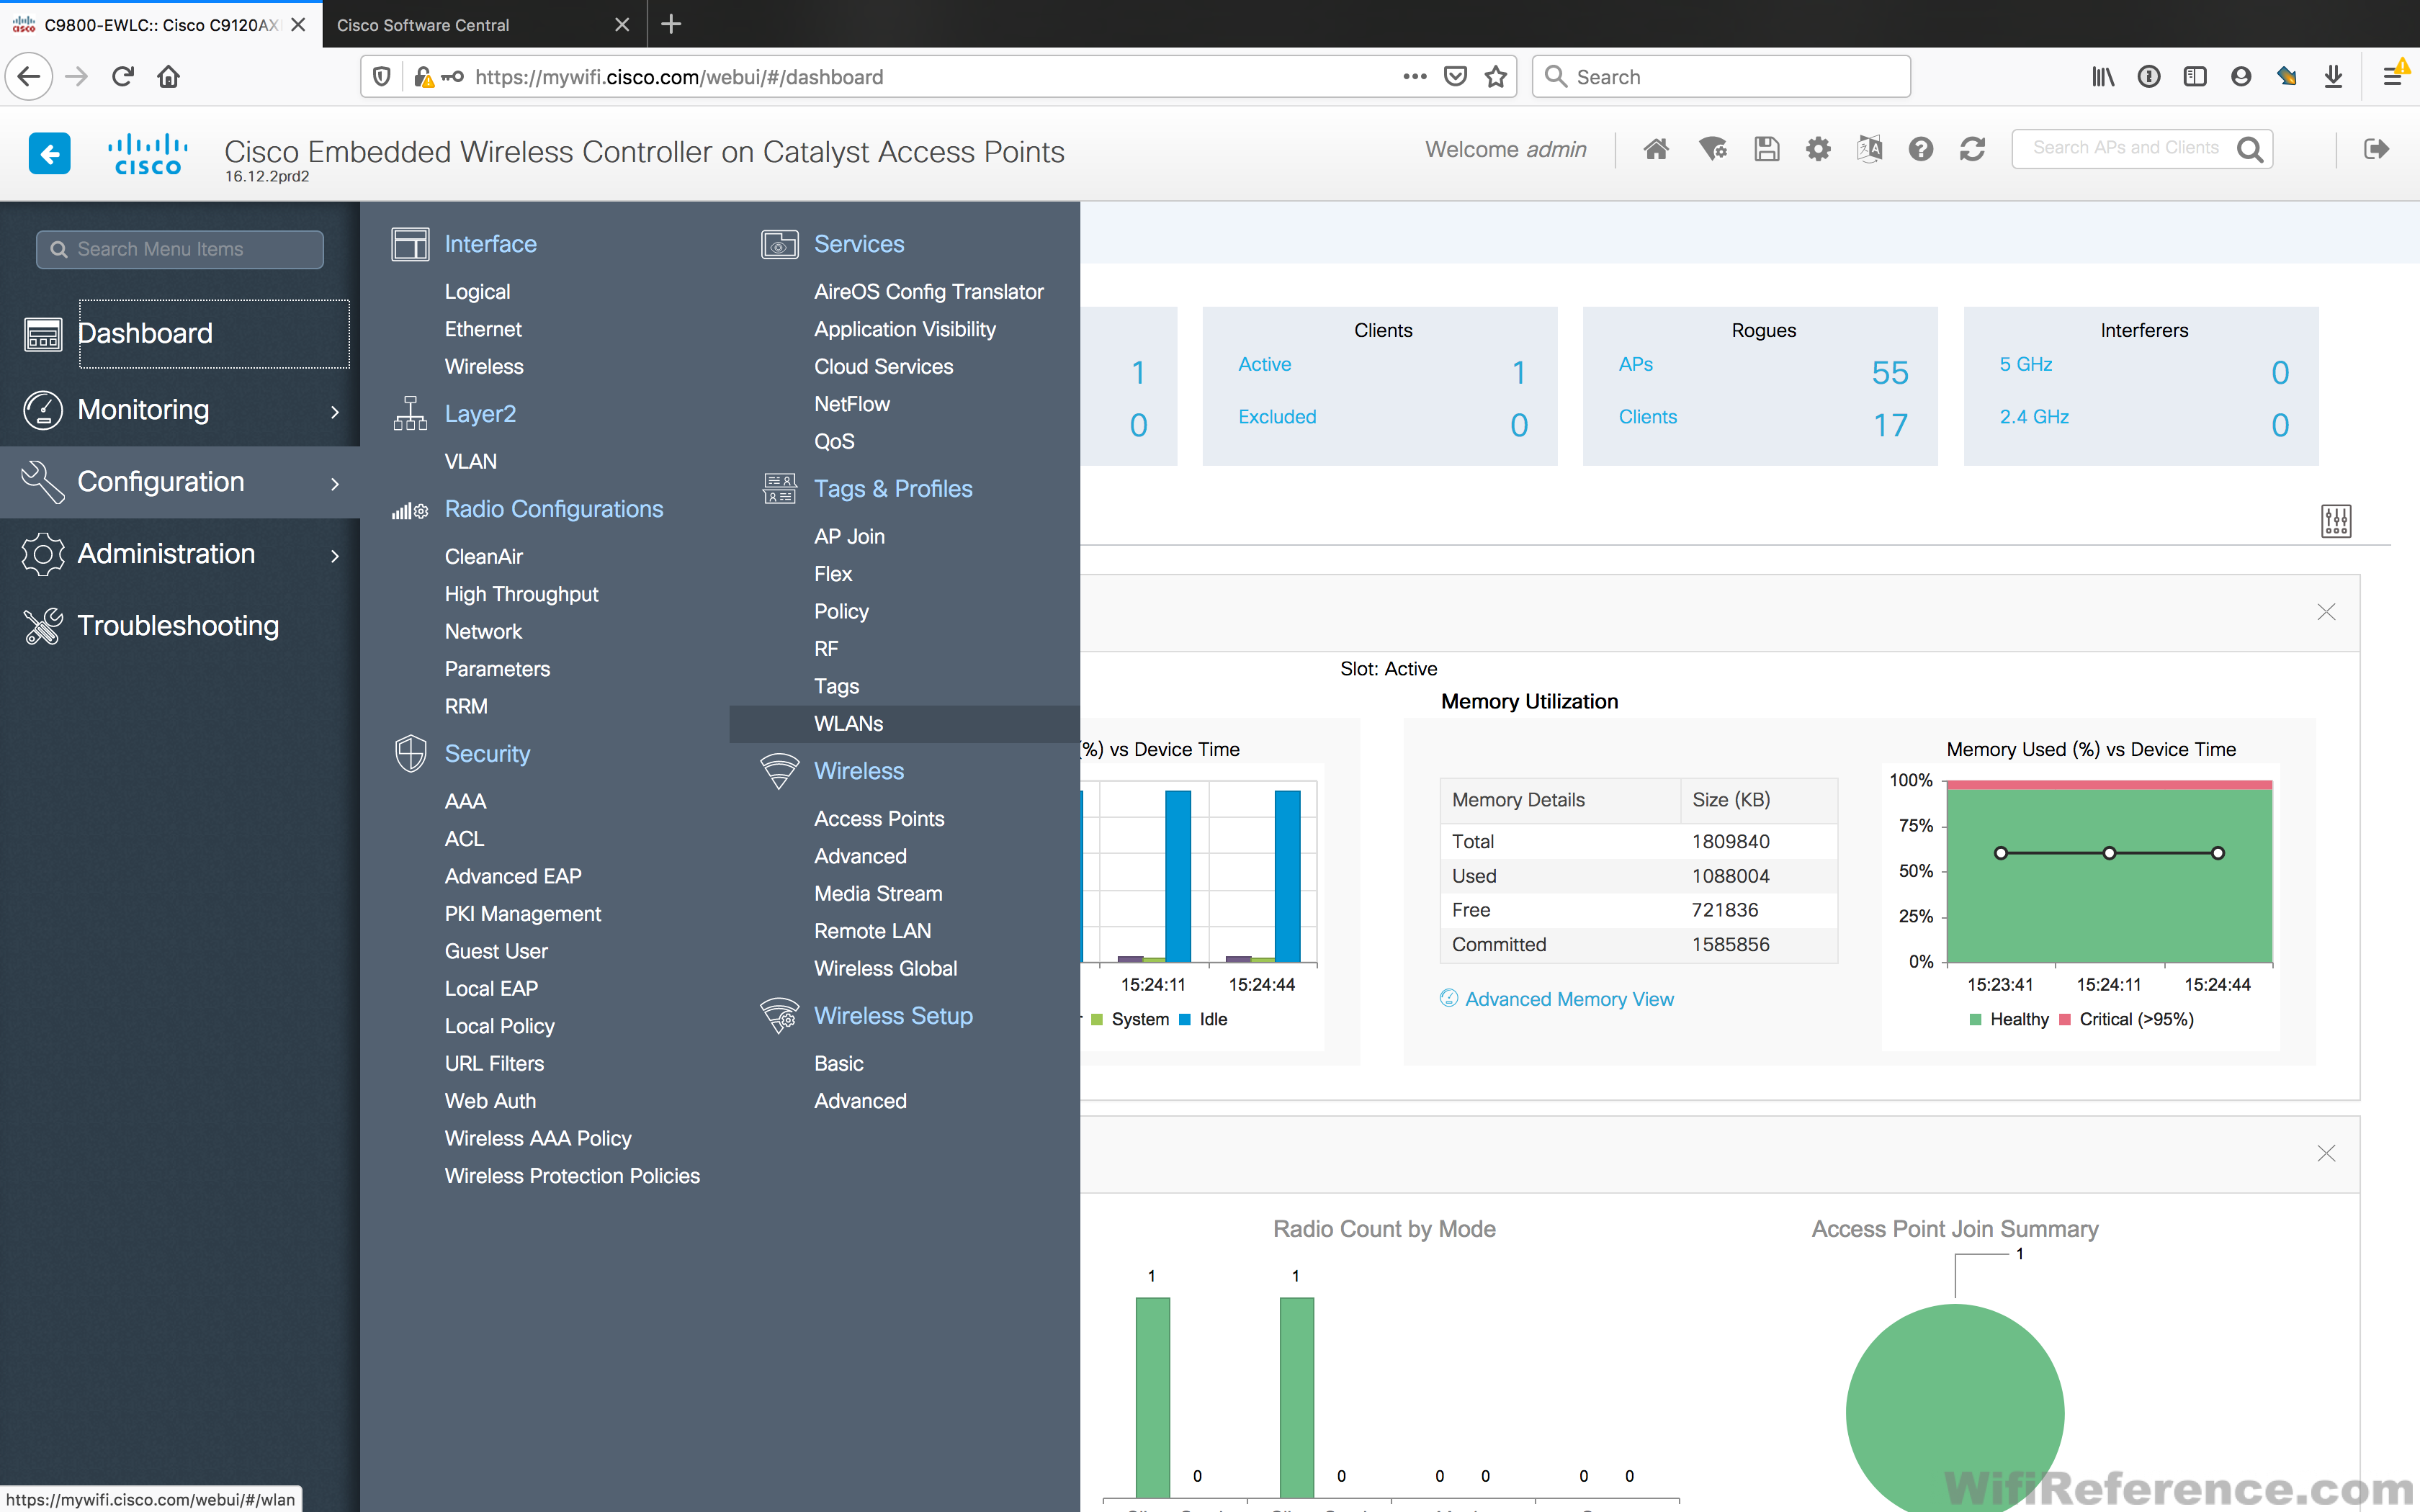
Navigate to Configuration > WLANs in the menu
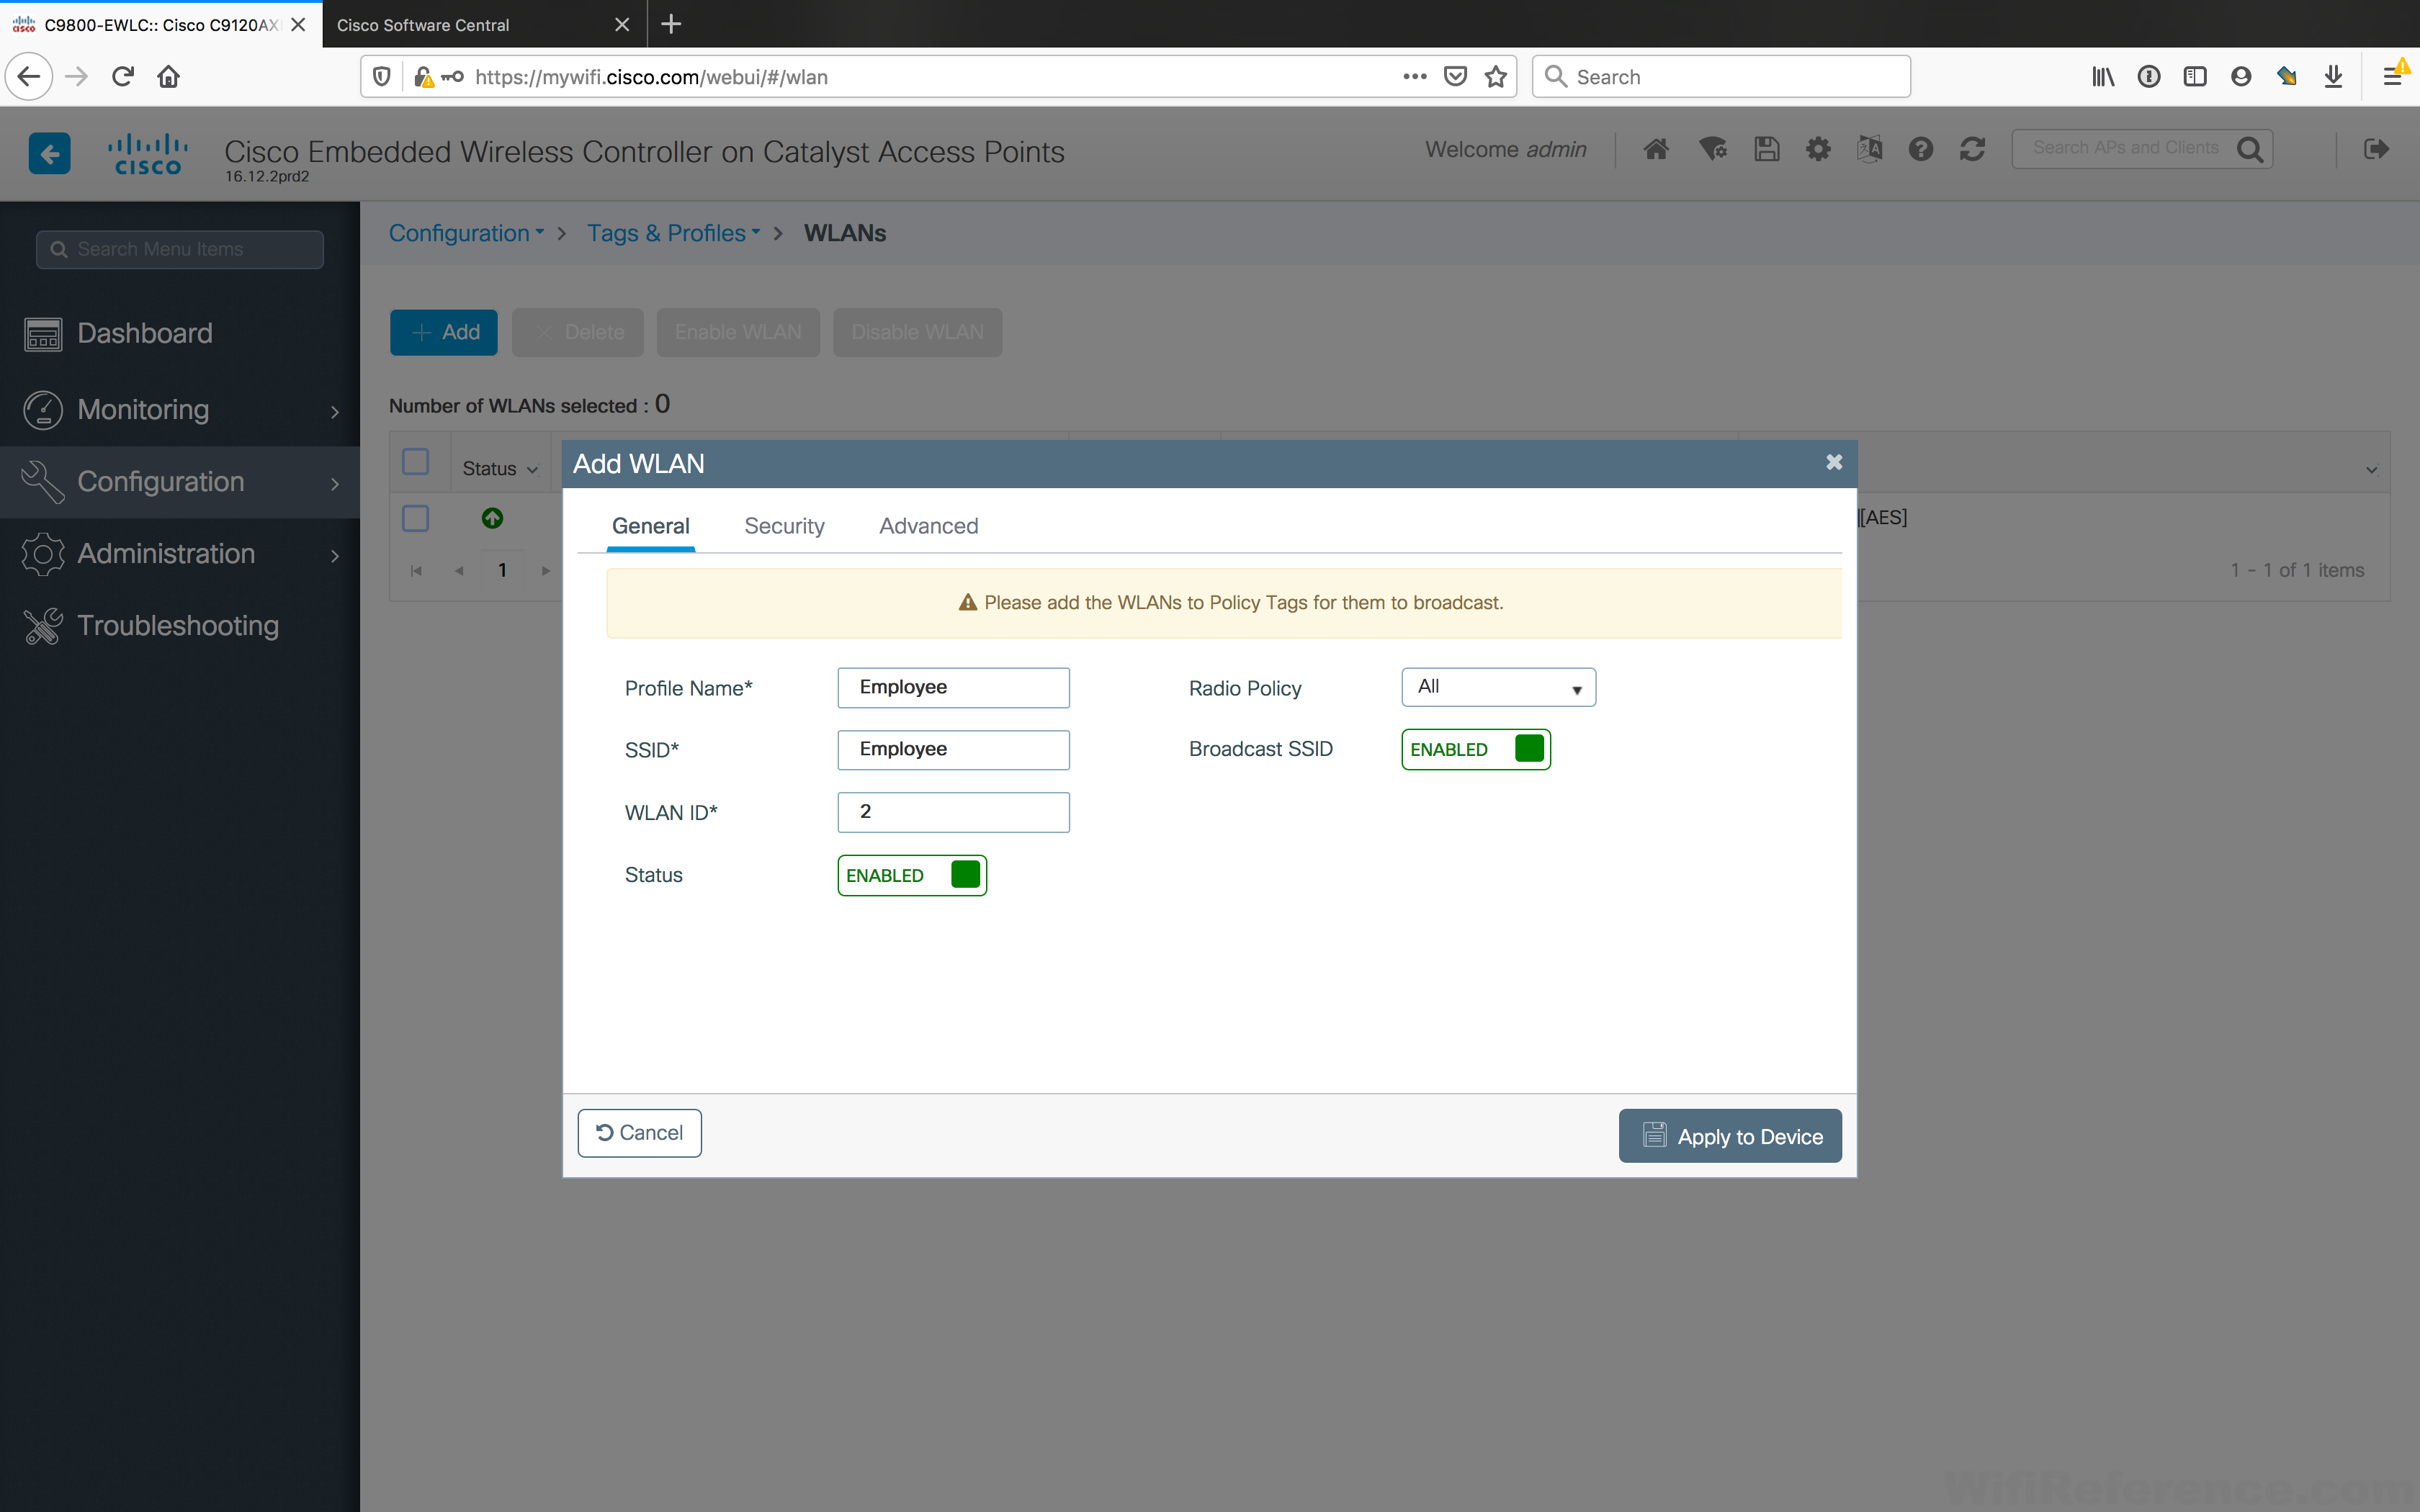
You’ll notice the WLAN you created in the CLI exists in the list already. Click the Add button in the upper-left corner to create your new 802.1x WLAN.
Name your Profile and SSID, and be sure to change the status to Enabled.
Click the Security tab and the Layer2 sub tab. The settings should default to WPA+WPA2 and 802.1x.
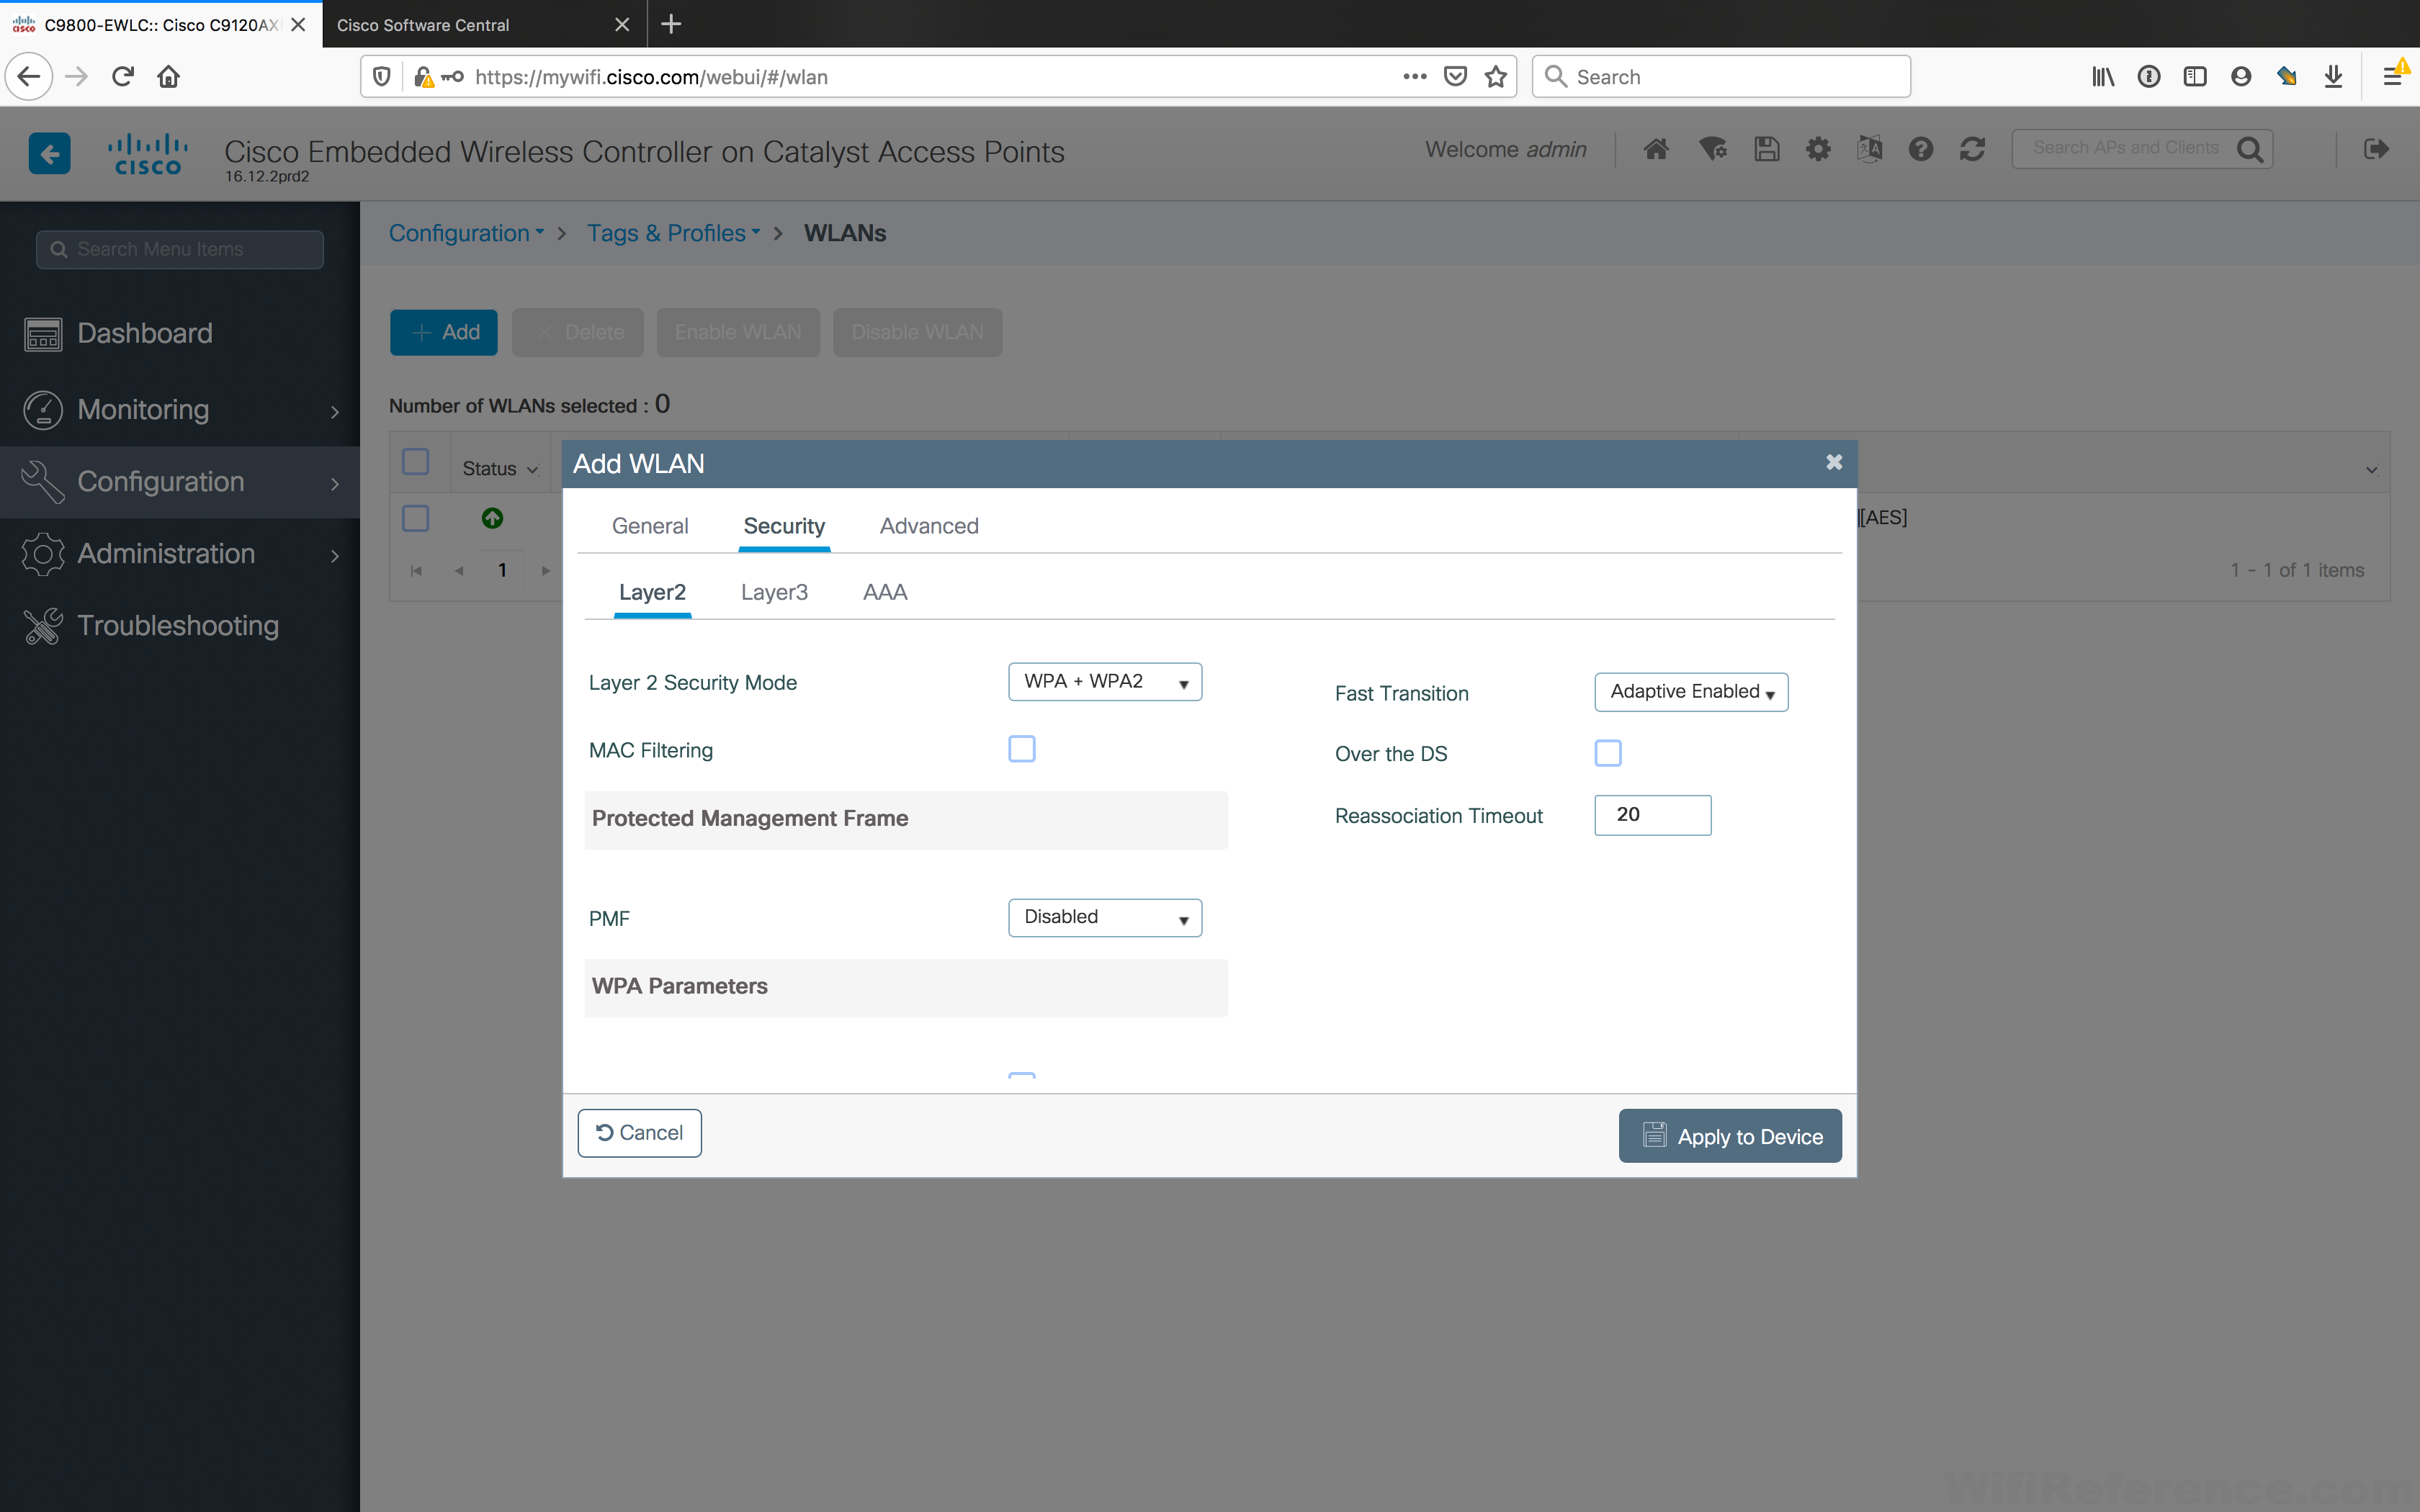
Scroll down to ensure that the WPA2 Policy, AES and 802.1x is enabled

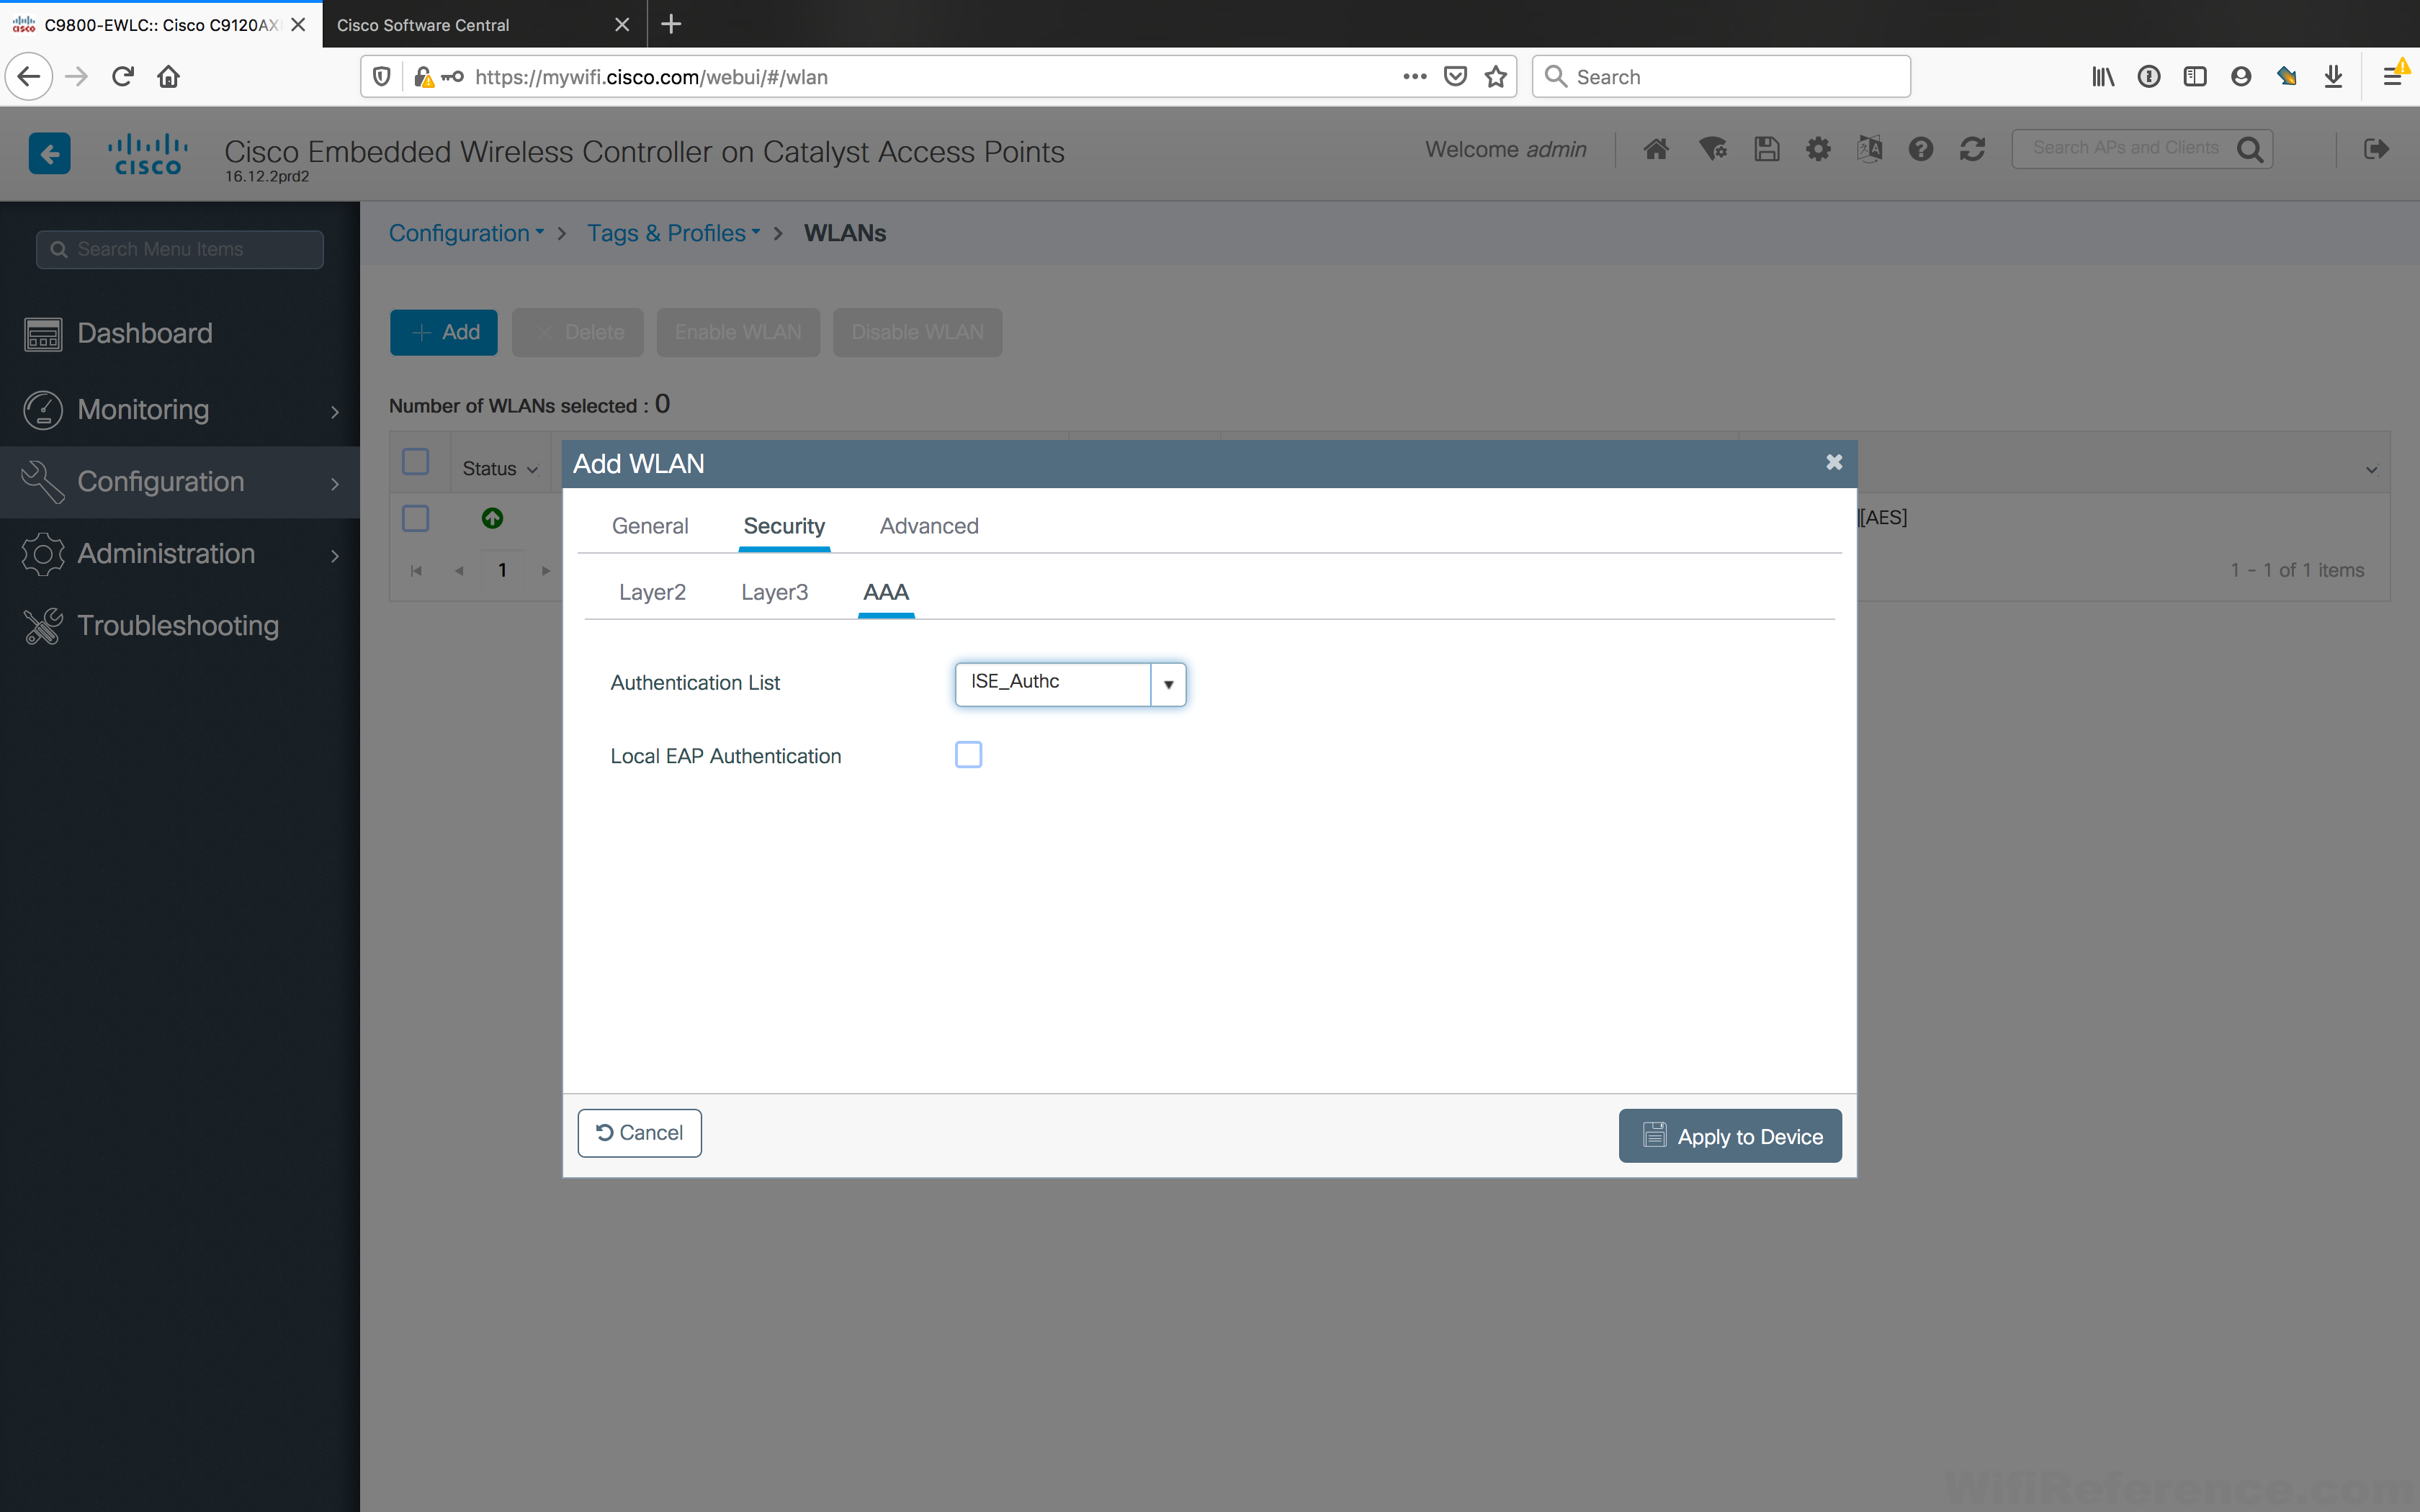
Scroll back to the top and select the AAA sub tab. Select the Authentication Method List you created in the earlier step. You can navigate to the Advanced Tab to change any settings necessary for your environment. Notice that you don’t have the ability to assign an interface/VLAN in this part of the configuration. We will cover that next. Click Apply to Device.
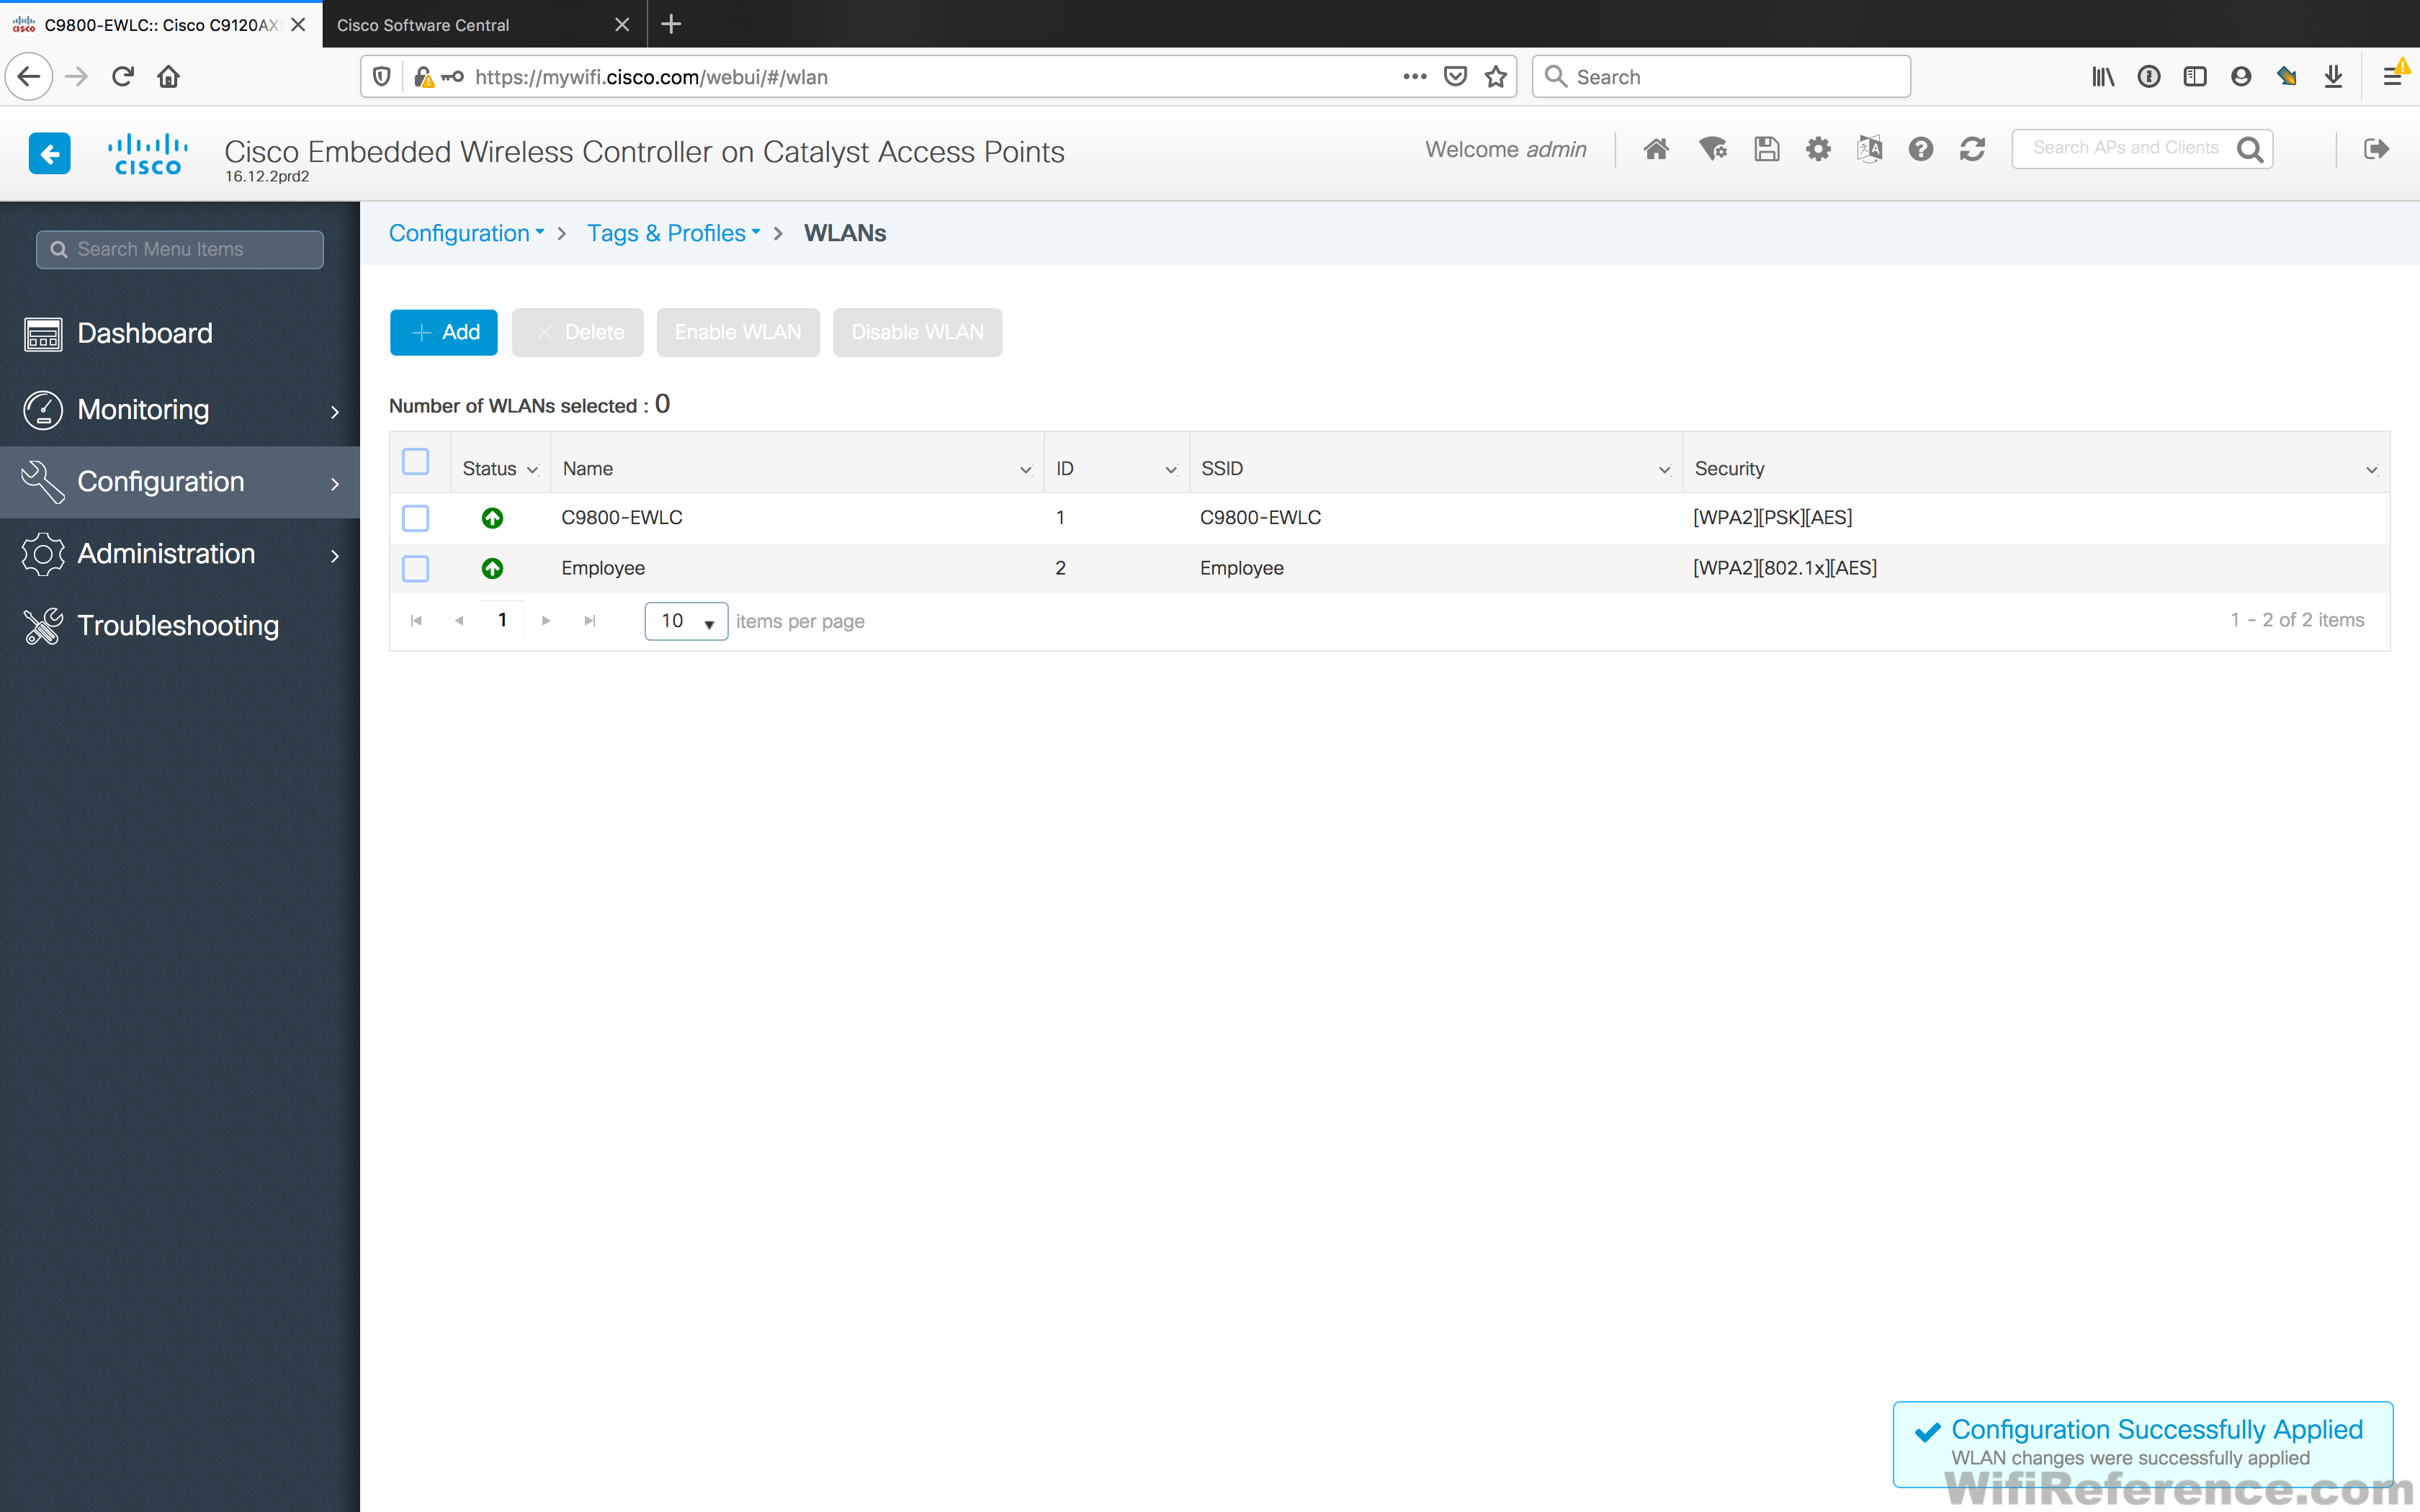
You should see your new WLAN in the list, and a green up arrow signifying that it is enabled.
Assign your new WLAN to a VLAN (FlexConnect)
Create a new Policy Profile
To assign clients to a VLAN, we need to create a Policy Profile (or modify the default policy profile). Assuming you will be placing your WLANs onto separate VLANs, I will walk you through the process of creating a Policy Profile and binding it to APs with a Tag. If everything is going to be on the same VLAN you can simply modify the default Policy Profile and change the VLAN there.
Navigate to Configuration > Policy in the menu
Add a new Policy Profile by clicking on the Add button in the upper-left corner. We will be making the minimum amount of changes to the policy profile, with the sole intent of assigning clients to a different VLAN. Feel free to navigate around to explore the other options available in a policy profile.
On the General tab, give the Policy Profile a Name and Description, and be sure to set the Status to Enabled.
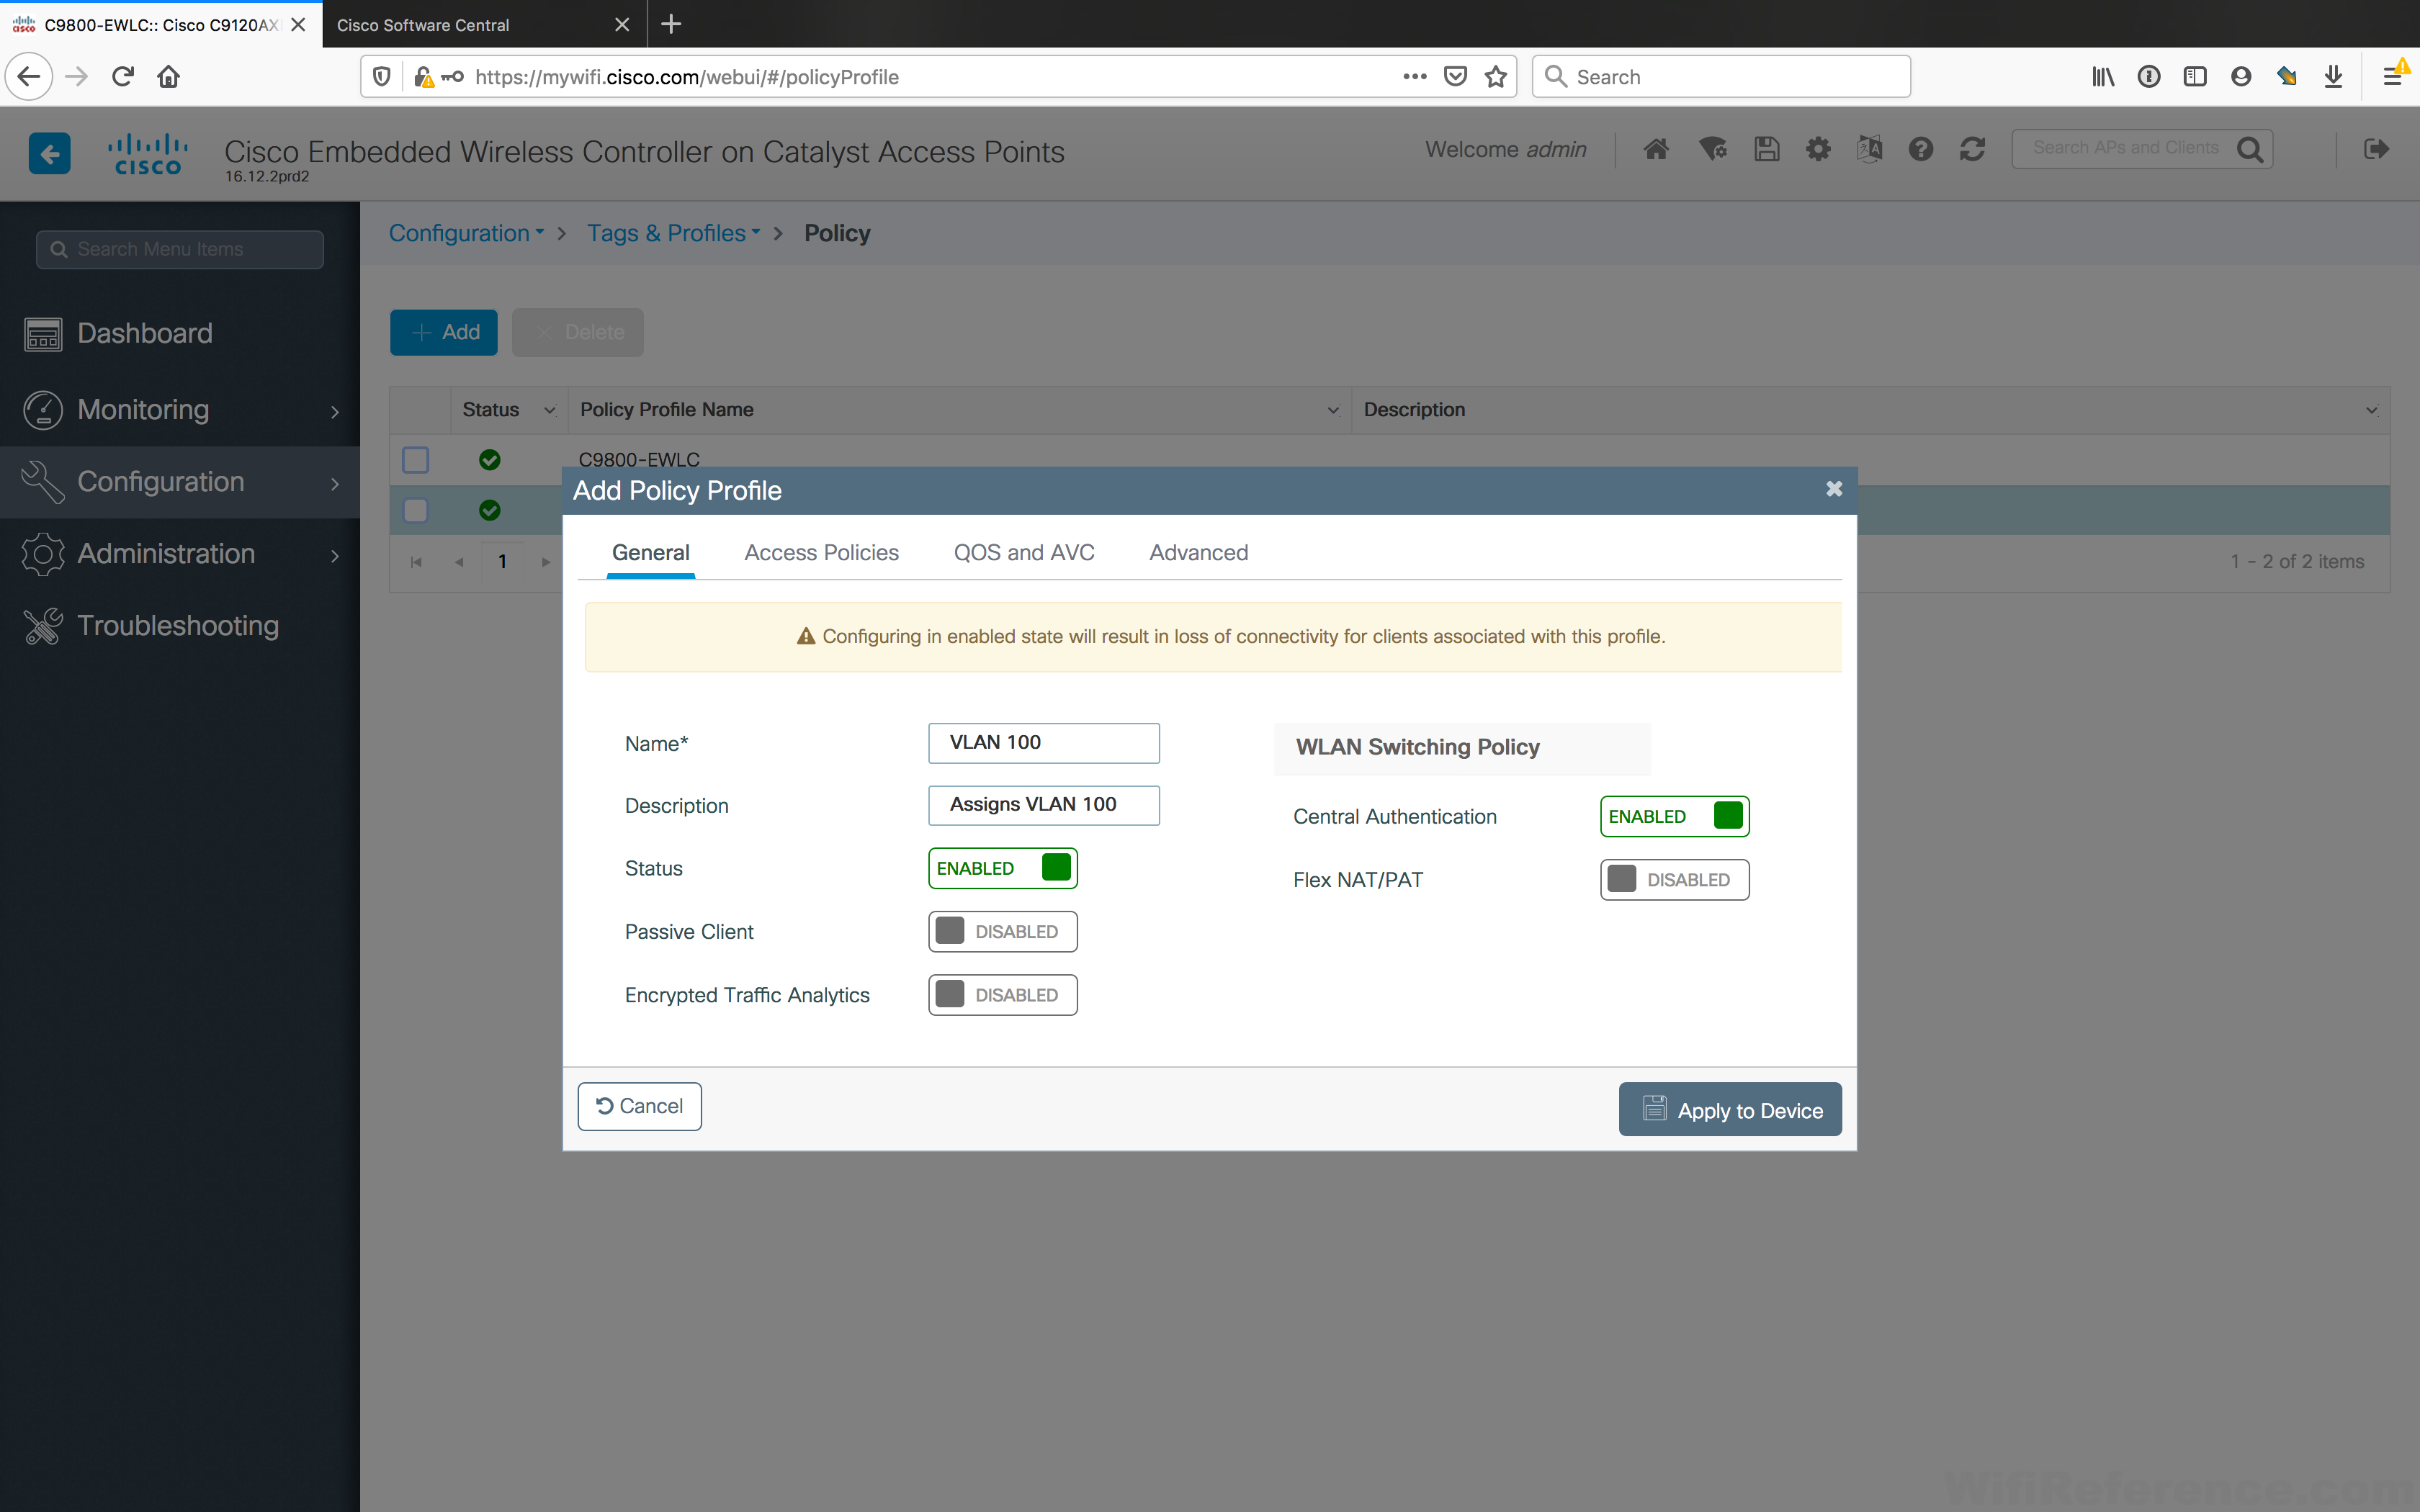
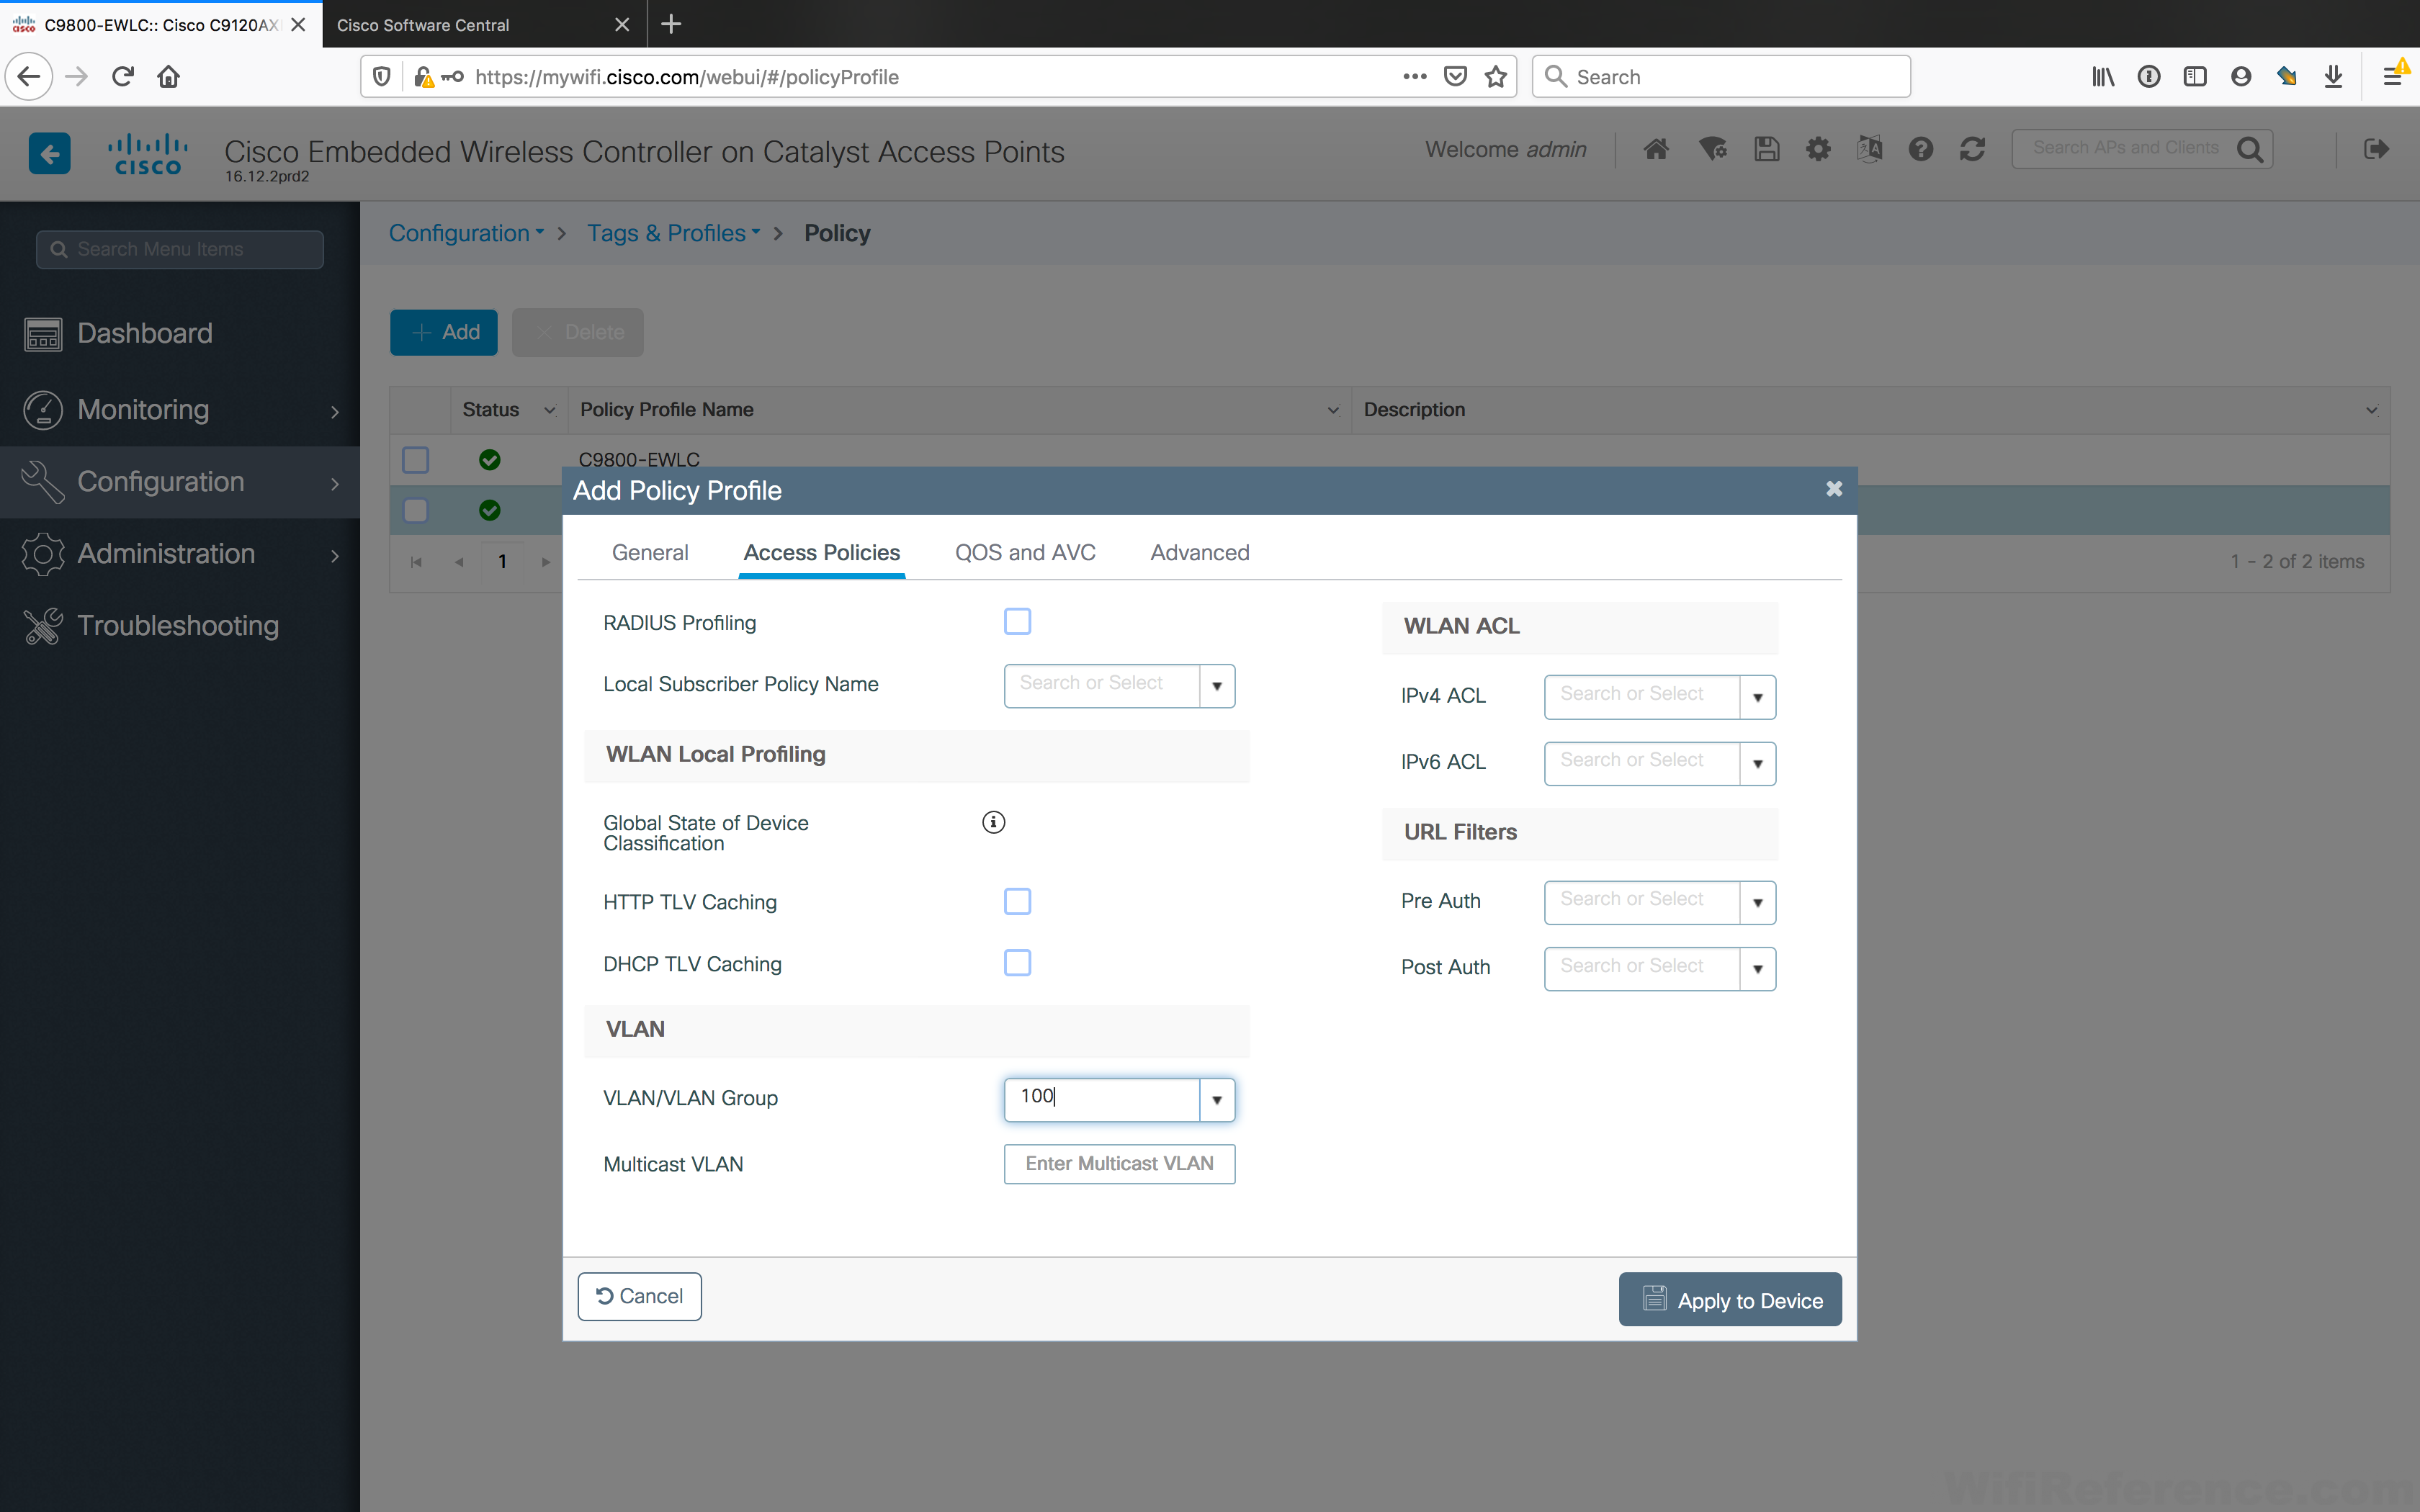
Click the Access Policy tab. This is where we will set the VLAN. Type the VLAN number you wish to assign to clients in the VLAN/VLAN Group field. Note: On traditional 9800 controllers with APs in Local Mode, you would typically create a L2 VLAN in the GUI and select it here. In FlexConnect you are able to simply type the VLAN number in this field to assign clients. We don’t need to make any other changes to the Policy Profile for our purposes. Click Apply to Device.
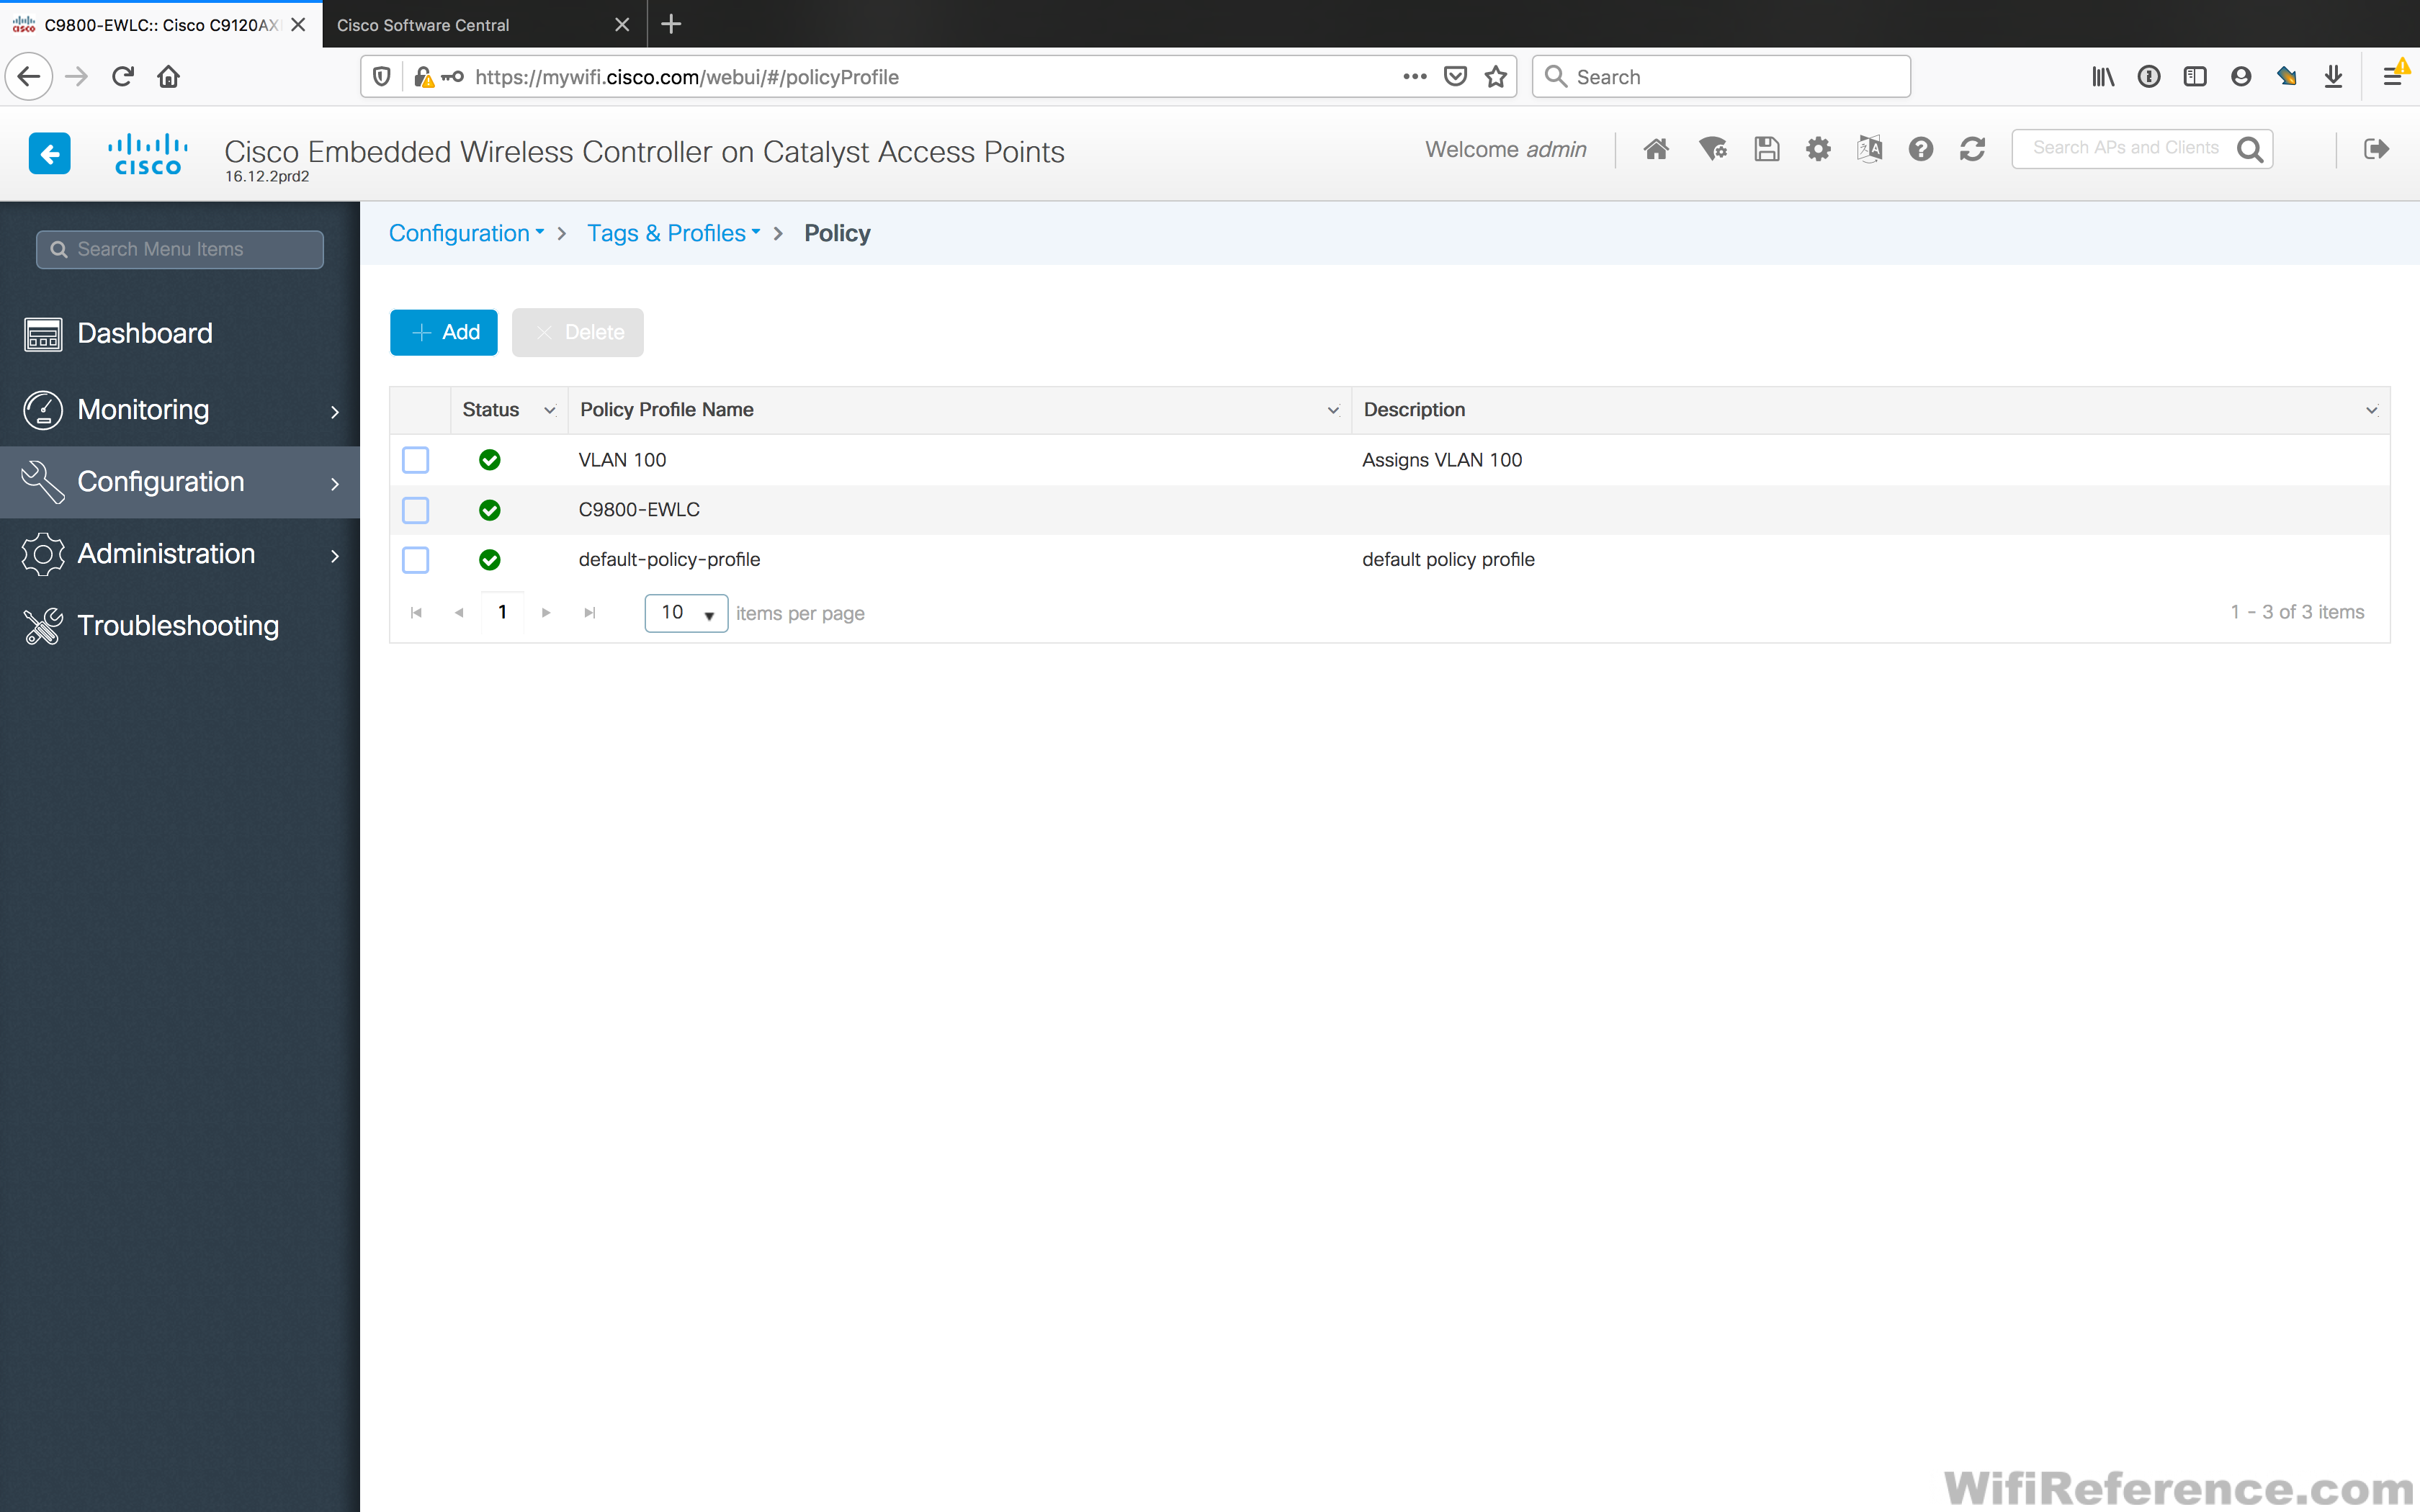
Your new Policy Profile should show up in the list as enabled.
Modify the default Policy Tag to assign the Policy Profile to your new WLAN (for simplicity)
This is where I will keep things simple because this is an Embedded Wireless Controller. In an enterprise environment, I would recommend against using the default Policy Tag (and Profile). Navigate to Configuration > Tags in the menu.
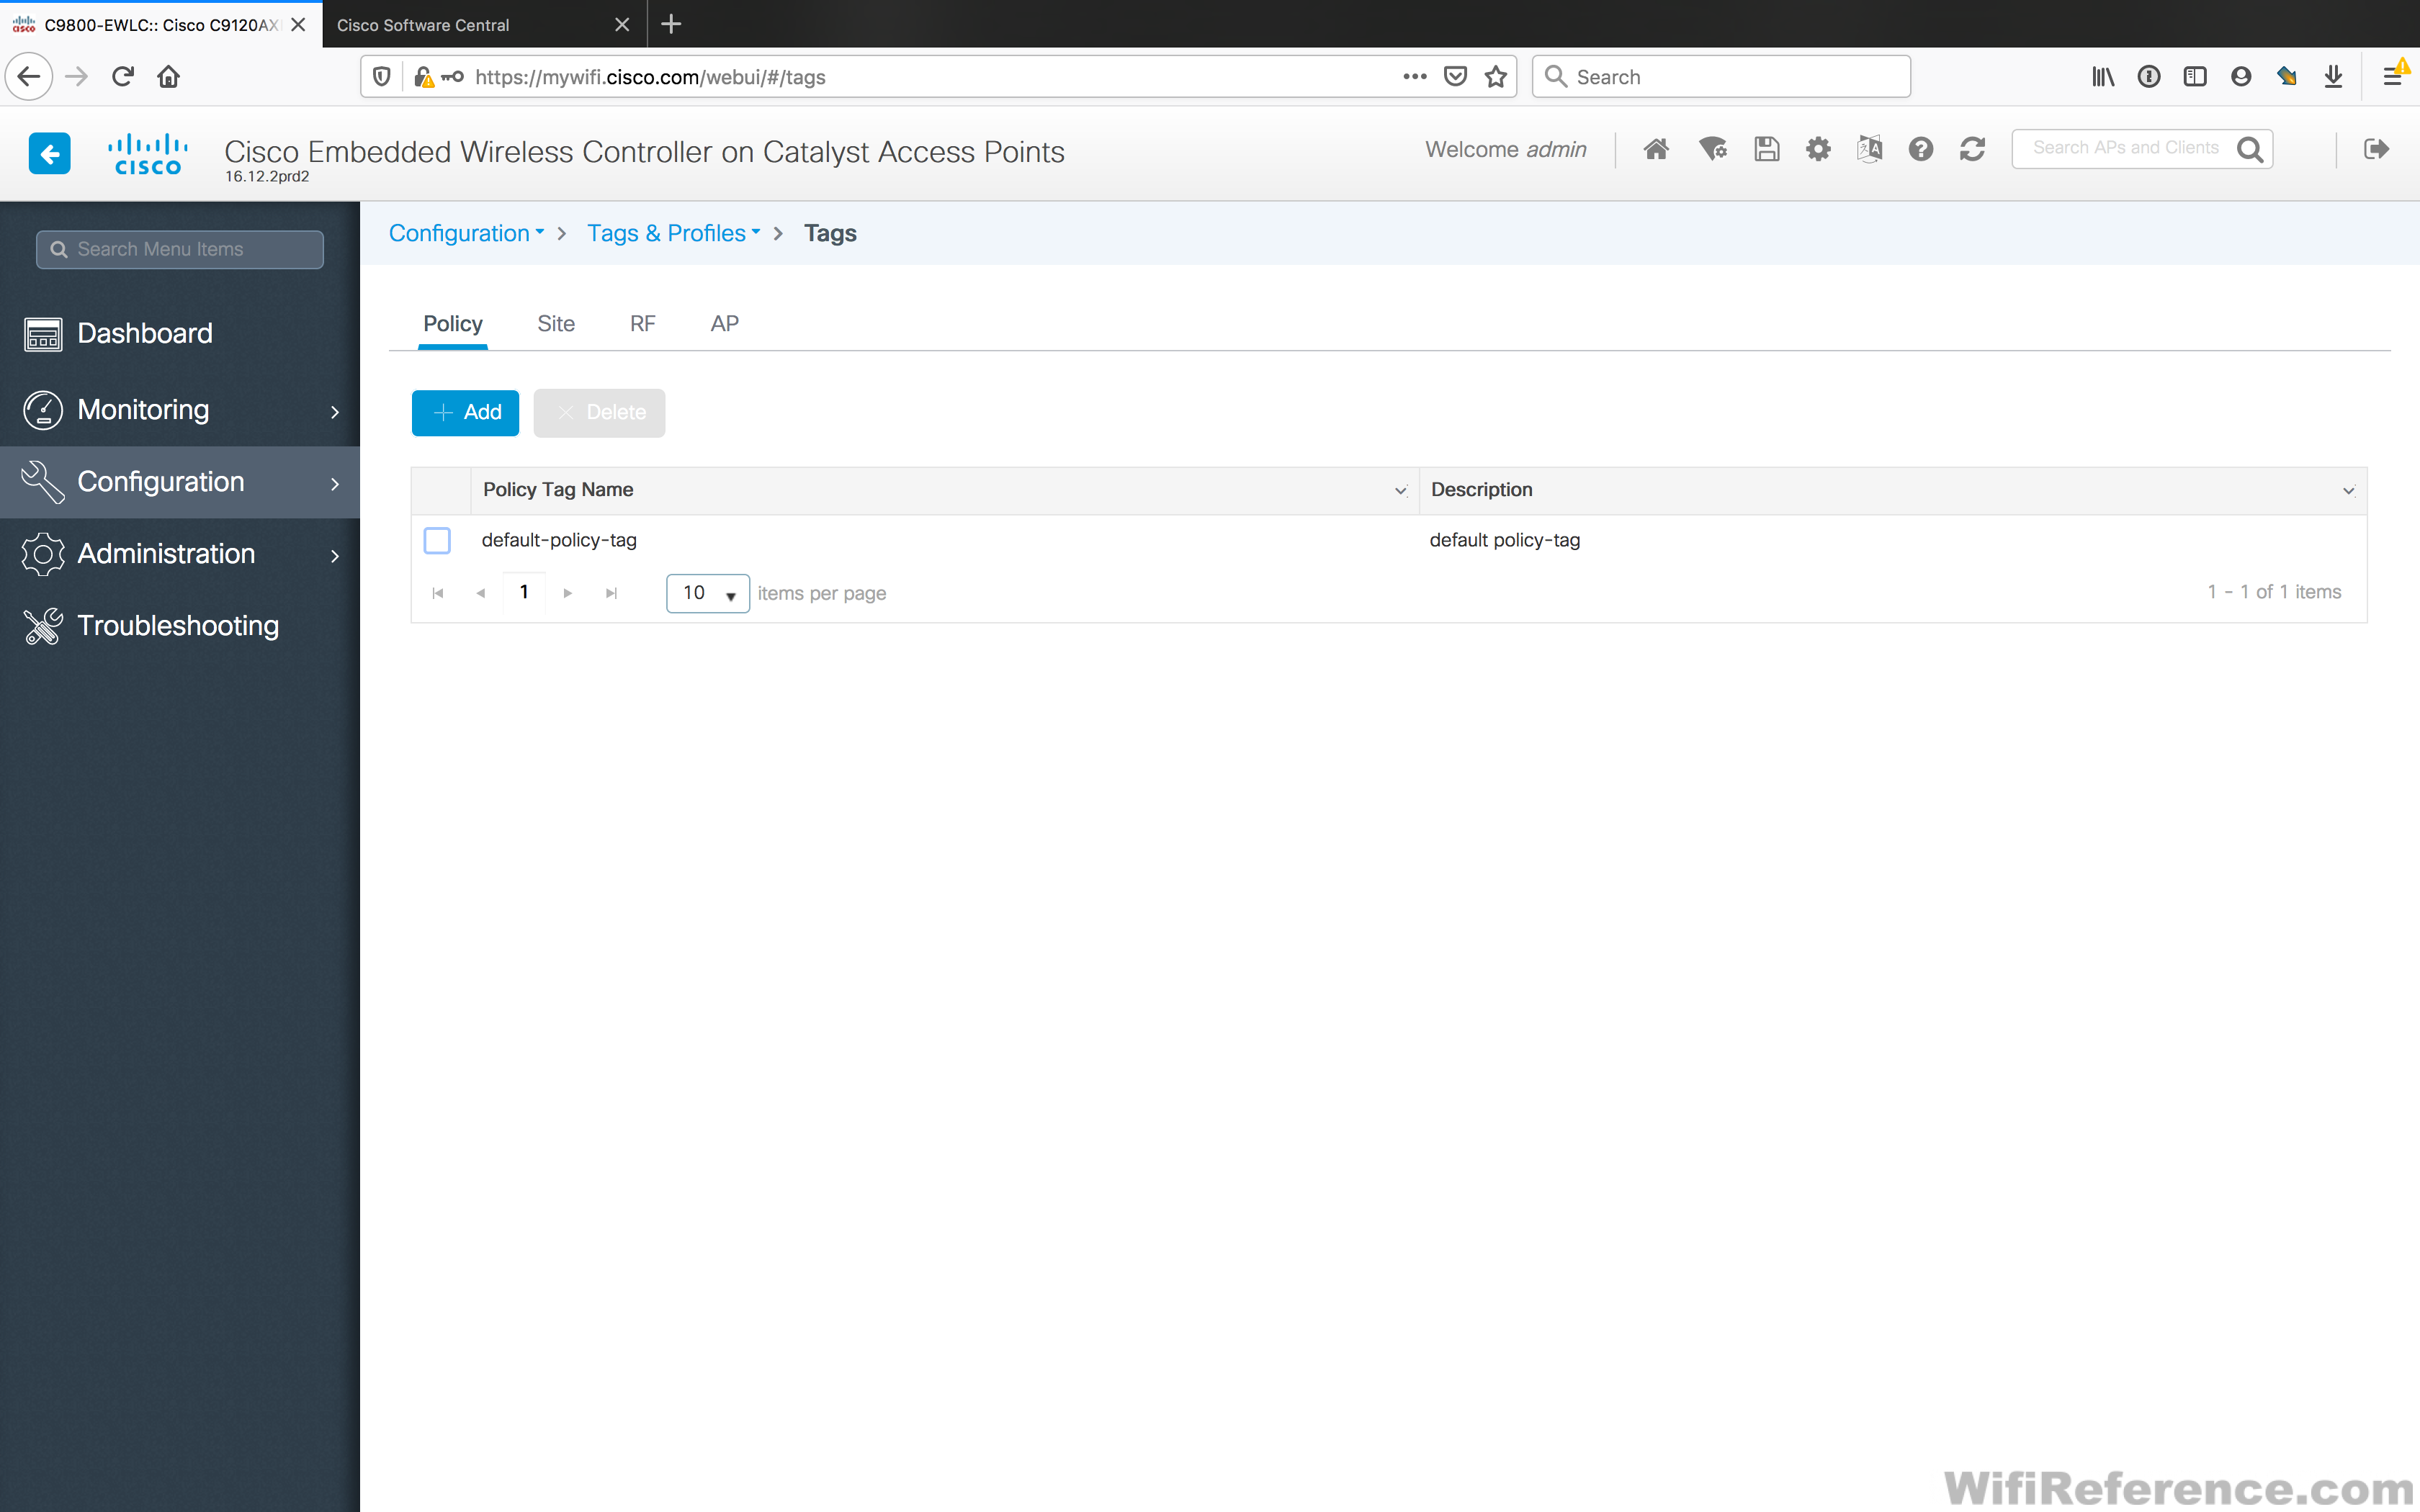
Make sure you are viewing the Policy tab at the top, and select the default-policy-tag

Notice that your existing WLAN and Policy Profile mapping shows up for the WLAN you are already connected to. Click the Add button to add a new mapping for the 802.1x WLAN.
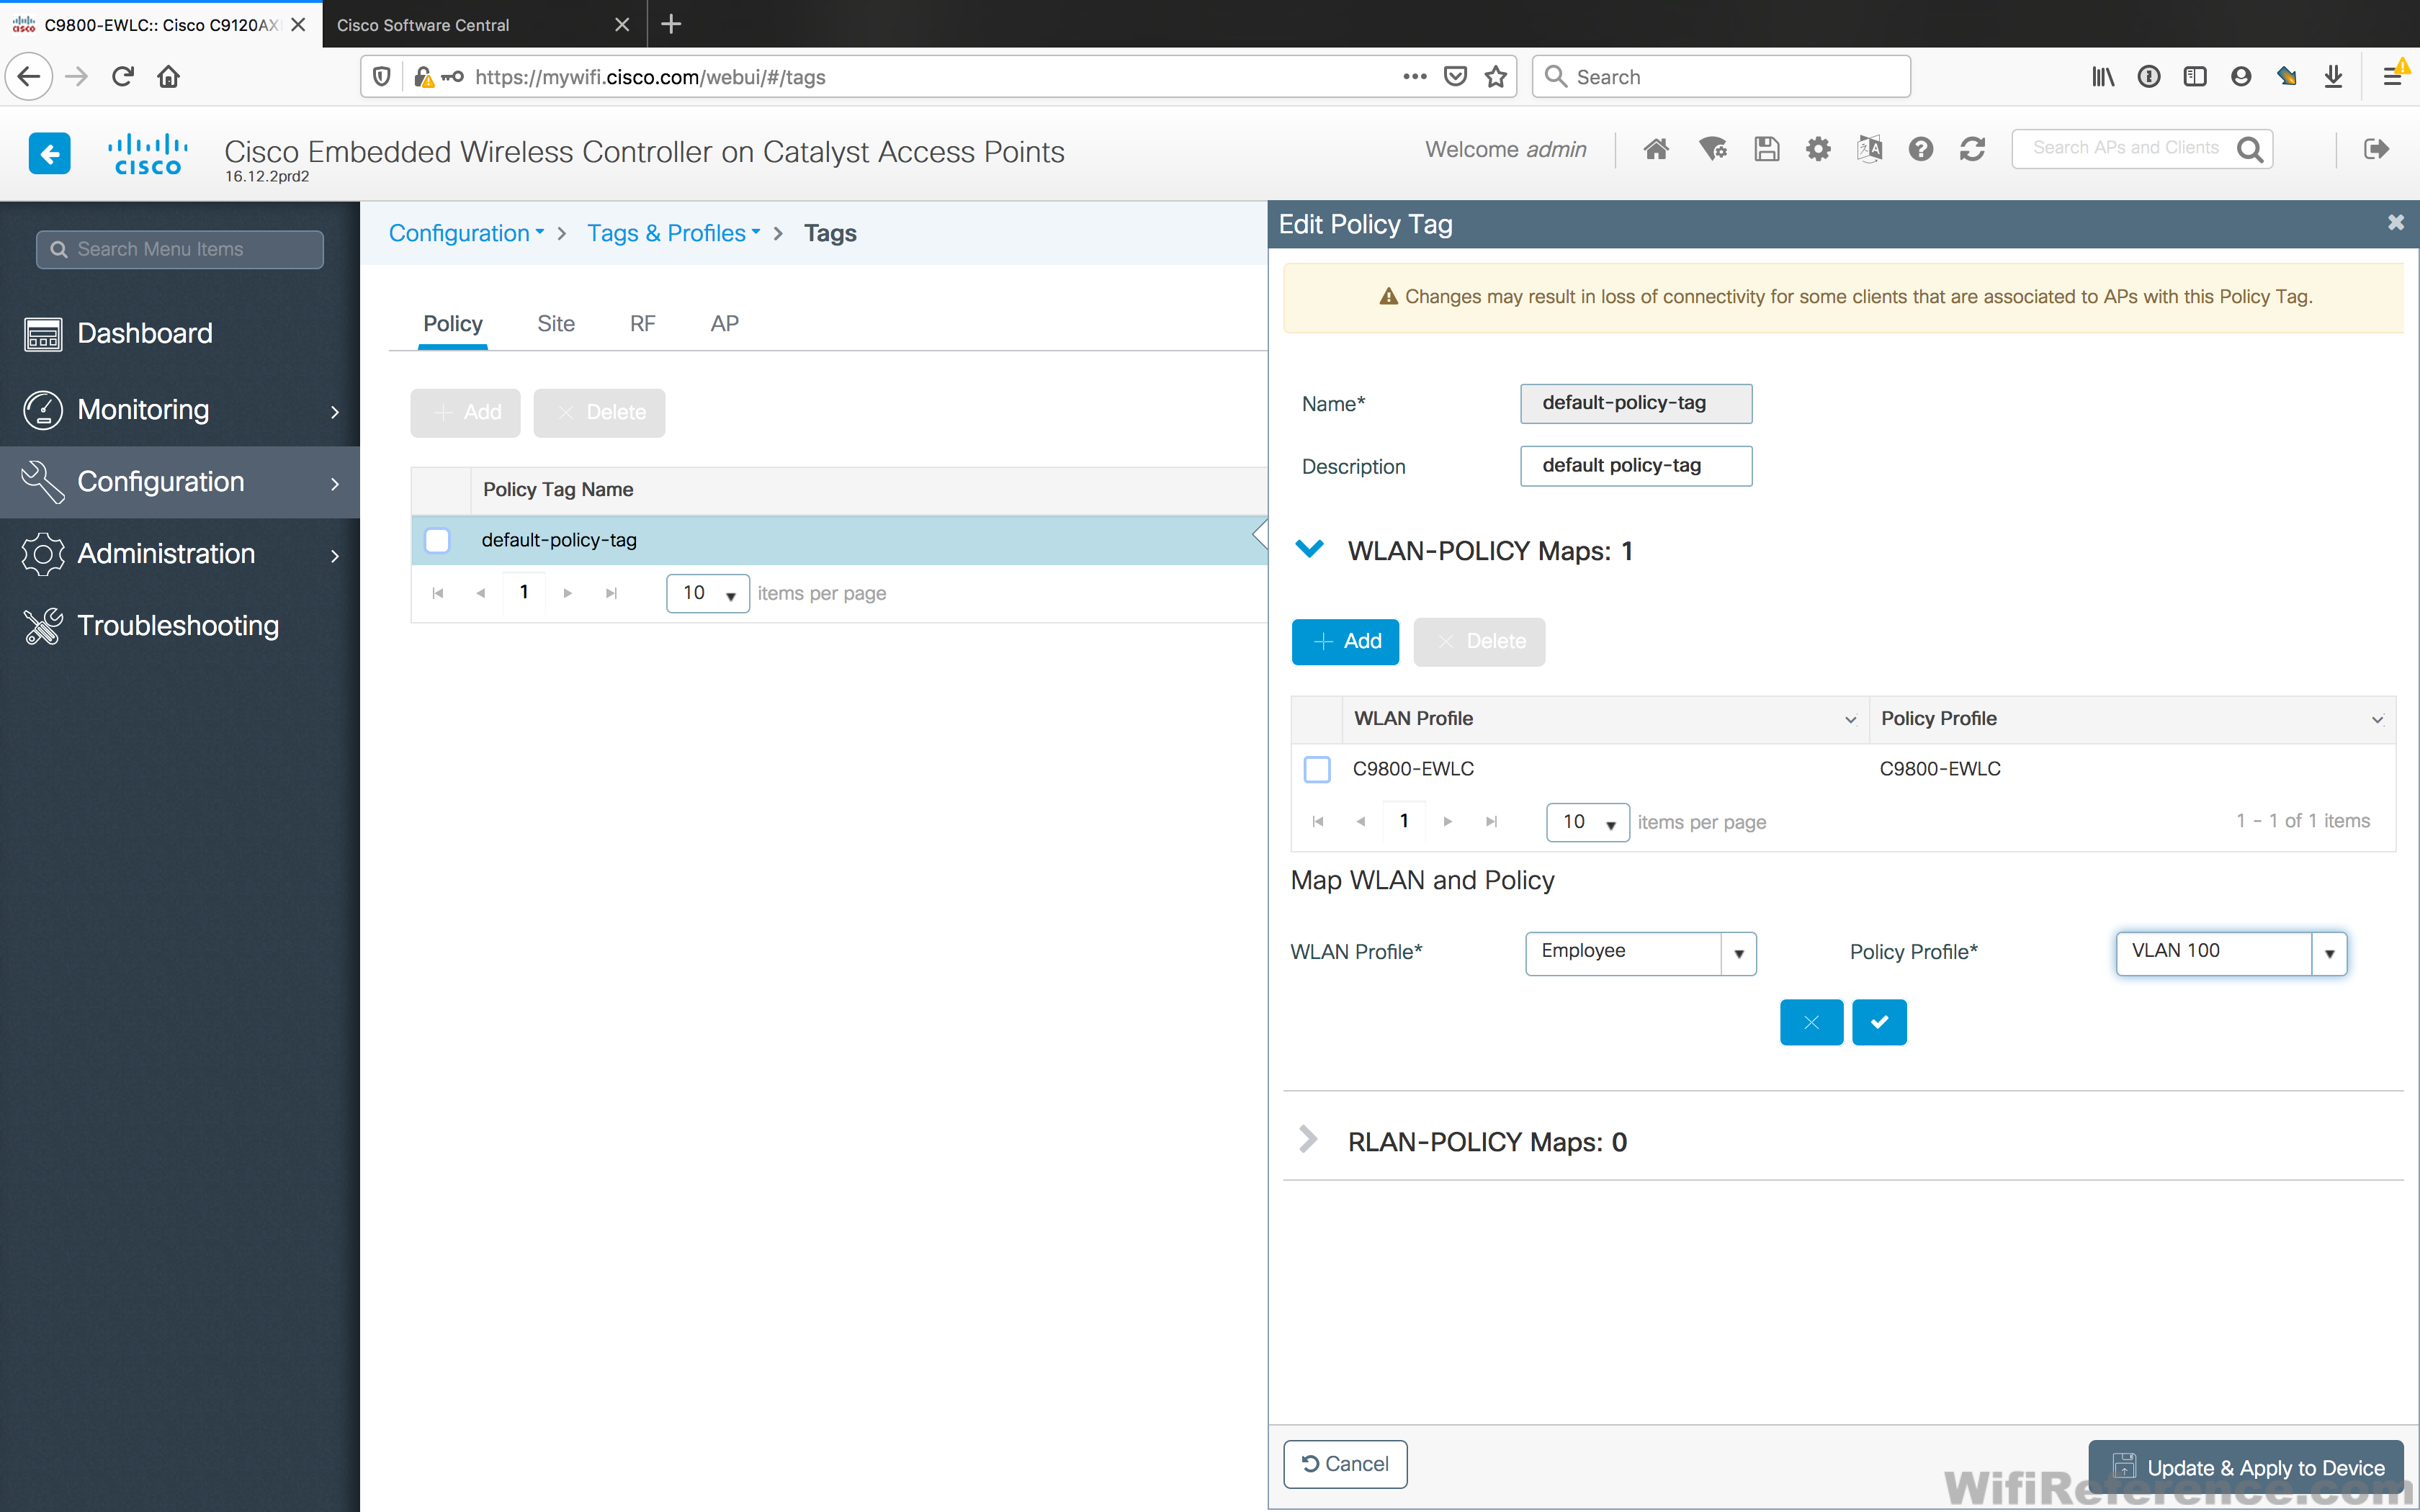
The window will change slightly, in order to show drop-down boxes for WLAN Profile and Policy Profile. Select your new WLAN and Policy Profile in these boxes. Click the checkbox near the drop-down boxes. If you fail to click the checkbox before you select “Update and Apply to Device” your changes will not take effect.
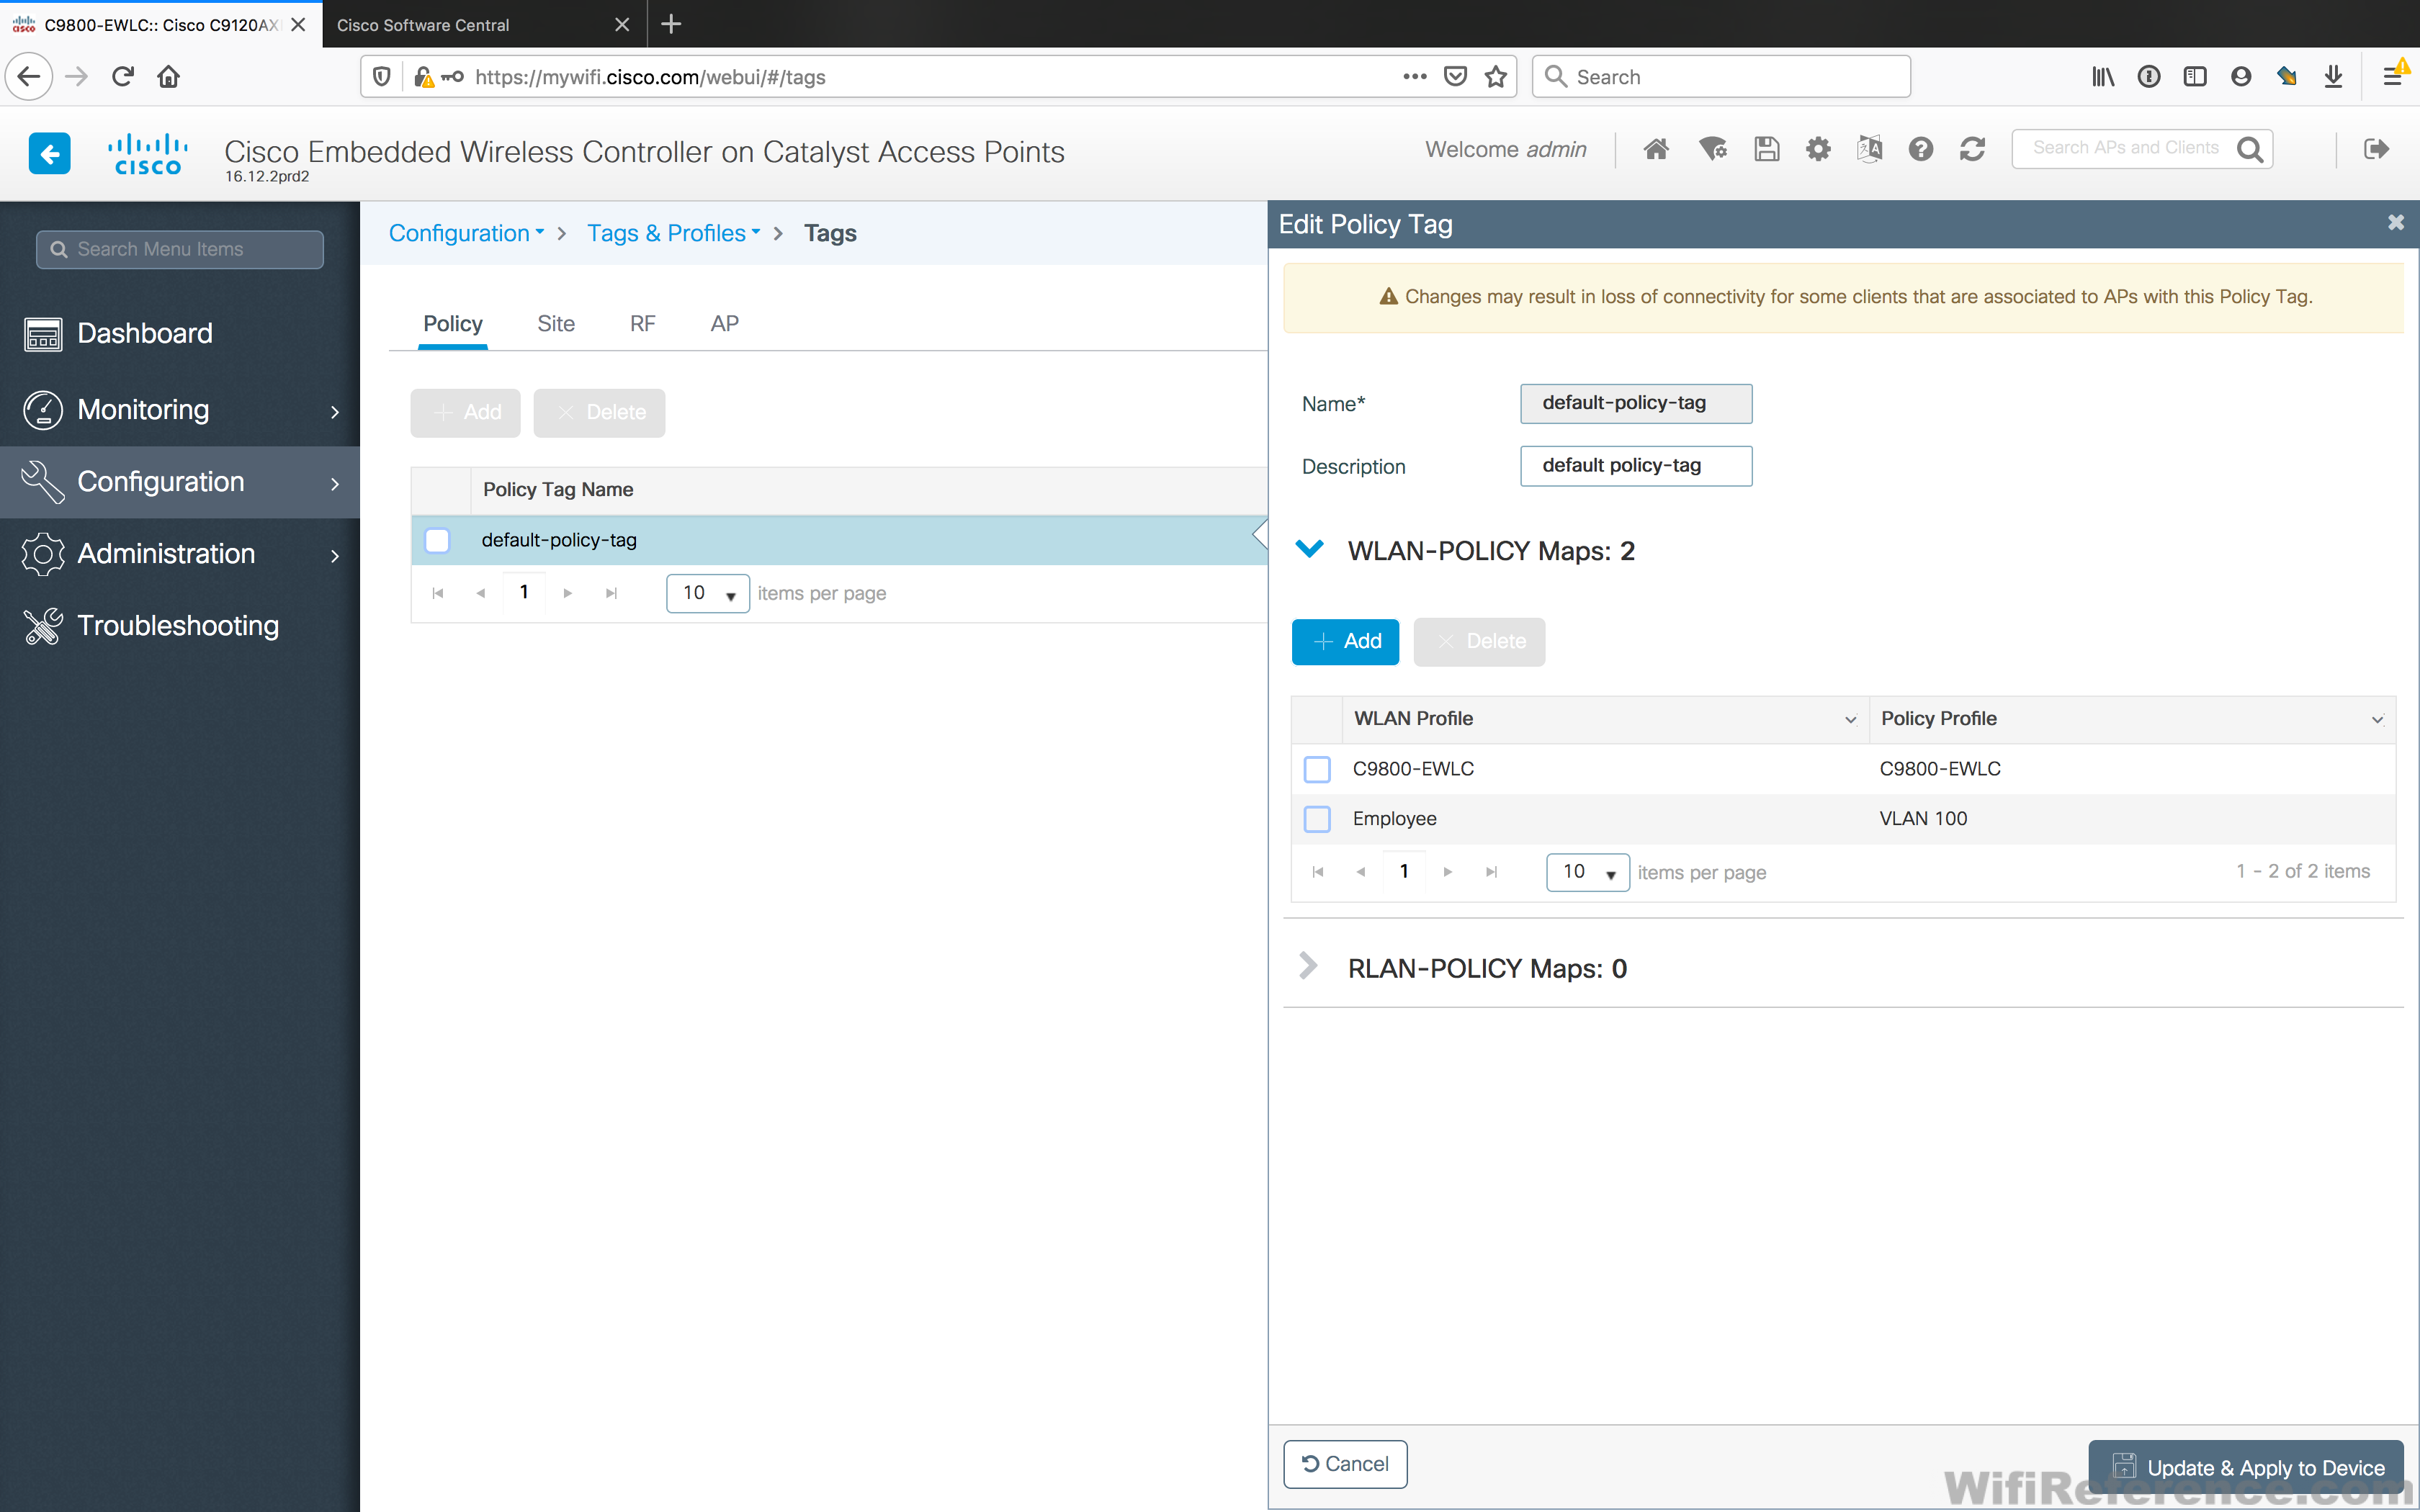
You should see your new WLAN and Policy Profile mappings on the page. Now you can click the Update and Apply to Device button.
Your new WLAN should now show up in the air, and you should be able to connect to it and be placed on the VLAN you specified. Note: The switch port of the EWC AP must be set to allow trunking for this to work.
Configure basic RF/RRM Settings
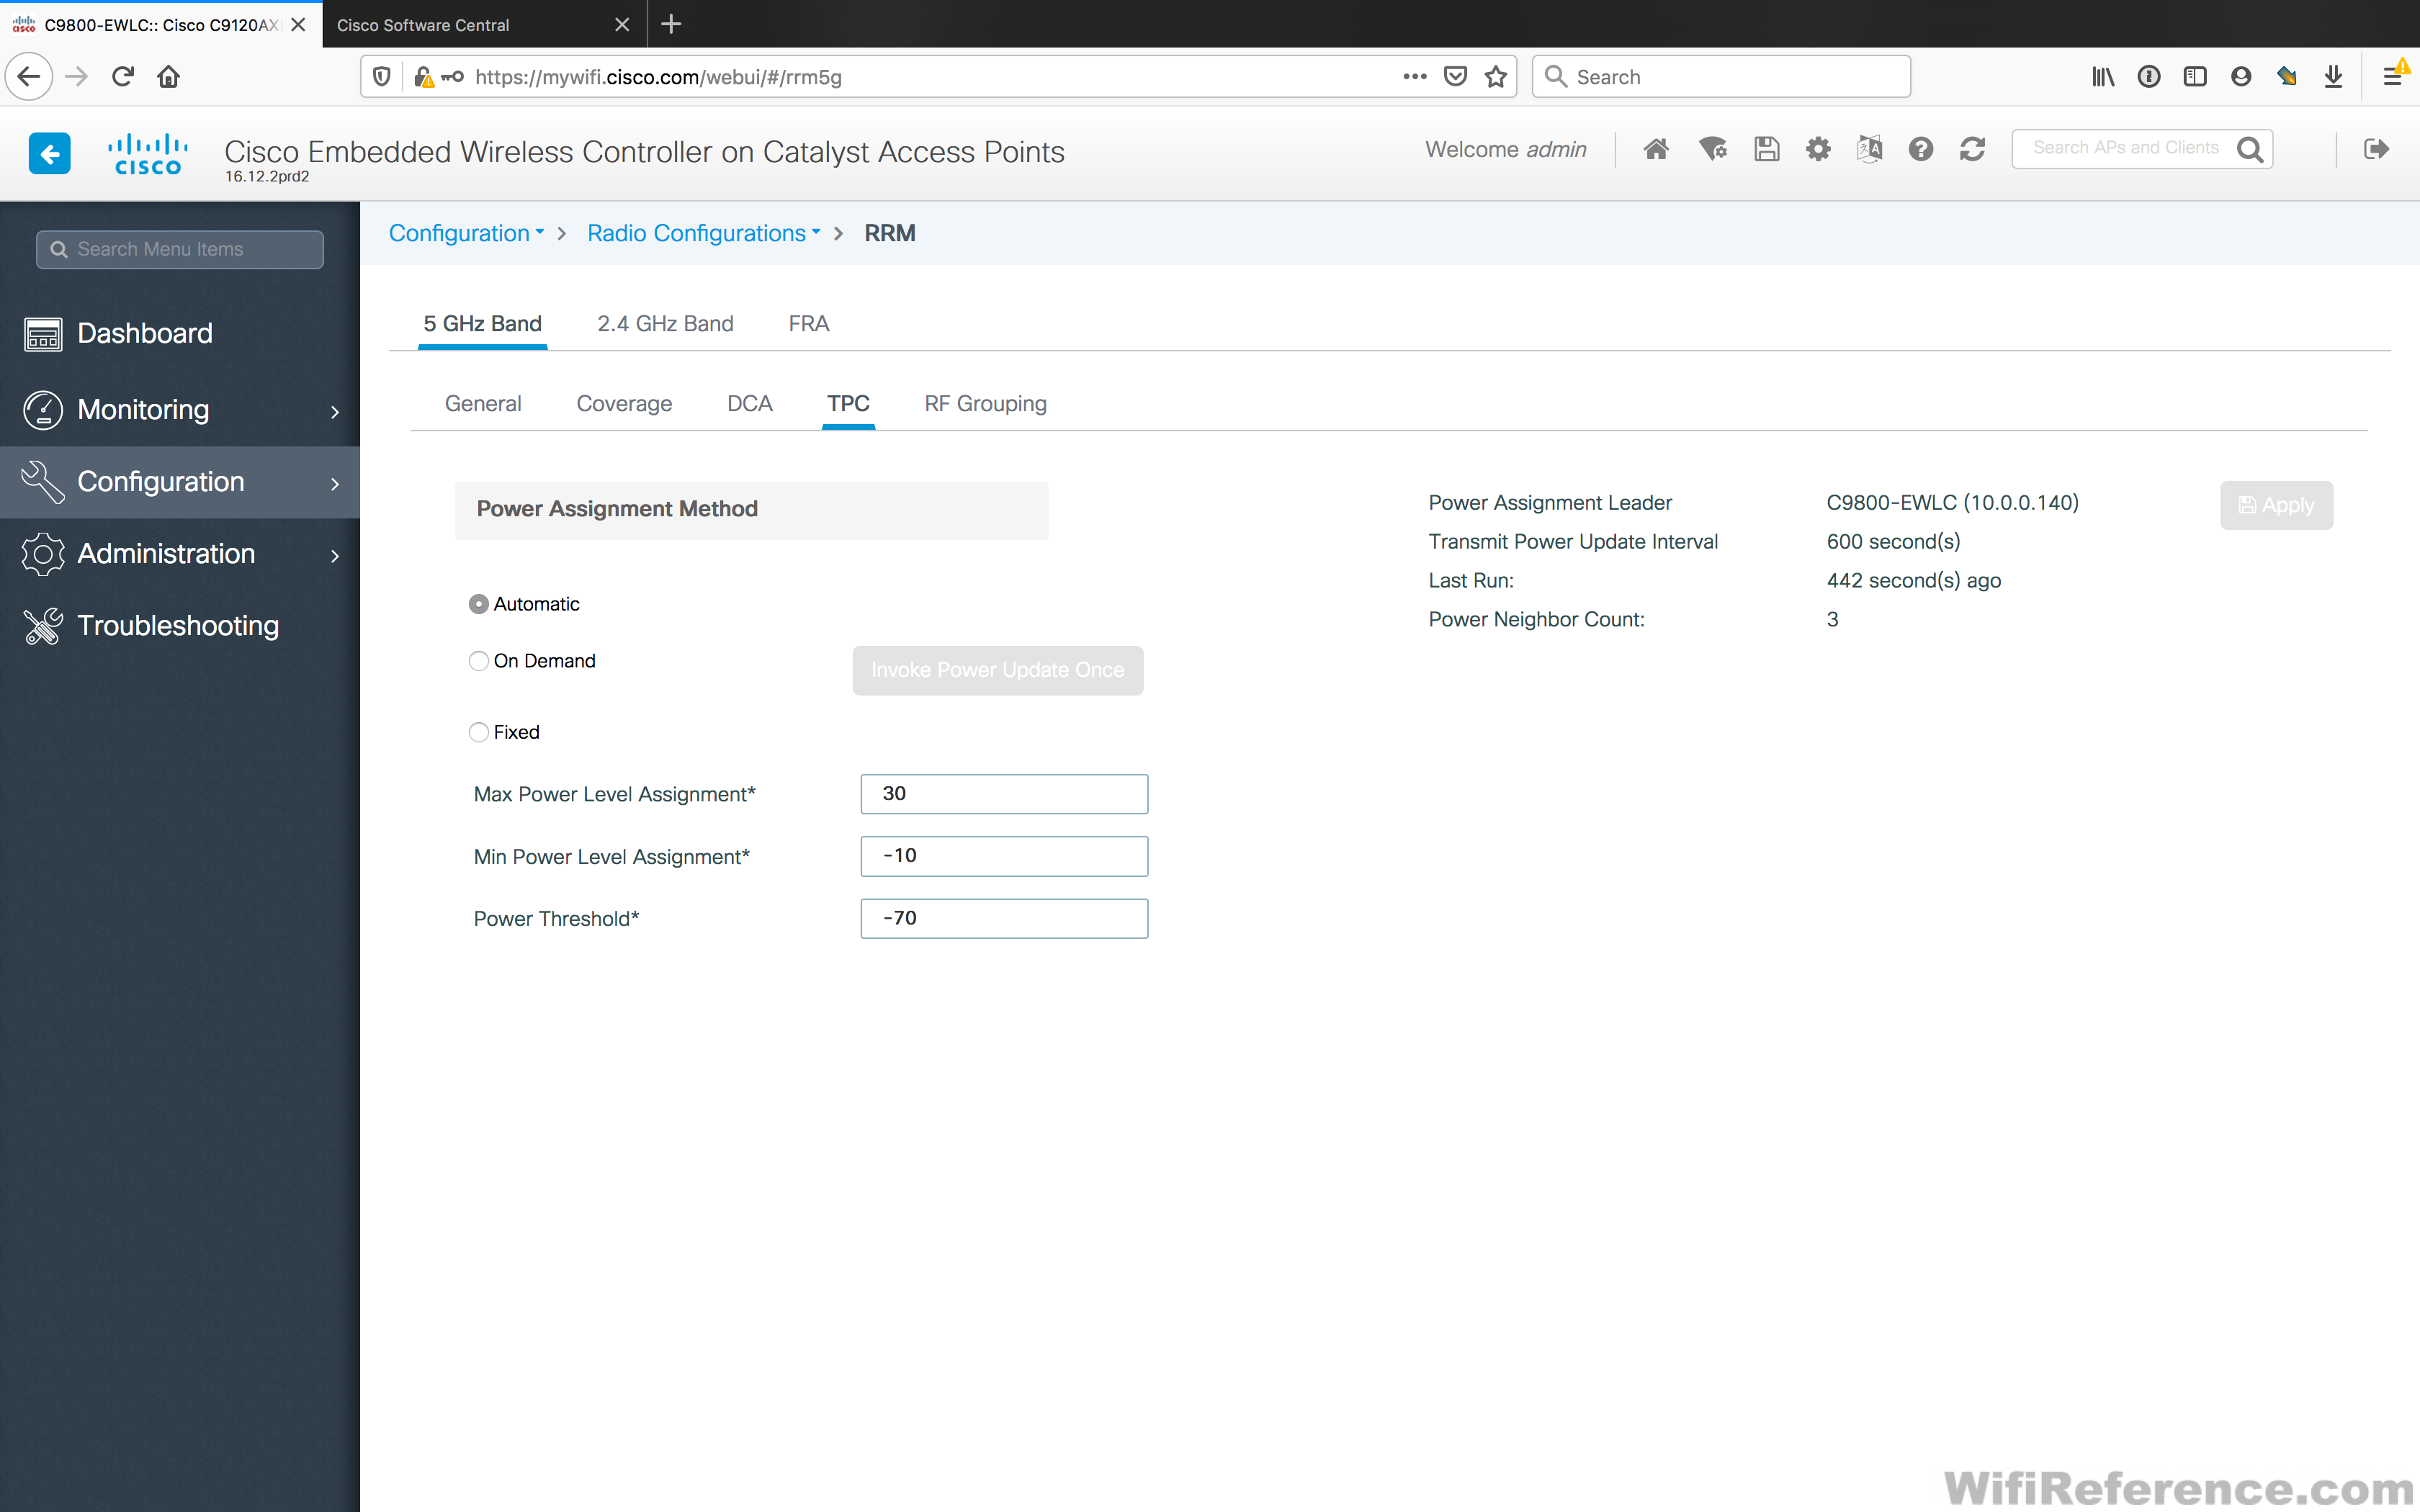
I will show you where these settings are located so that you can modify them. Navigate to Configuration > RRM in the menu

Click on the DCA tab to set your Channel List and Channel Width. Note: You are modifying these settings for 5GHz by default. Click the 2.4GHz Band tab at the top to change the settings for 2.4GHz.

Click on the TPC tab to set the Max and Min TxPower Levels
Conclusion
I feel like the Embedded Wireless Controller is a huge step forward from Mobility Express. It adds a lot of flexibility for small sites that still need the configuration options that a Catalyst 9800 brings to the table.
This guide covers the basic setup of a Catalyst 9800 Embedded Wireless Controller on a Catalyst 9100 Access Point. Hopefully this helps you get things setup in your lab or a small production environment. You can always use the AireOS Configuration Translator (available in the GUI, in Prime or on the Web) to translate portions of your AireOS configuration to the Catalyst 9800 configuration model.
Have you encountered the AAA override issue? I have devices using the iPSK, some of them get right VLAN associated, some of them not, VLAN association seems working in randomly…
Is this issue unique to the EWC? Or do you have this issue on regular Catalyst 9800 controllers as well? I have not personally used iPSK with EWC, but I have had success with it on the regular 9800 controllers. Granted, it’s been a while since I used it.
I don’t have any access points.
Nice technical writing. What can someone do when setting this up in a small work environment? Can this be capable of performing the function of a radius server?
What is the best approach to setting this up for a simple wireless connection?
Thanks,
Ashanabobo
While it is technically capable of performing RADIUS duty, I would not recommend using it for authenticating clients. The simplest way to use EWC for client connections is with a PSK network, or integrated with an external RADIUS server at HQ, etc.
how to add new AP to in EWC?
What configuration should I do on the new access point?