
Cisco Prime Infrastructure 3.3 was released on November 22, 2017, and this new version brings a few notable feature improvements. The feature I’m most excited about is called “Rolling AP Upgrade.” Rolling AP Upgrade allows you to select groups of access points to upgrade in succession, while leaving other access points online, to serve clients during the upgrade. Once the first group of APs is upgraded and back online, it will move on to the next group of APs. The idea is that you will manually group the APs so that other nearby APs can cover the clients while APs are being upgraded. This process can work well enough that clients may not realize the network is being upgraded. However, very sensitive applications may notice a delay as the client roams between APs. I was able to document the process for this article, while connected wirelessly, without ever losing my network connection. Since I am using Adrian Granados’ “Wifi Signal” app on my Macbook, I was able to see each time my connection roamed to another AP.
Many of us that have managed large Cisco Wireless deployments have performed this process manually, in order to minimize the downtime during an upgrade. Prime is essentially performing all of those steps automatically. There isn’t any “magic” to this solution, but it is awesome to be able to just sit back and enjoy the show. It’s a big improvement from the days of having to monitor the status of all of the APs manually, at each step in the process!
Rolling AP Upgrade Overview and Requirements
- You will need to have an N+1 WLC (not in SSO mode) to shuffle the APs to/from
- This will be the temporary (or permanent) destination of the APs during the Rolling AP Upgrade process
- This WLC needs to be capable of running the code that you want to run on your primary WLC
- (This posed a problem in my home lab, because my 2504 isn’t capable of running 8.6 code. As a result, you may notice that I am actually doing a “downgrade” on my WLC, in order to document this process)
- You need to manually upgrade the secondary WLC to the new version of code; the Rolling AP Upgrade process doesn’t do that for you (although, it does upgrade the primary WLC)
- This WLC does not need to be the same model as the primary WLC(s)
- Configuration on all involved WLCs needs to be fairly consistent
- Serving the same SSIDs
- Consistent AP Groups and RF Profiles, etc.
- You can have up to 10 Rolling AP Upgrade Groups per WLC, and up to 1,000 APs in each group (these are soft limits)
- Prime Infrastructure will remember these groups, so that the next time you go through this process, you can simply order the WLCs/Groups and begin the process.
- Contrary to much of Cisco’s documentation, this process does NOT require WLC 8.6 code. The process itself is handled entirely from Prime Infrastructure. I’m not sure how old the WLC code can be, but it stands to reason that it could be fairly old. I was able to successfully complete the process with WLC 8.5 code.
- This process will wipe out the existing Primary/Secondary/Tertiary “High Availability” config in the APs that are used in this process. When it automatically moves the APs from one controller to the next, it reconfigures the Primary WLC for the AP, and subsequently clears the Secondary and Tertiary WLCs that may have been configured on the AP. Unfortunately, it does not restore these values when the process is complete.
Step-by-Step Guide
It is actually a fairly manual process, the first time you do it. This is both good, and bad. Some might wish that Prime Infrastructure could automatically select the AP Upgrade Groups for you. However, no one knows your environment better than you, and it’s probably best that you are involved when selecting the APs in each AP Upgrade Group.
Step 0 – Prerequisites
You need to ensure that all of the following items are in place, before beginning the upgrades
- The secondary WLC has already been upgraded to the new code
- All WLCs have similar configurations (SSIDs, AP Groups, RF Profiles, etc.), so that when the APs migrate between them, they can consistently serve clients
- All WLCs are configured to send AP Register SNMP Traps to Prime Infrastructure


Step 1 – Select APs to be included in the first Rolling AP Upgrade Group
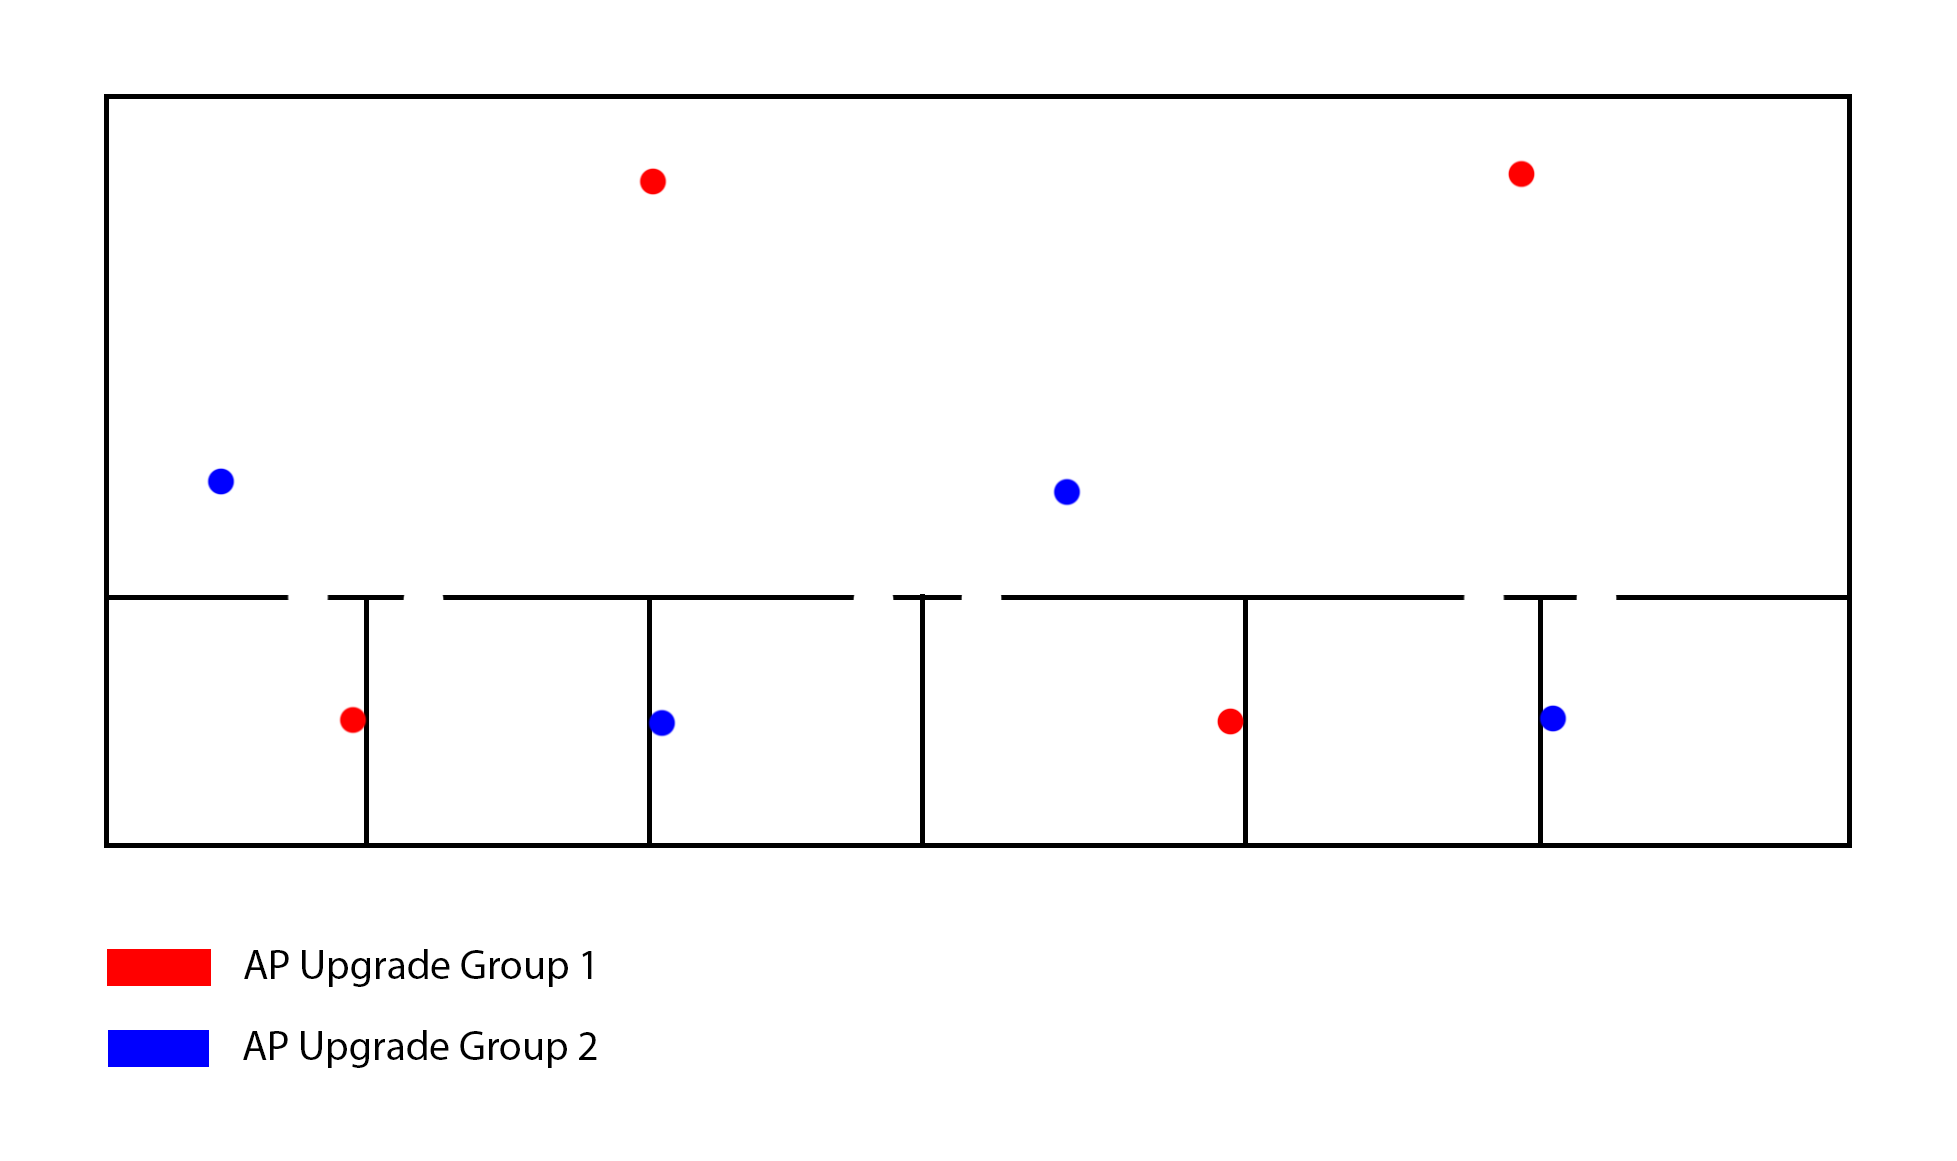
Now that you’ve completely the prerequisites, you can move on to creating the Rolling AP Upgrade Groups. AP Upgrade Groups are different from AP Groups, and RF Groups. These groups are used for the sole purpose of dividing the affected “outage” area during a Rolling AP Upgrade. These groups should each include APs that have other APs nearby for client coverage. Think of it as a “salt and pepper” approach. For example, if your APs are lined up down a hallway (circa 2002), choosing every other AP for the first group, and then the remaining APs for the second group, would be a good place to start. You can have up to 10 AP Upgrade Groups per WLC, so you could get quite creative with this, if you want. The WLC will not take down the next group of APs, until the current group of APs is back online.
Here is a very simple map showing one way to approach AP Upgrade Groups. Notice how the APs are split in such a way that coverage would likely be maintained (albeit with reduced signal and data rate) during the Rolling AP Upgrade process.
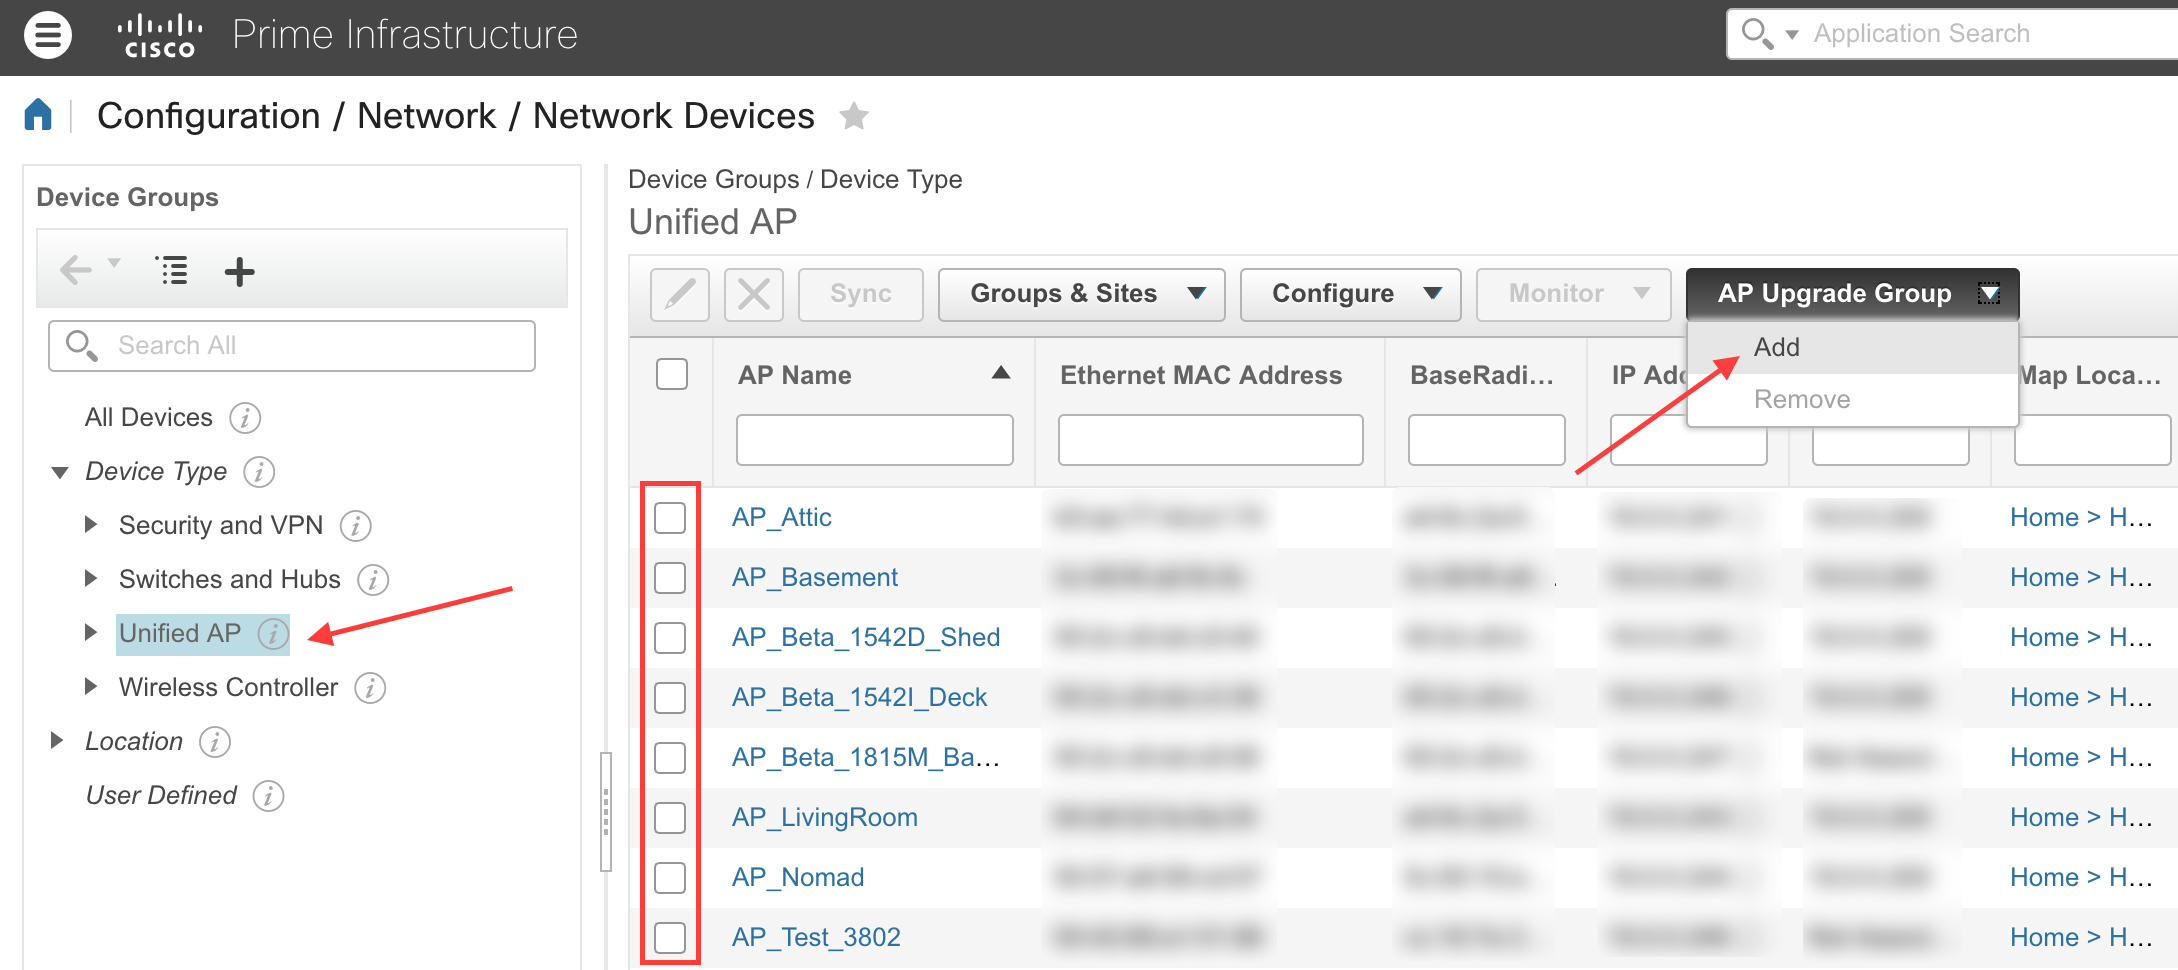
Now you need to select the APs that you wish to include in the first group. In Prime Infrastructure, click the top-left menu button, and choose Configuration > Network > Network Devices

This will initially bring to you a list of all of your WLCs and Switches, etc. Select the Unified AP category on the left side, to be brought to a list of your APs. Now you can add APs to the first group. Select the APs that you wish to be included in the first group, and choose AP Upgrade Group > Add
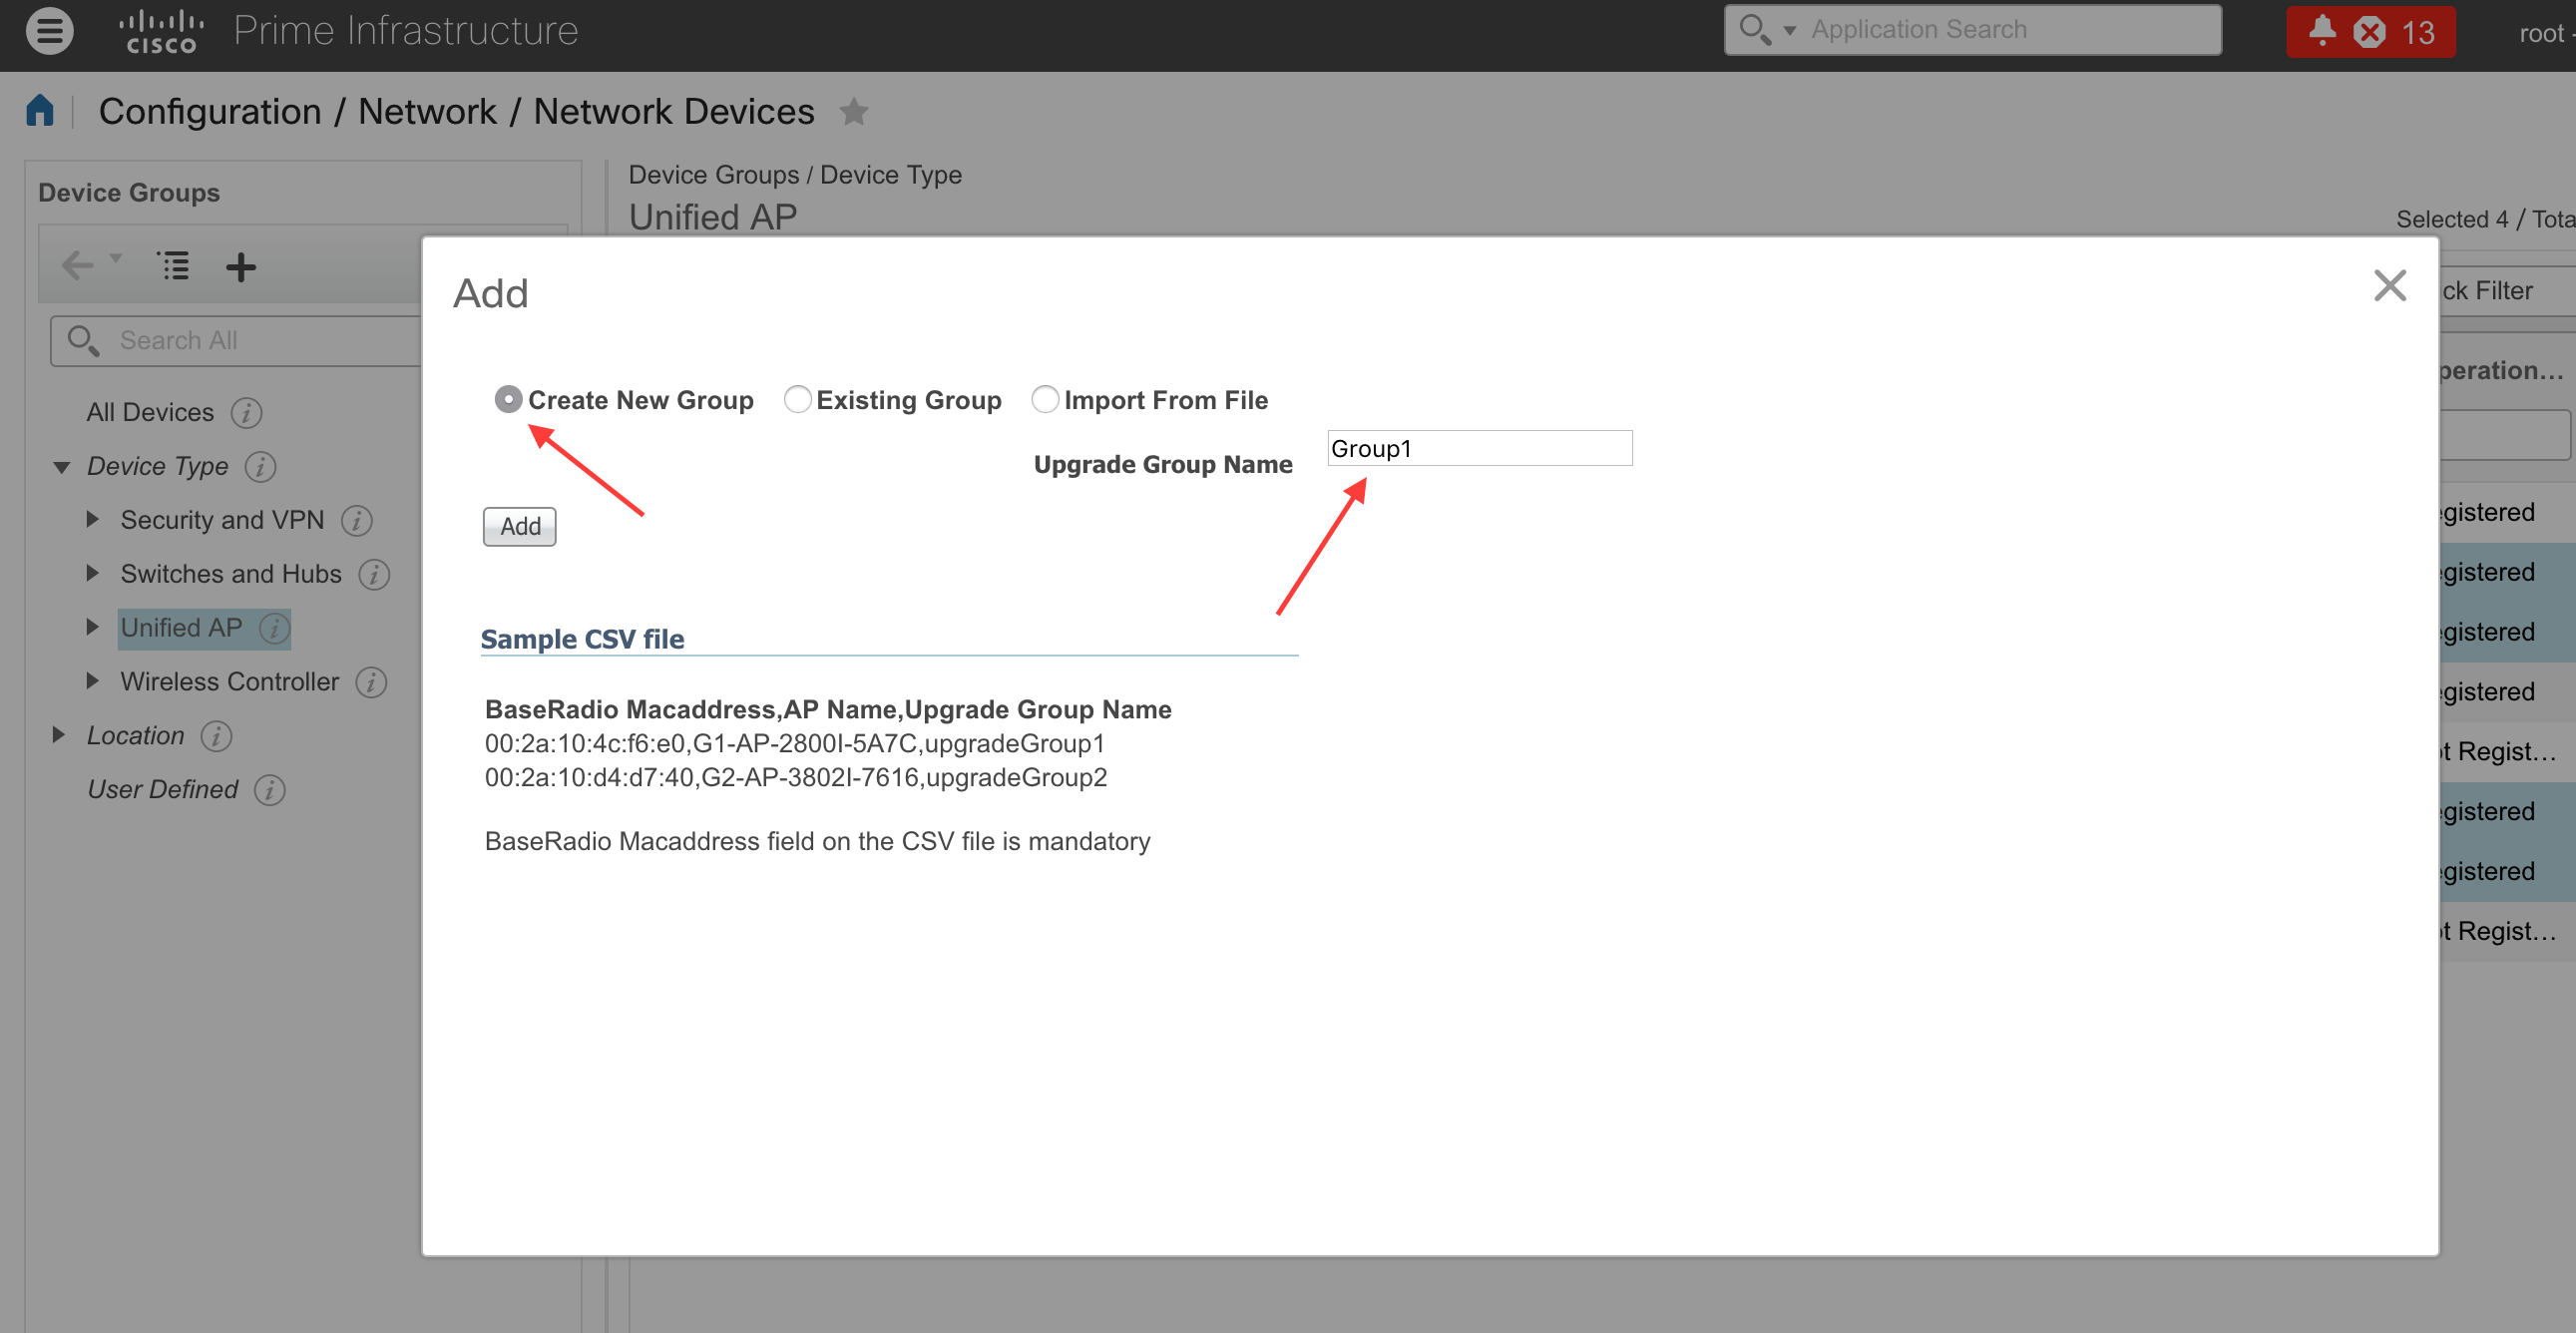
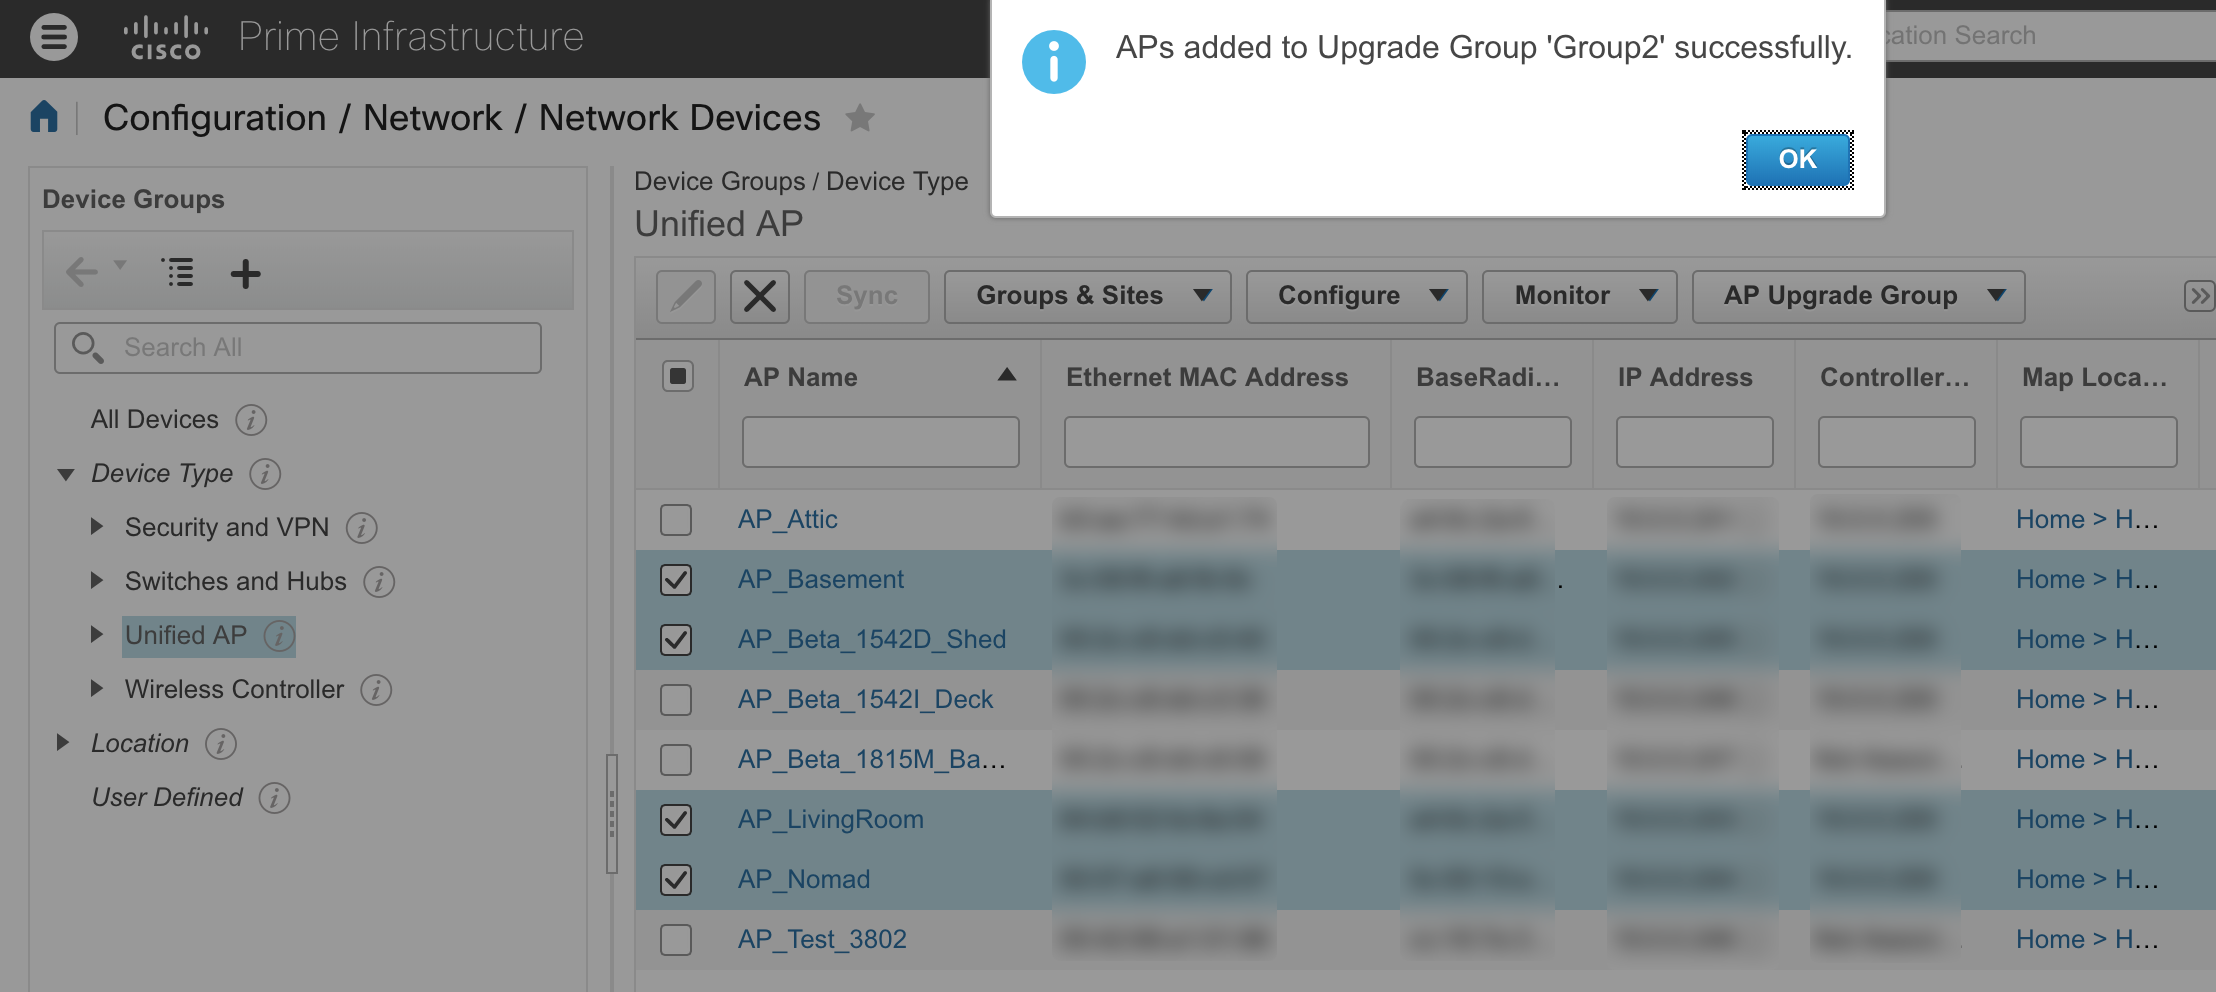
Step 2 – Create the First Rolling AP Upgrade Group
If you have used the process in the past, you can add APs to existing groups. Assuming this is the first time you are going through this process, you’ll need to create new groups. The groups can be named whatever you want, so make them descriptive. I simply called them Group1 and Group2, in this example. You’ll only need to do this once, as the group membership is persistent.
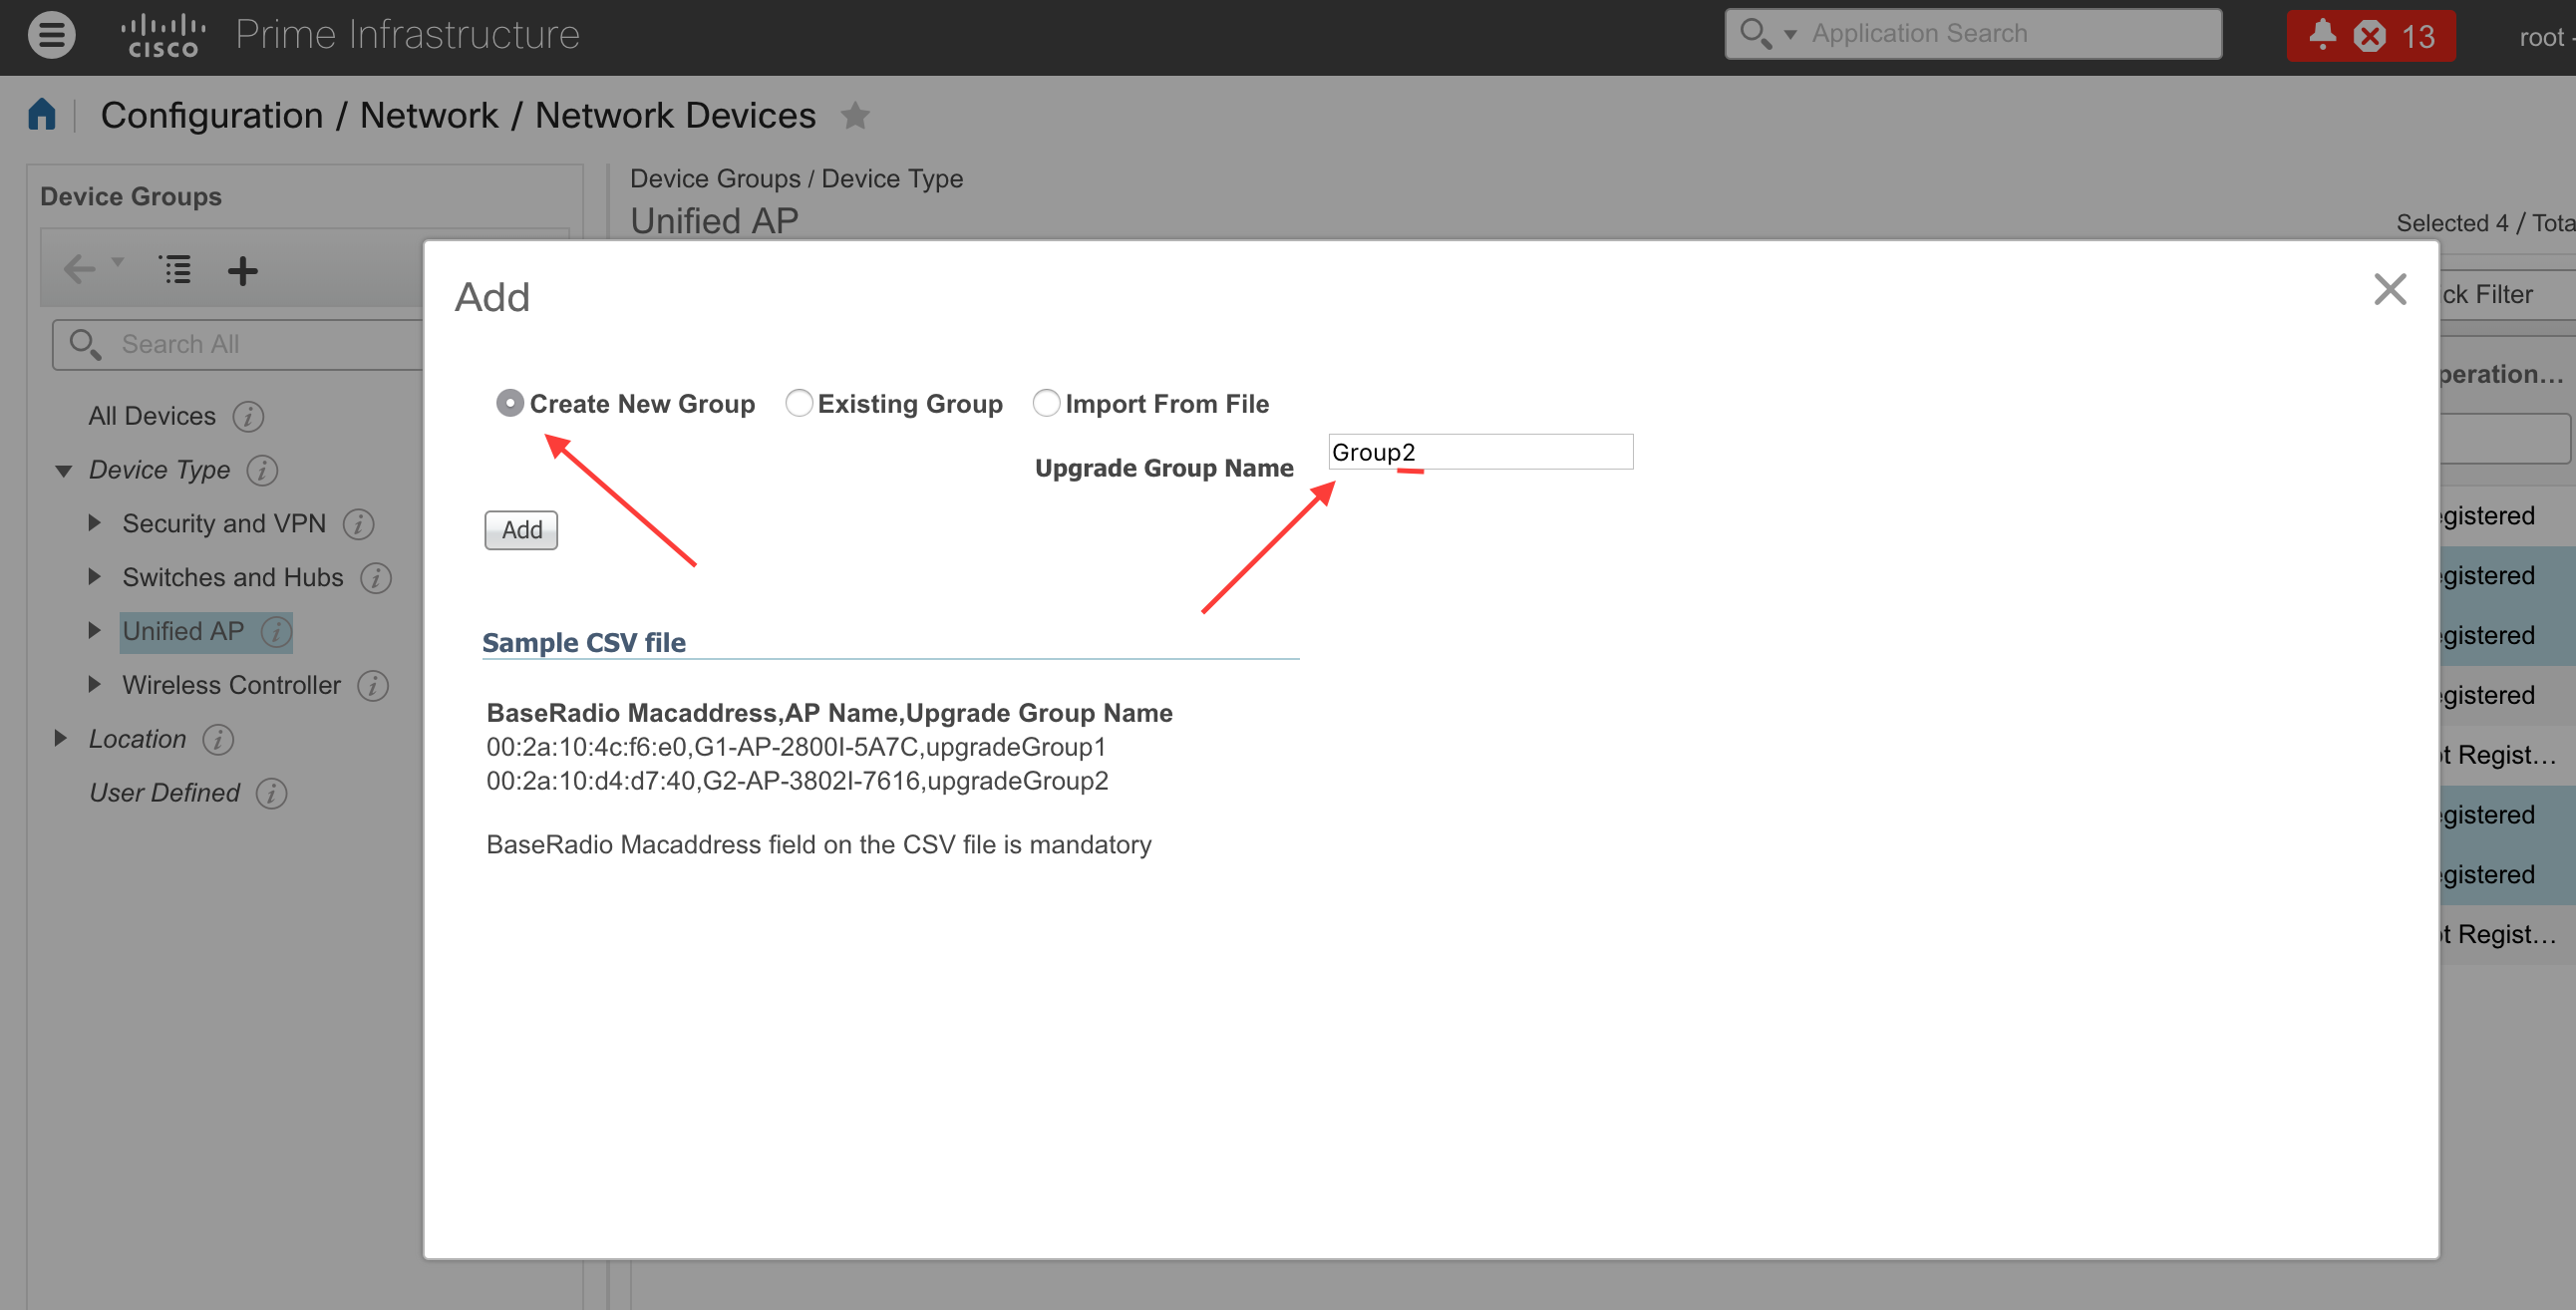
Step 3 – Create the Second Rolling AP Upgrade Group
Select another group of APs to be used in the second group. If you are only creating 2 groups, this should be the remainder of your APs (the ones not selected for the first group).
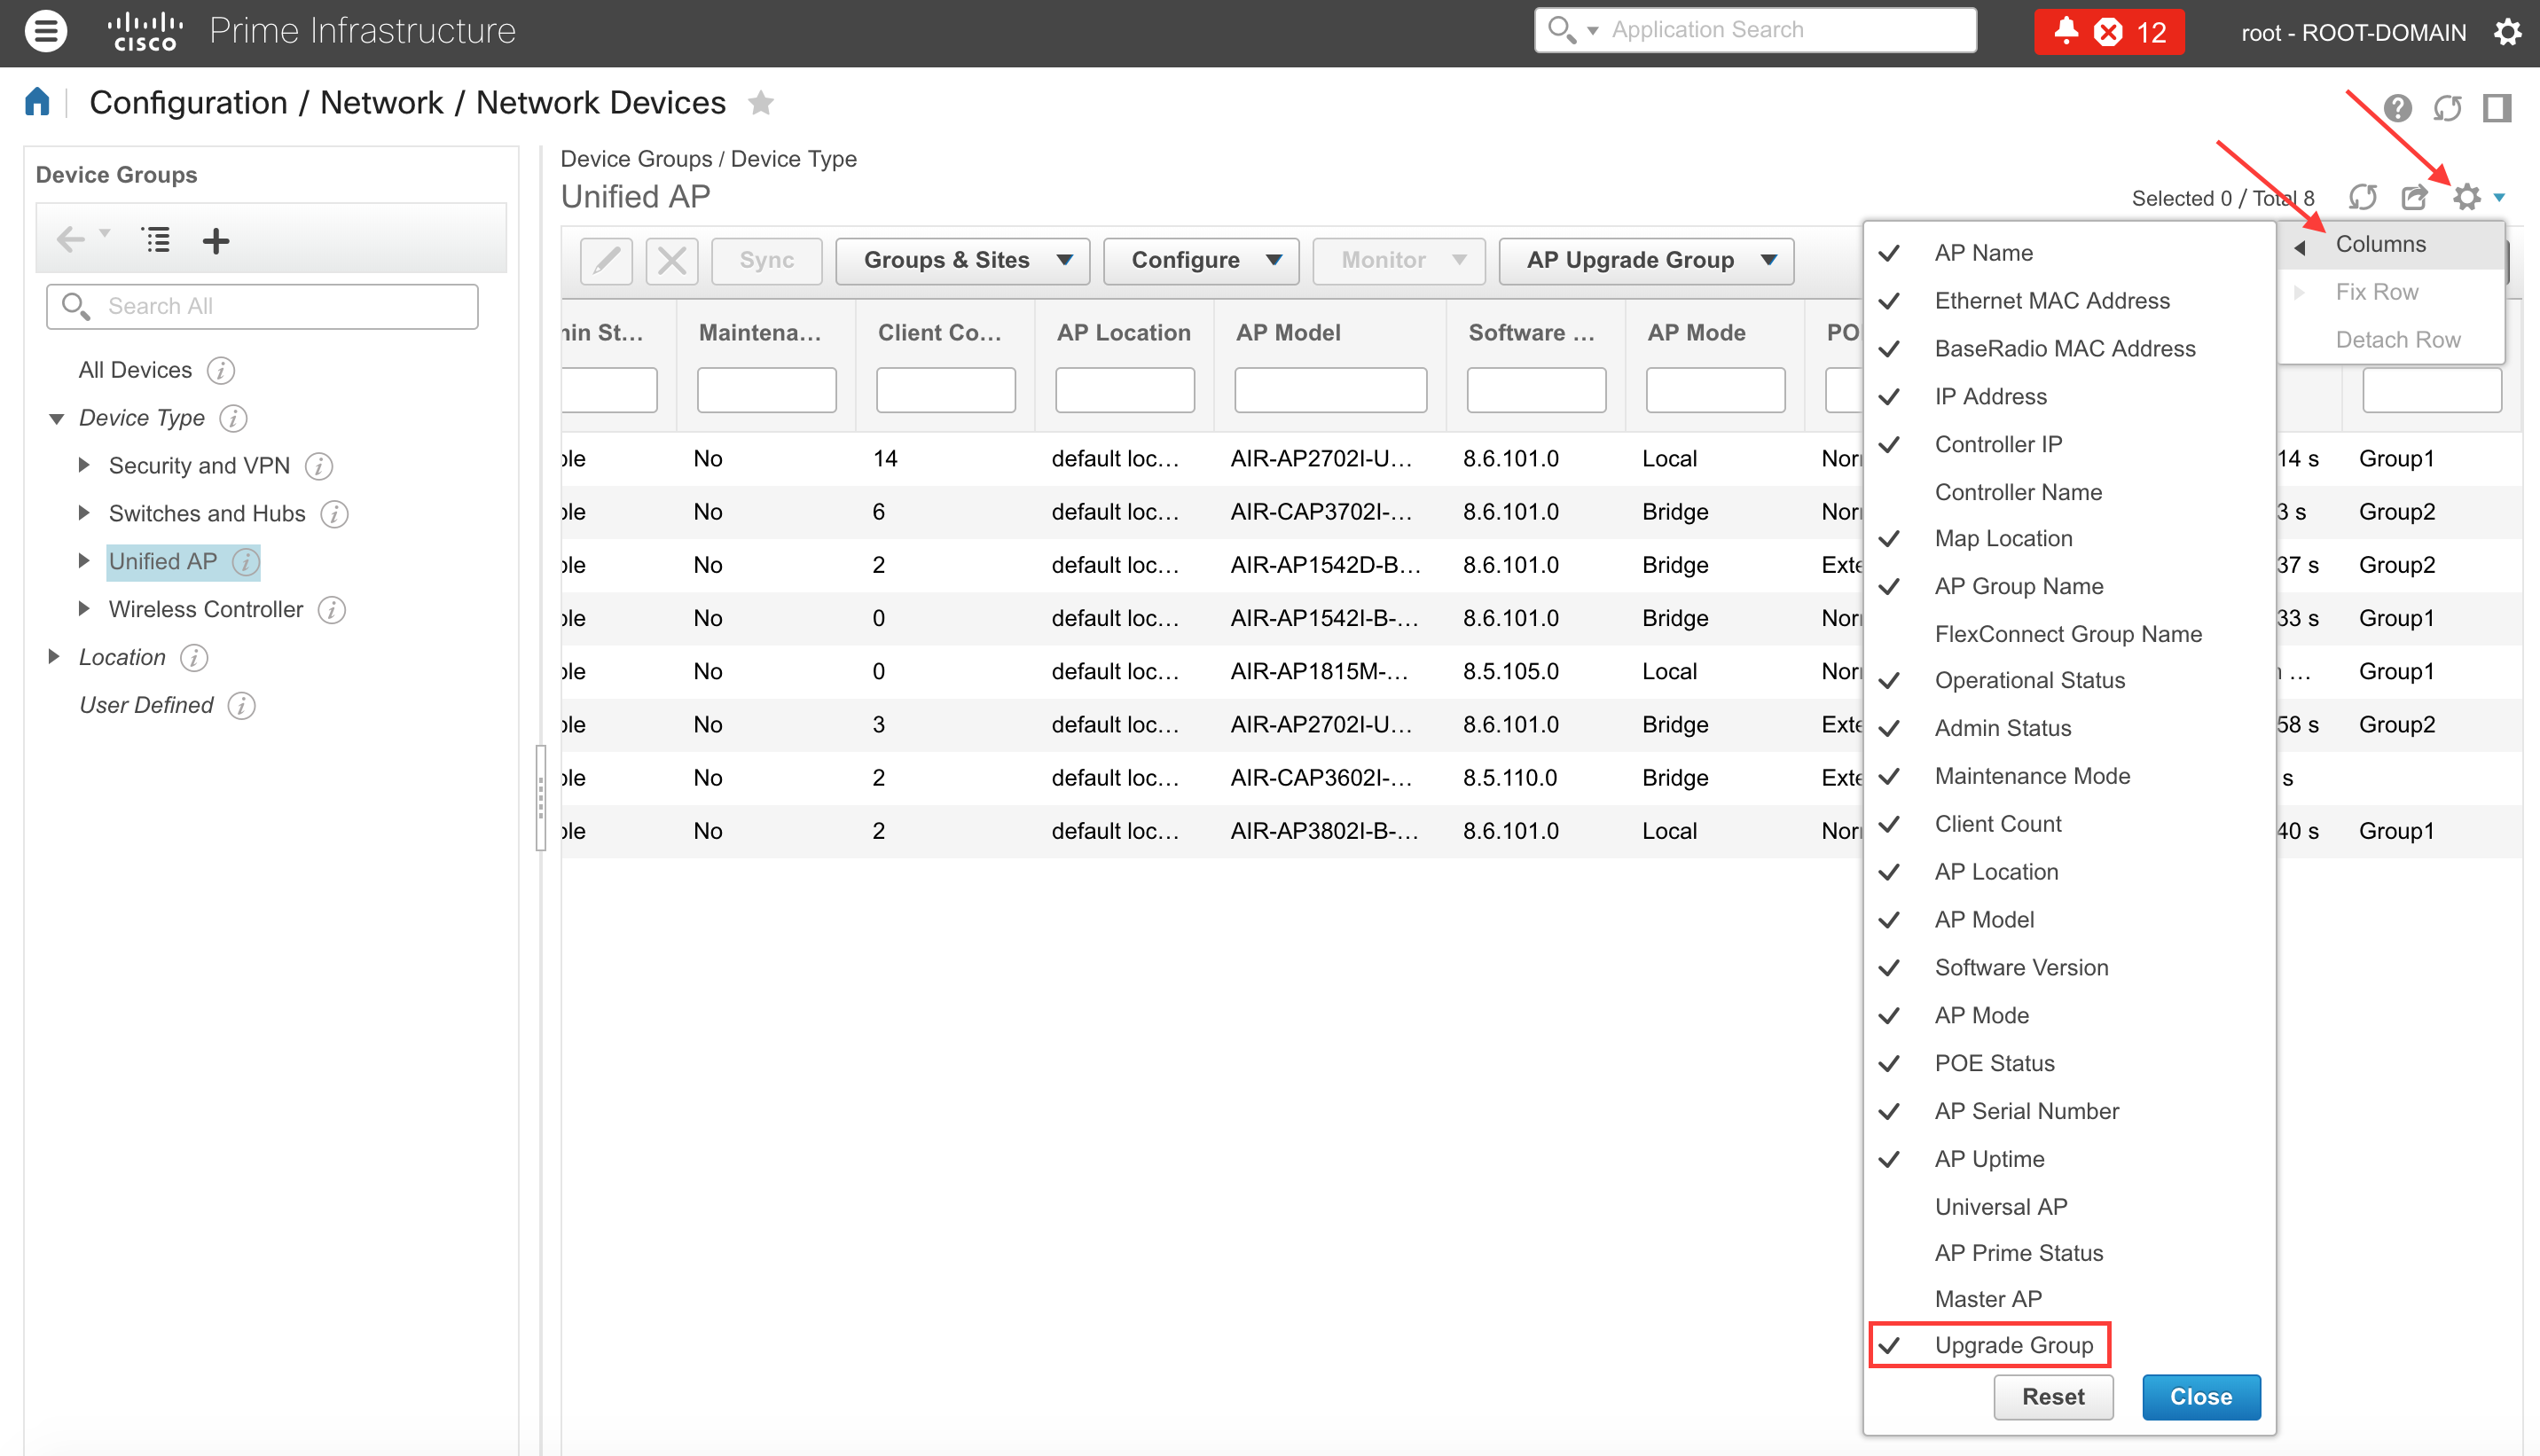
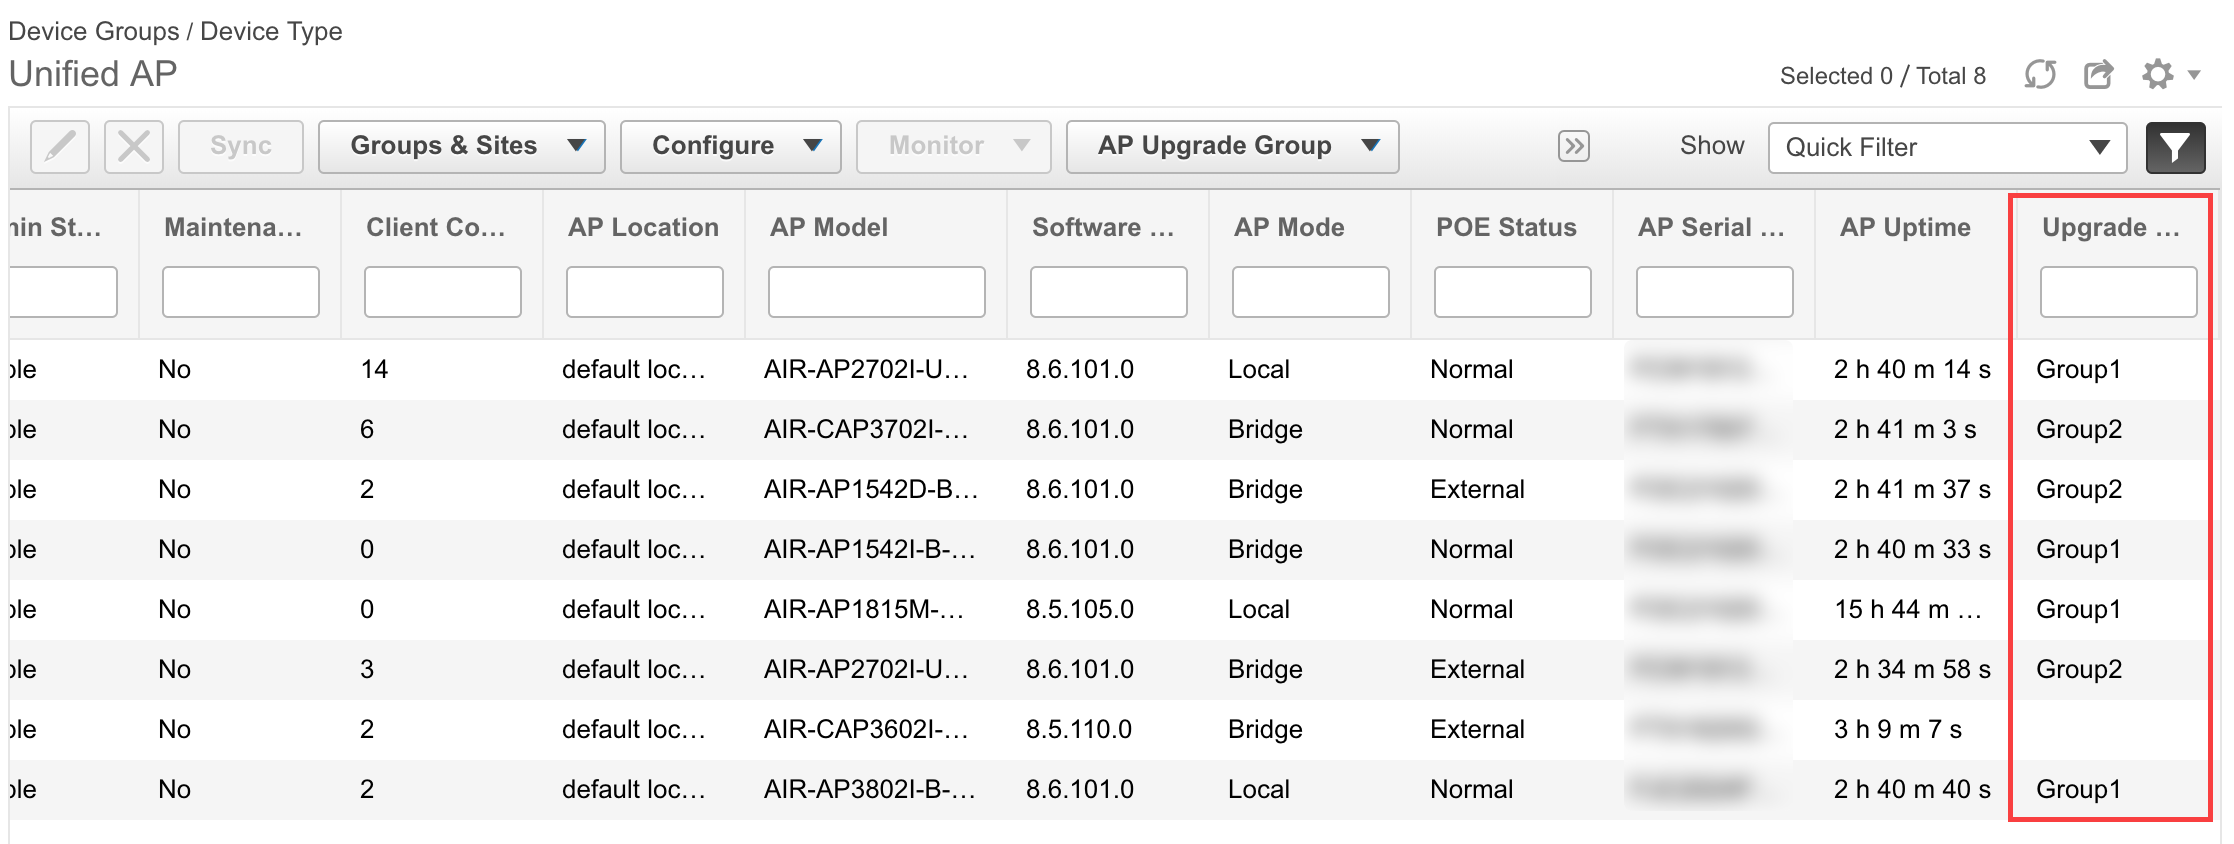
If you’d like to see the current AP Upgrade Group for each AP, you’ll need to make sure the “Upgrade Group” column is enabled in Prime Infrastructure. Once the column is enabled, you can see the group membership of each AP.
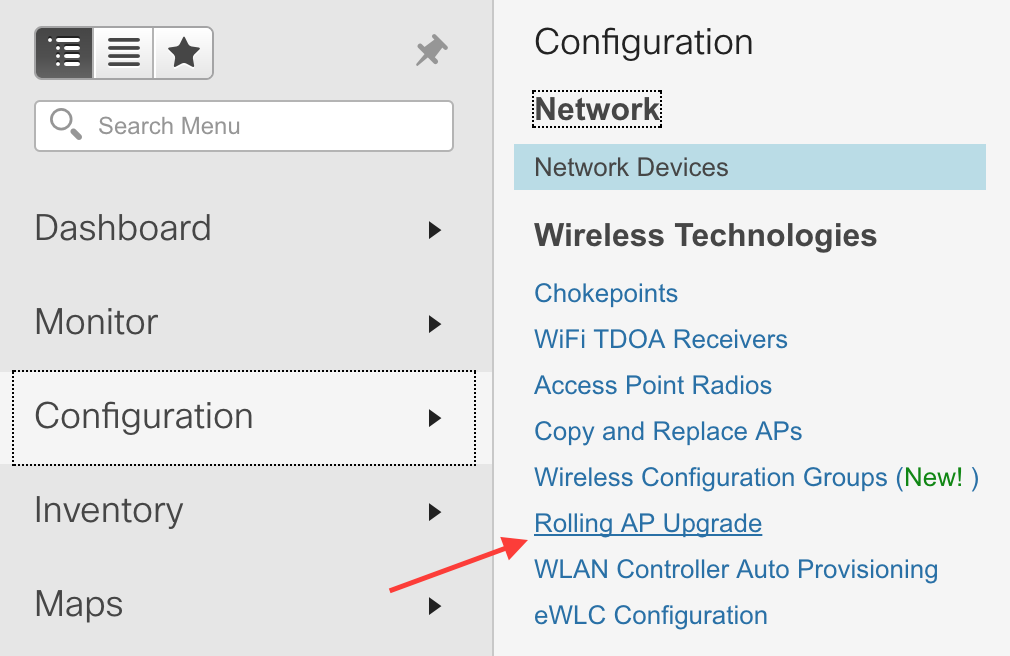
Step 4 – Navigate to the Rolling AP Upgrade Menu
Now that the AP Upgrade Groups are created, you can actually begin the Rolling AP Upgrade process. Start by clicking on the top-left menu in Prime Infrastructure, and choose Configuration > Wireless Technologies > Rolling AP Upgrade.
Step 5 – Select the WLCs and the Order of AP Upgrade Groups
At this stage, you will be selecting the Primary WLC, and the N+1 WLC (which APs will be shuffled to). The Primary WLC is the WLC that APs will be moved from, then it will be upgraded and rebooted. The N+1 WLC is the WLC that the APs will be moved to (either temporarily or permanently), during this process. The N+1 controller should already be upgraded to the new version of code (manually, by you). This screen will show the current version of both WLCs.
Note: If the WLC versions are out of date, you can “Sync” the status on the Network Devices screen.

Decide whether you want the APs to remain on the N+1 WLC, or moved back to the Primary WLC, with the check box near the top of the page.
Choose the order in which you would like the AP Upgrade Groups to be processed. Prime will pre-download code to all of the APs at the same time, but it will not reboot APs in the next group, until the current group is completely upgraded.
Once you’ve selected your WLCs, and the order of the AP Upgrade Groups, you will need to configure the file transfer for the Primary WLC Upgrade. Unfortunately, this does not employ the Image Repository within Prime Infrastructure, so you must manually select the server (which can be Prime), transfer type, and the filename.
I ran into a UI bug at this point, that will likely impact you, as well. The text field for the filename box is not large enough to contain the filename for pretty much any version of WLC code. You will notice this if you pay careful attention to the filename, after you paste it into the box. In my case, it stripped the extension off of the file:
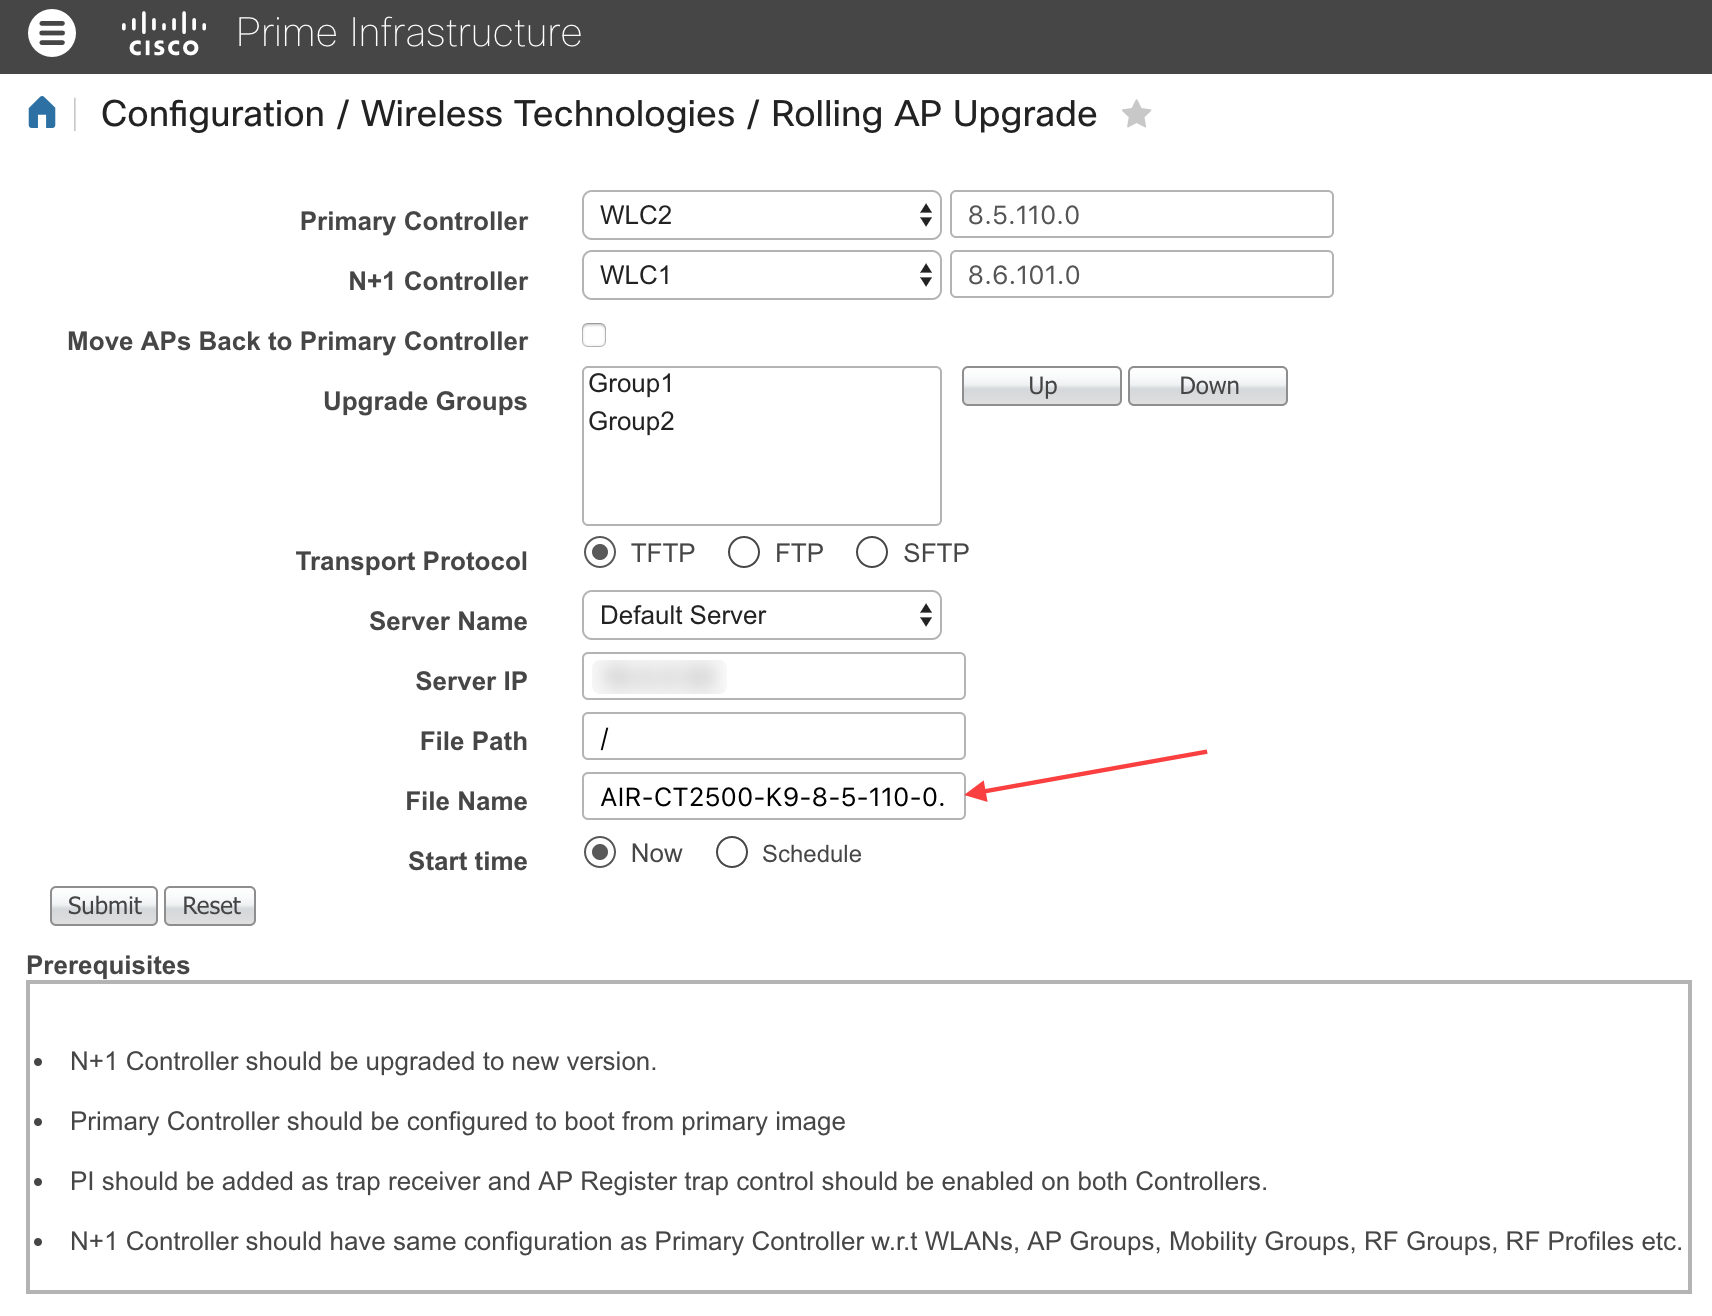
As a result, you will need to rename the file to something shorter than the default name. (Pay no attention to the fact that the failed file name was for a 2504, and the new filename is for a 3504. This is because I took screen shots during different attempts at this process.)
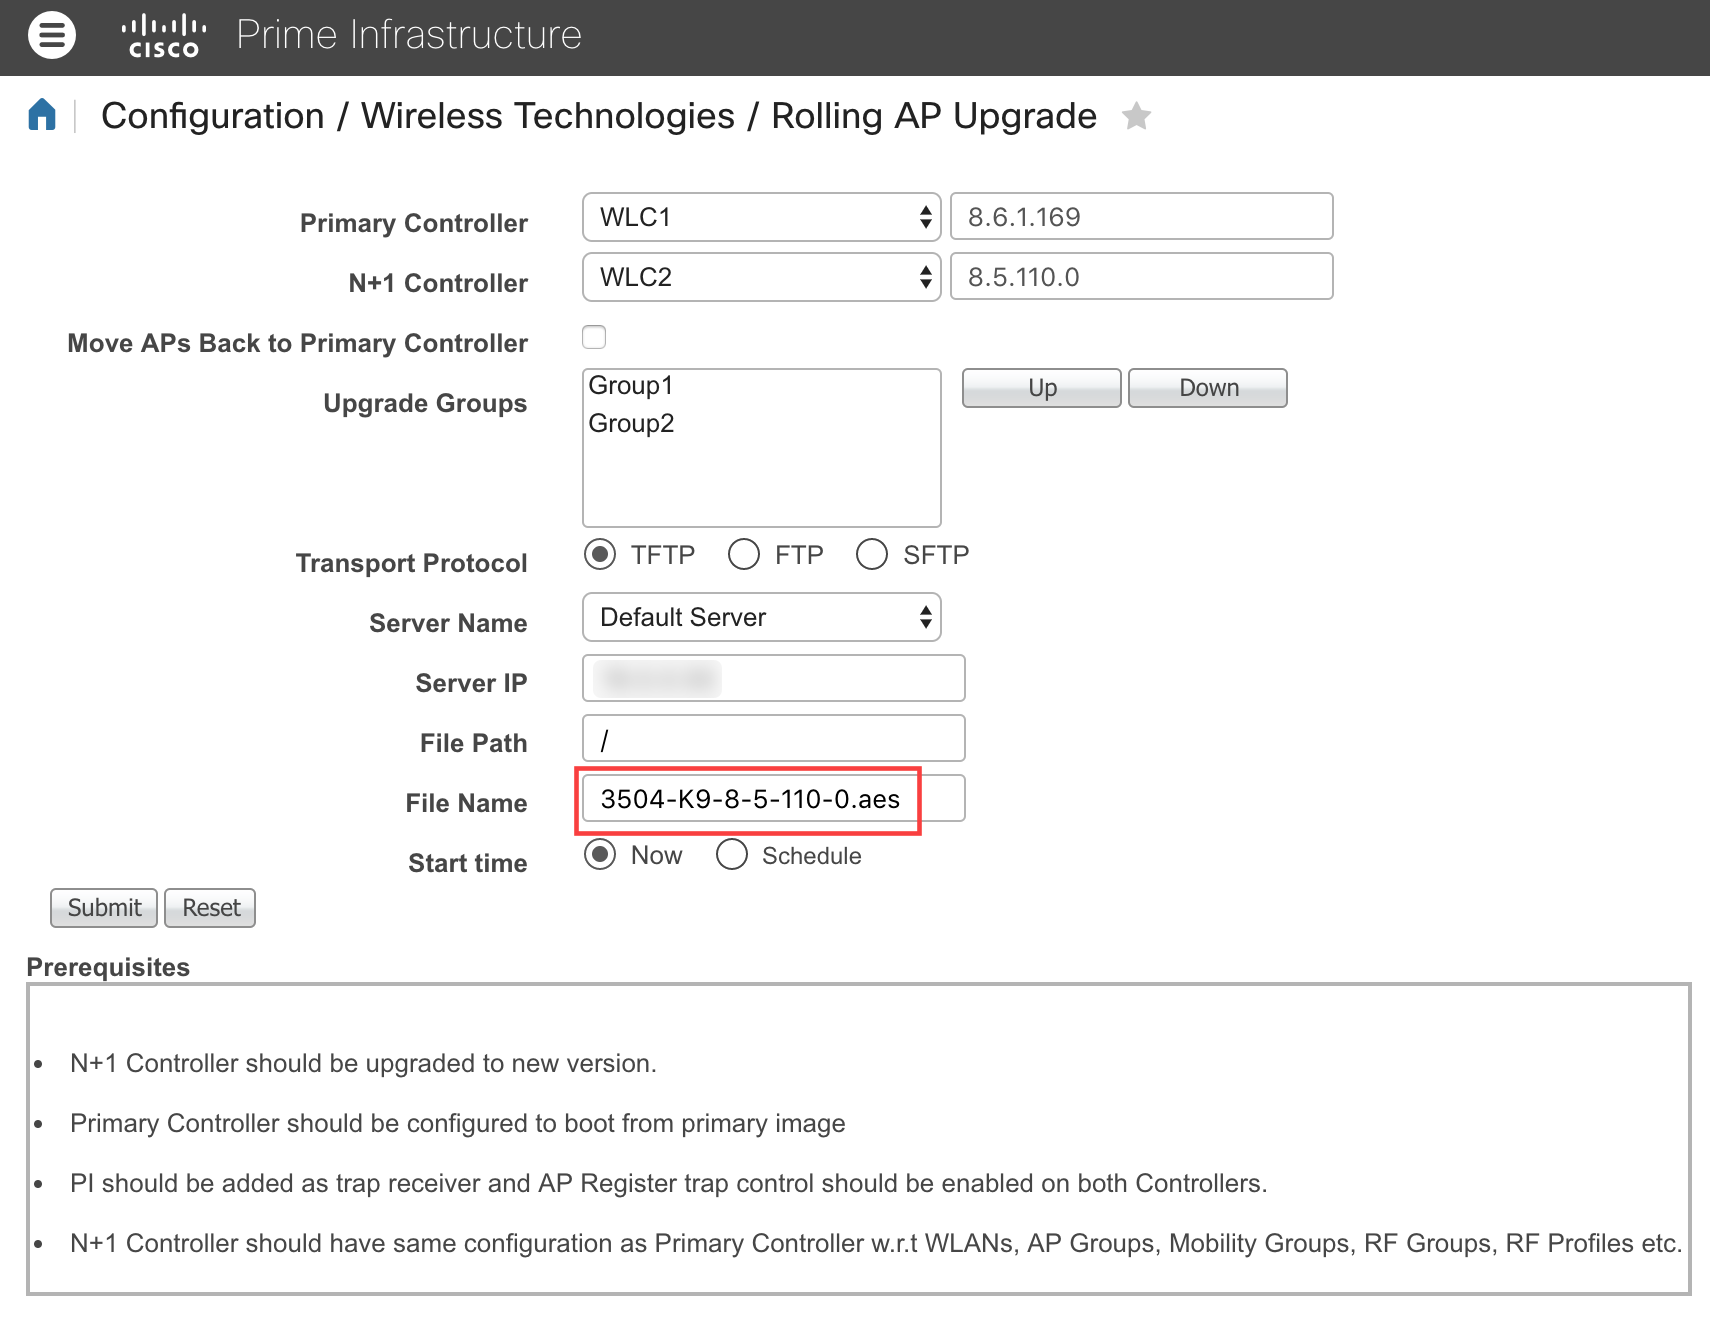
You can see the shorter filename above, which also includes the file extension. If you don’t rename the file, you will get a very non-intuitive error in the job dashboard, which I will be shown in a later step.
Click Submit, and your job will begin.
Step 6 – Monitor the Job in the Job Dashboard
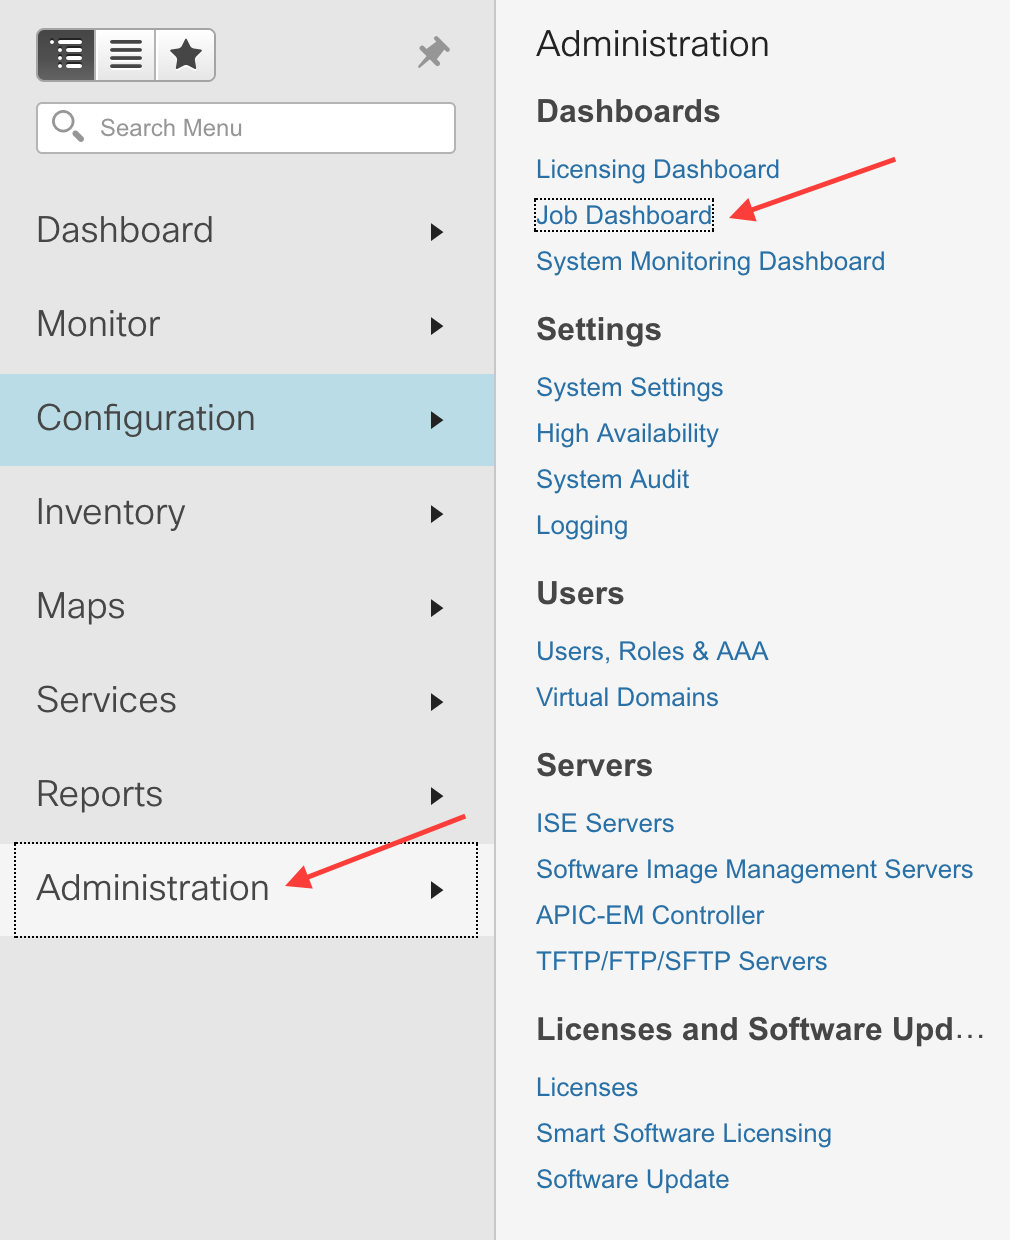
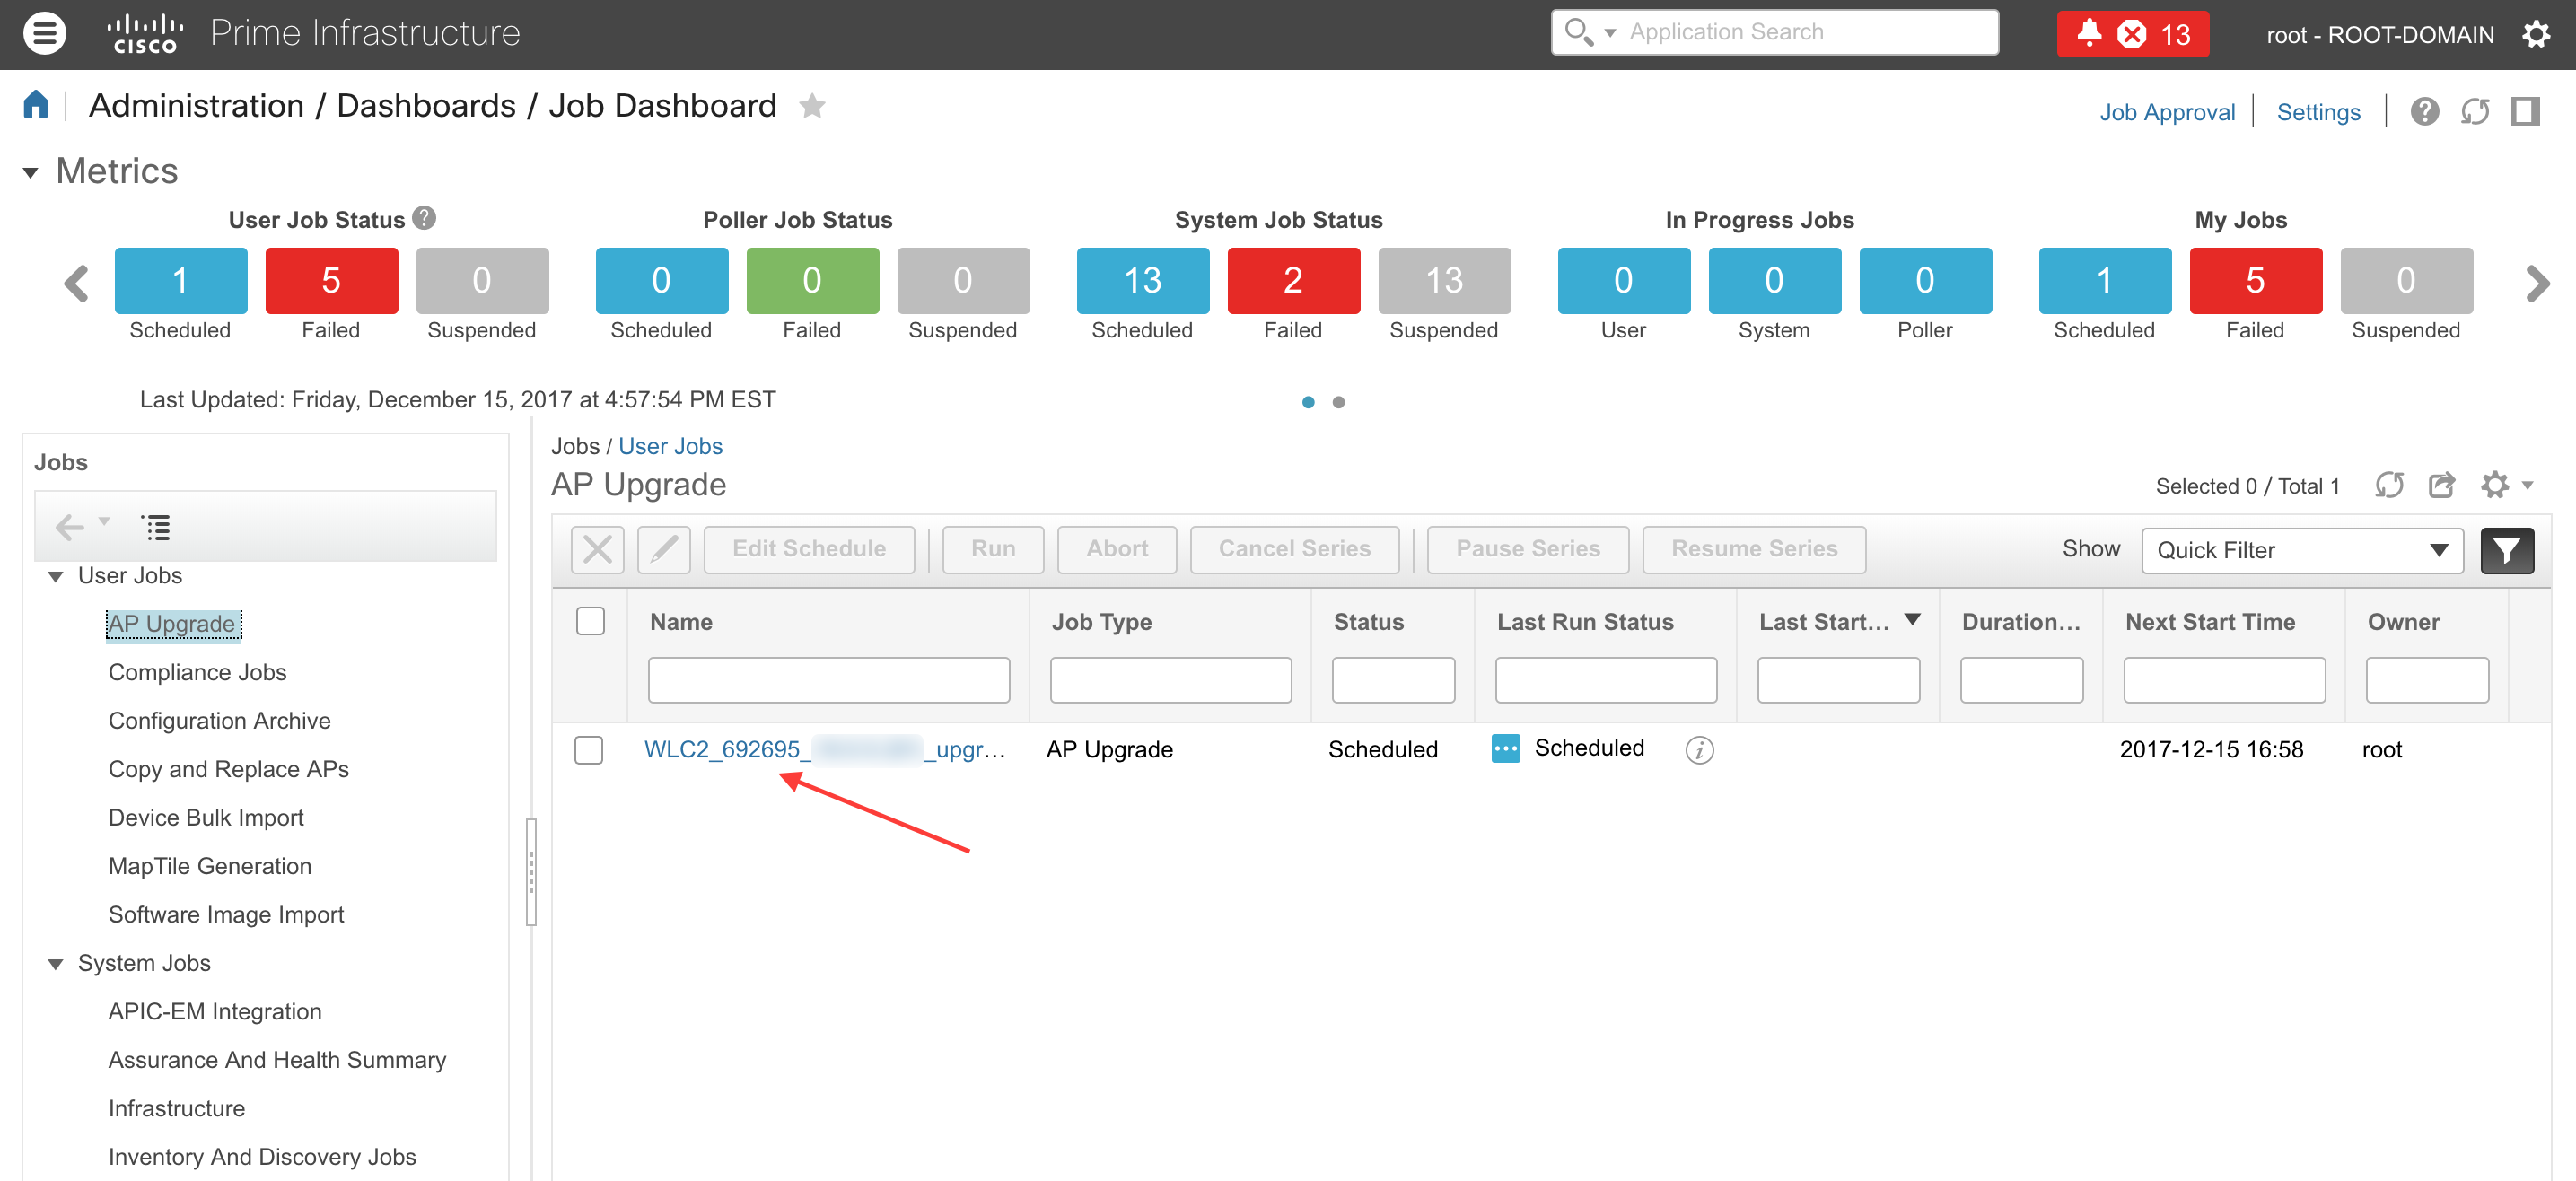
Now that your job has been submitted, you should monitor its progress. To do this, you need to visit the Job Dashboard, by clicking the top-left menu, then Administration > Job Dashboard
In the Job Dashboard, you should see your newly created job. Initially, it will say “Scheduled,” but will soon transition to a “Running” state.
Click on the job name to see the detailed status. Here I will first show you what it looks like when the job fails, due to the filename bug I wrote about in Step 5:
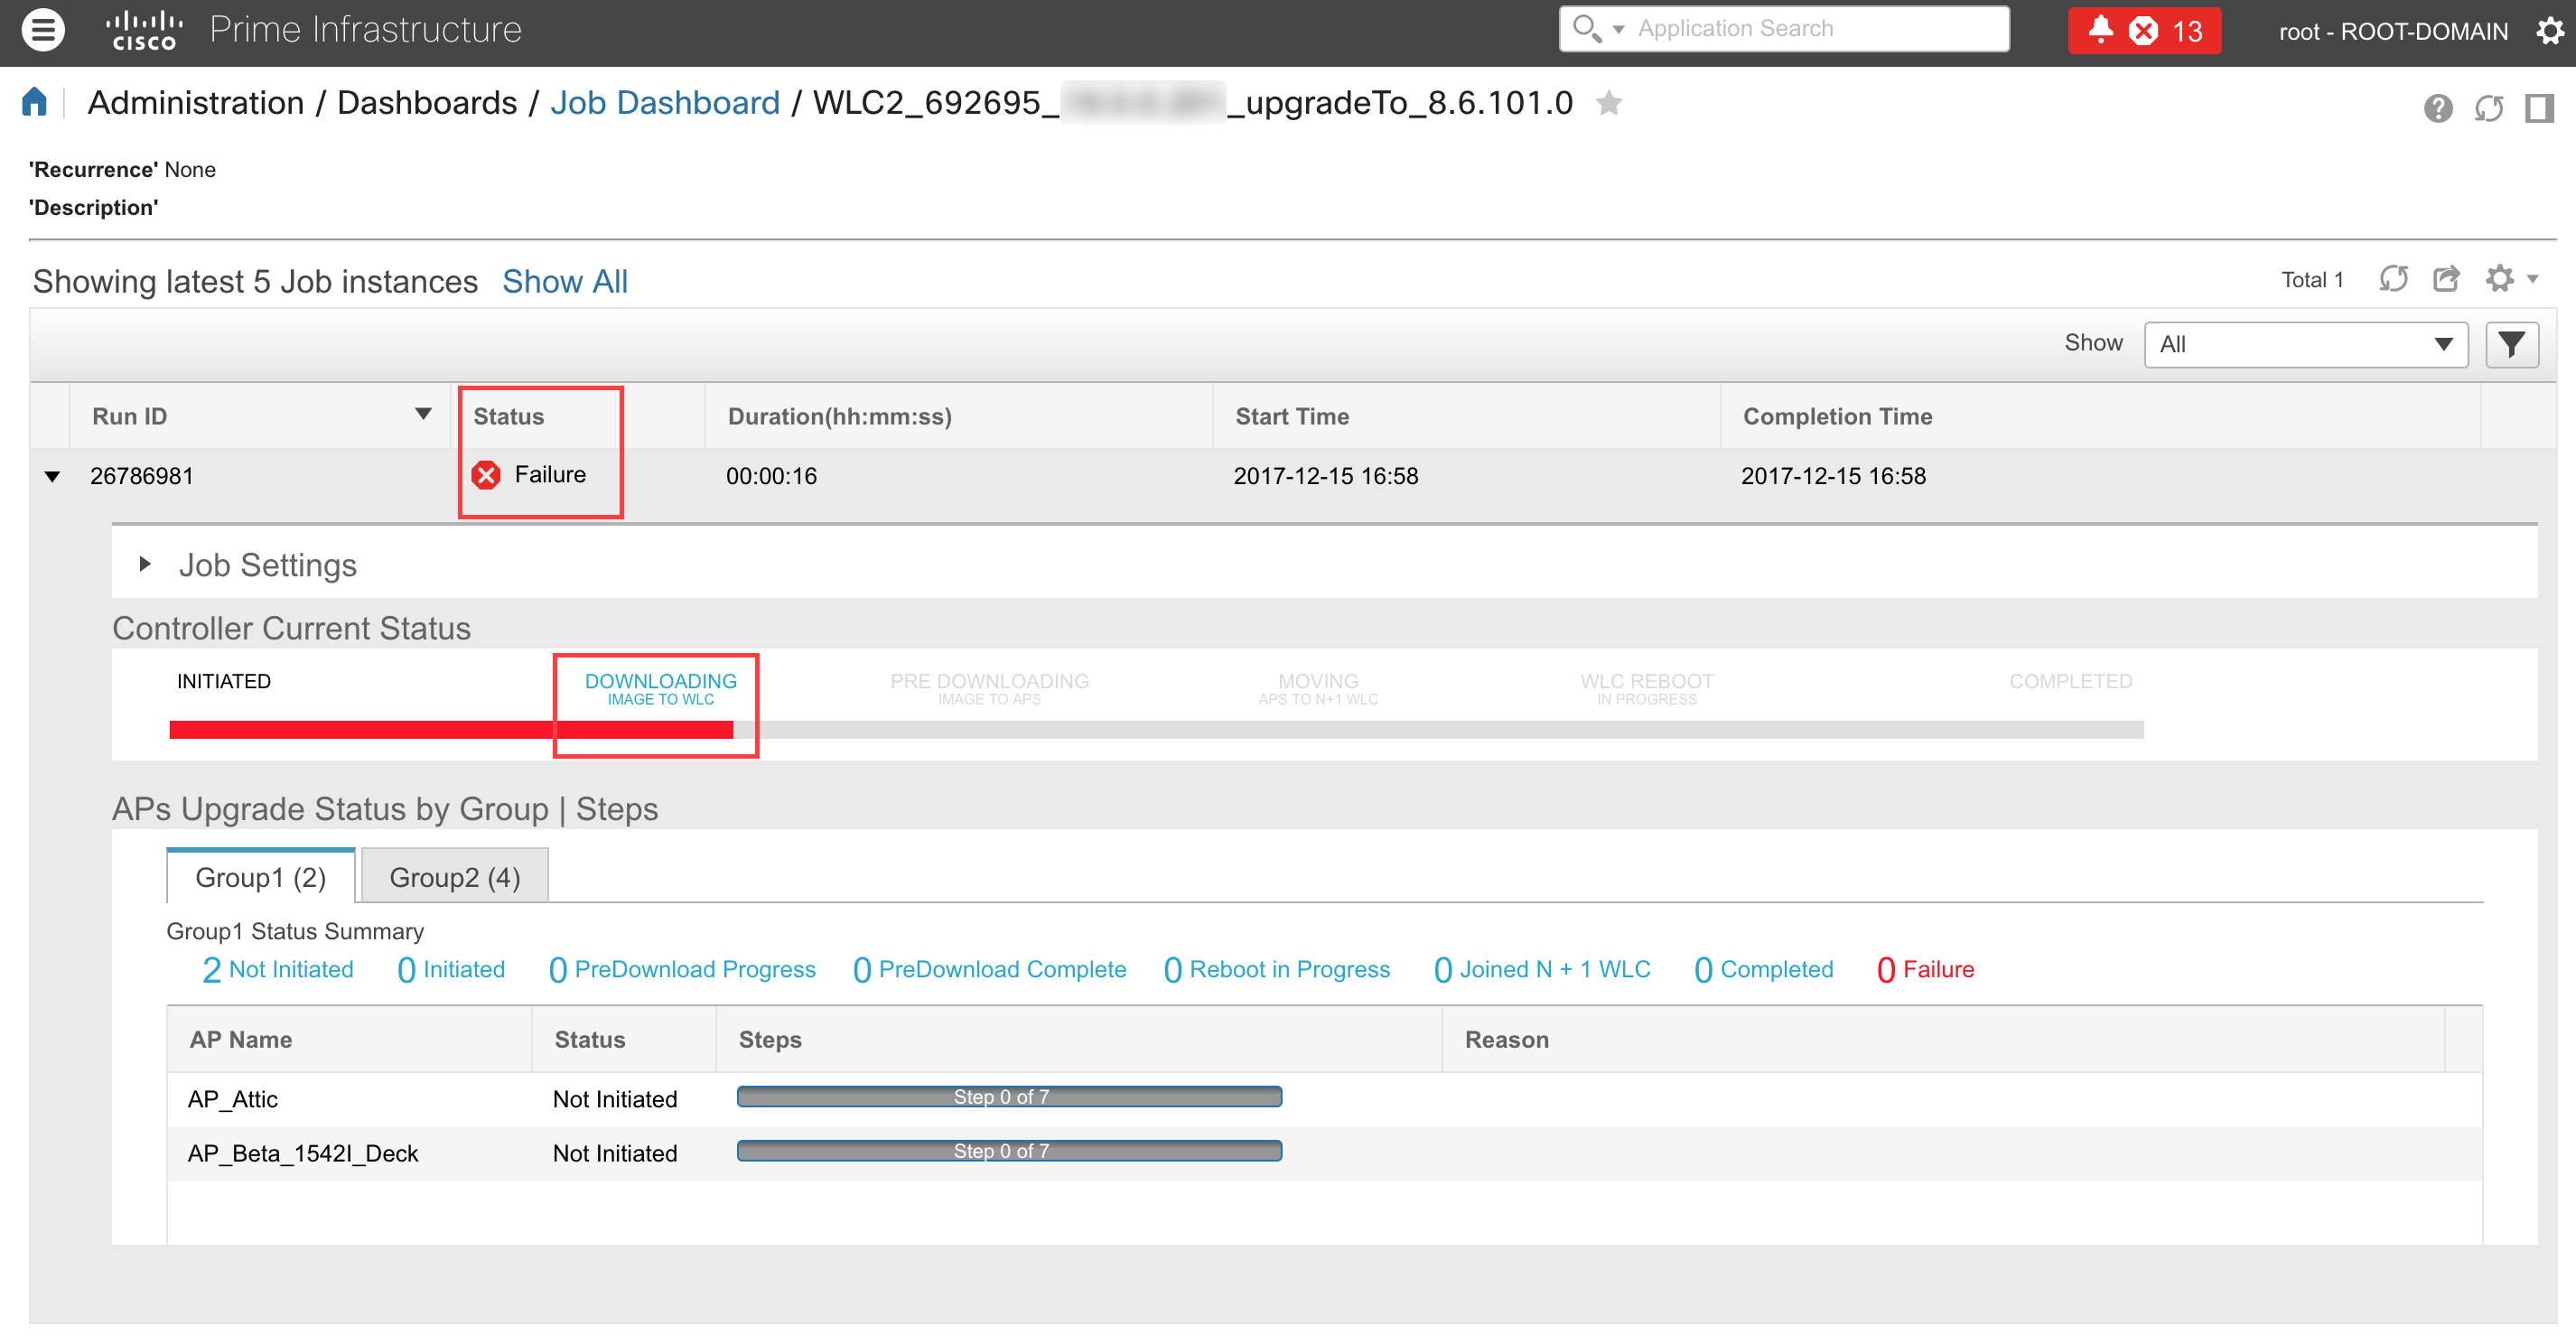
Notice that the job has failed while downloading the image to the WLC. Unfortunately, there is no further detail on the failure, and it can be quite confusing as to the cause, if you didn’t realize the text box stripped the end of the filename. If you check the Message Log on the WLC, you may see the following error (which is also very unintuitive):
TransferTask: Dec 15 18:57:16.854: %INIT-3-ER_IMAGE_VERSION: bootos.c:943 Upgraded ER image required to show version. For information regarding Emergency image Version,Please refer Controller documents.
Assuming your filename was short enough to fit in the text box, you should see something similar in the Job Details:
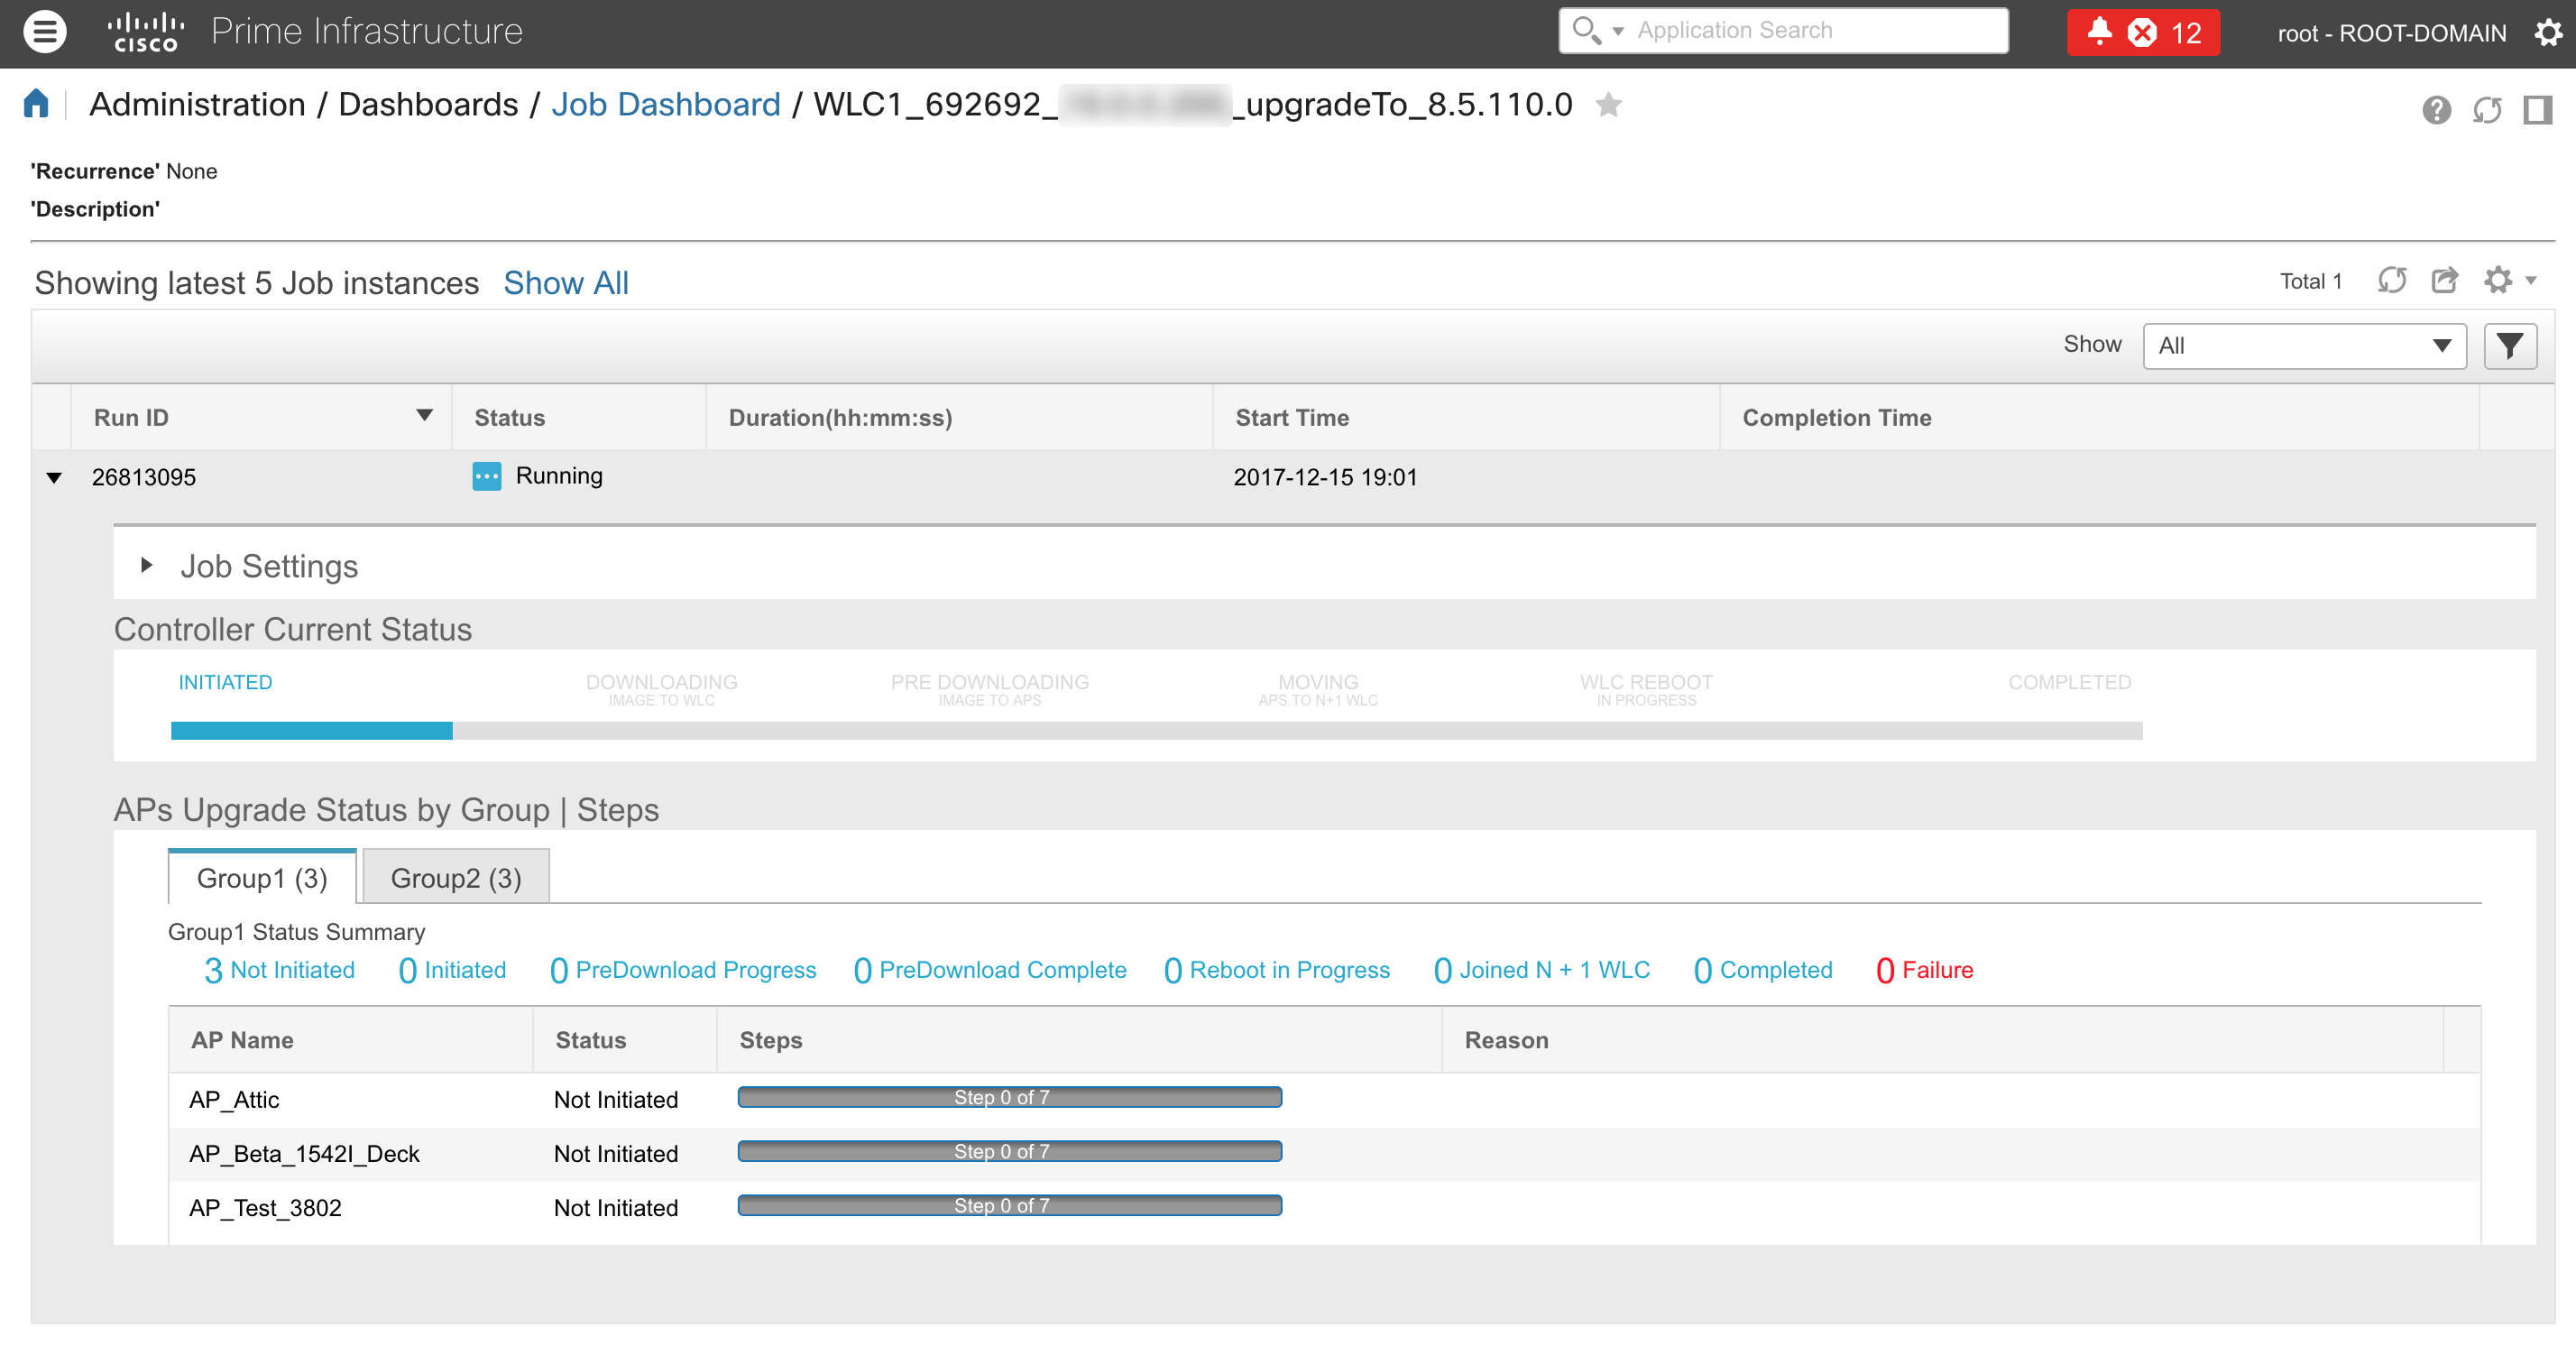
The status will remain at this point, until the file has been successfully transferred to the Primary WLC. Depending on the WLC, and the connection to the WLC, this may take up to 10 minutes. Once complete, it will move on to the next phase.
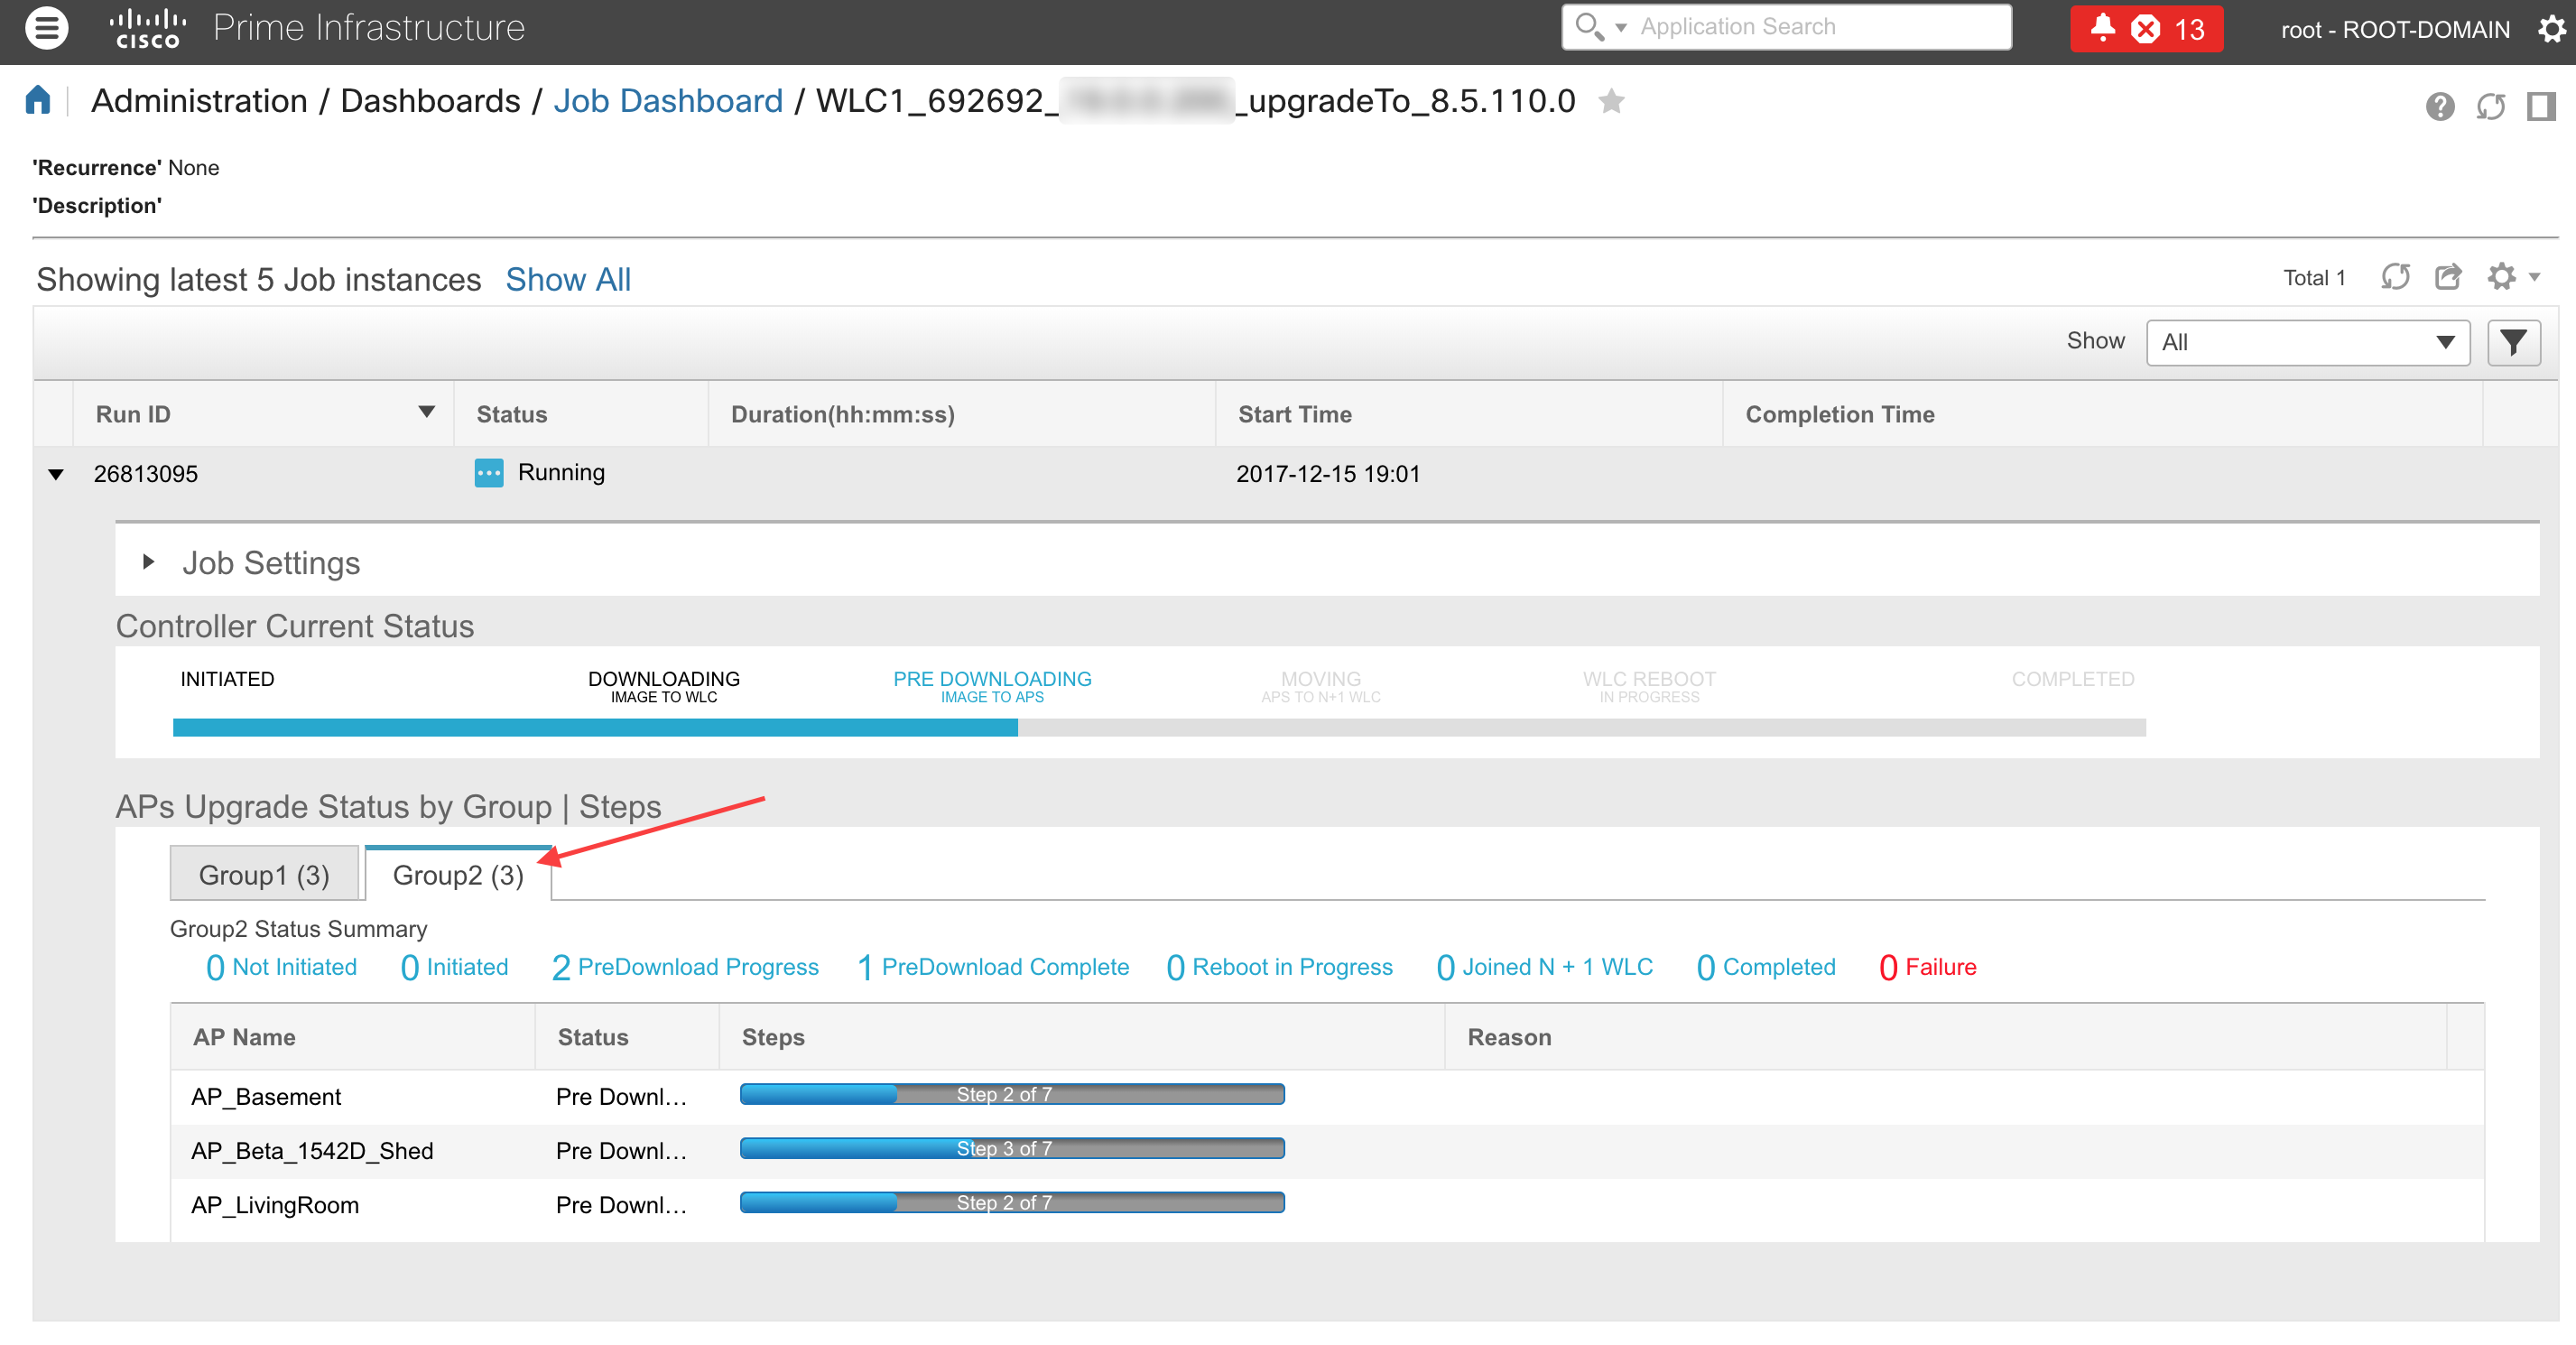
Step 7 – Prime Pre-Downloads Code to the APs in all AP Upgrade Groups
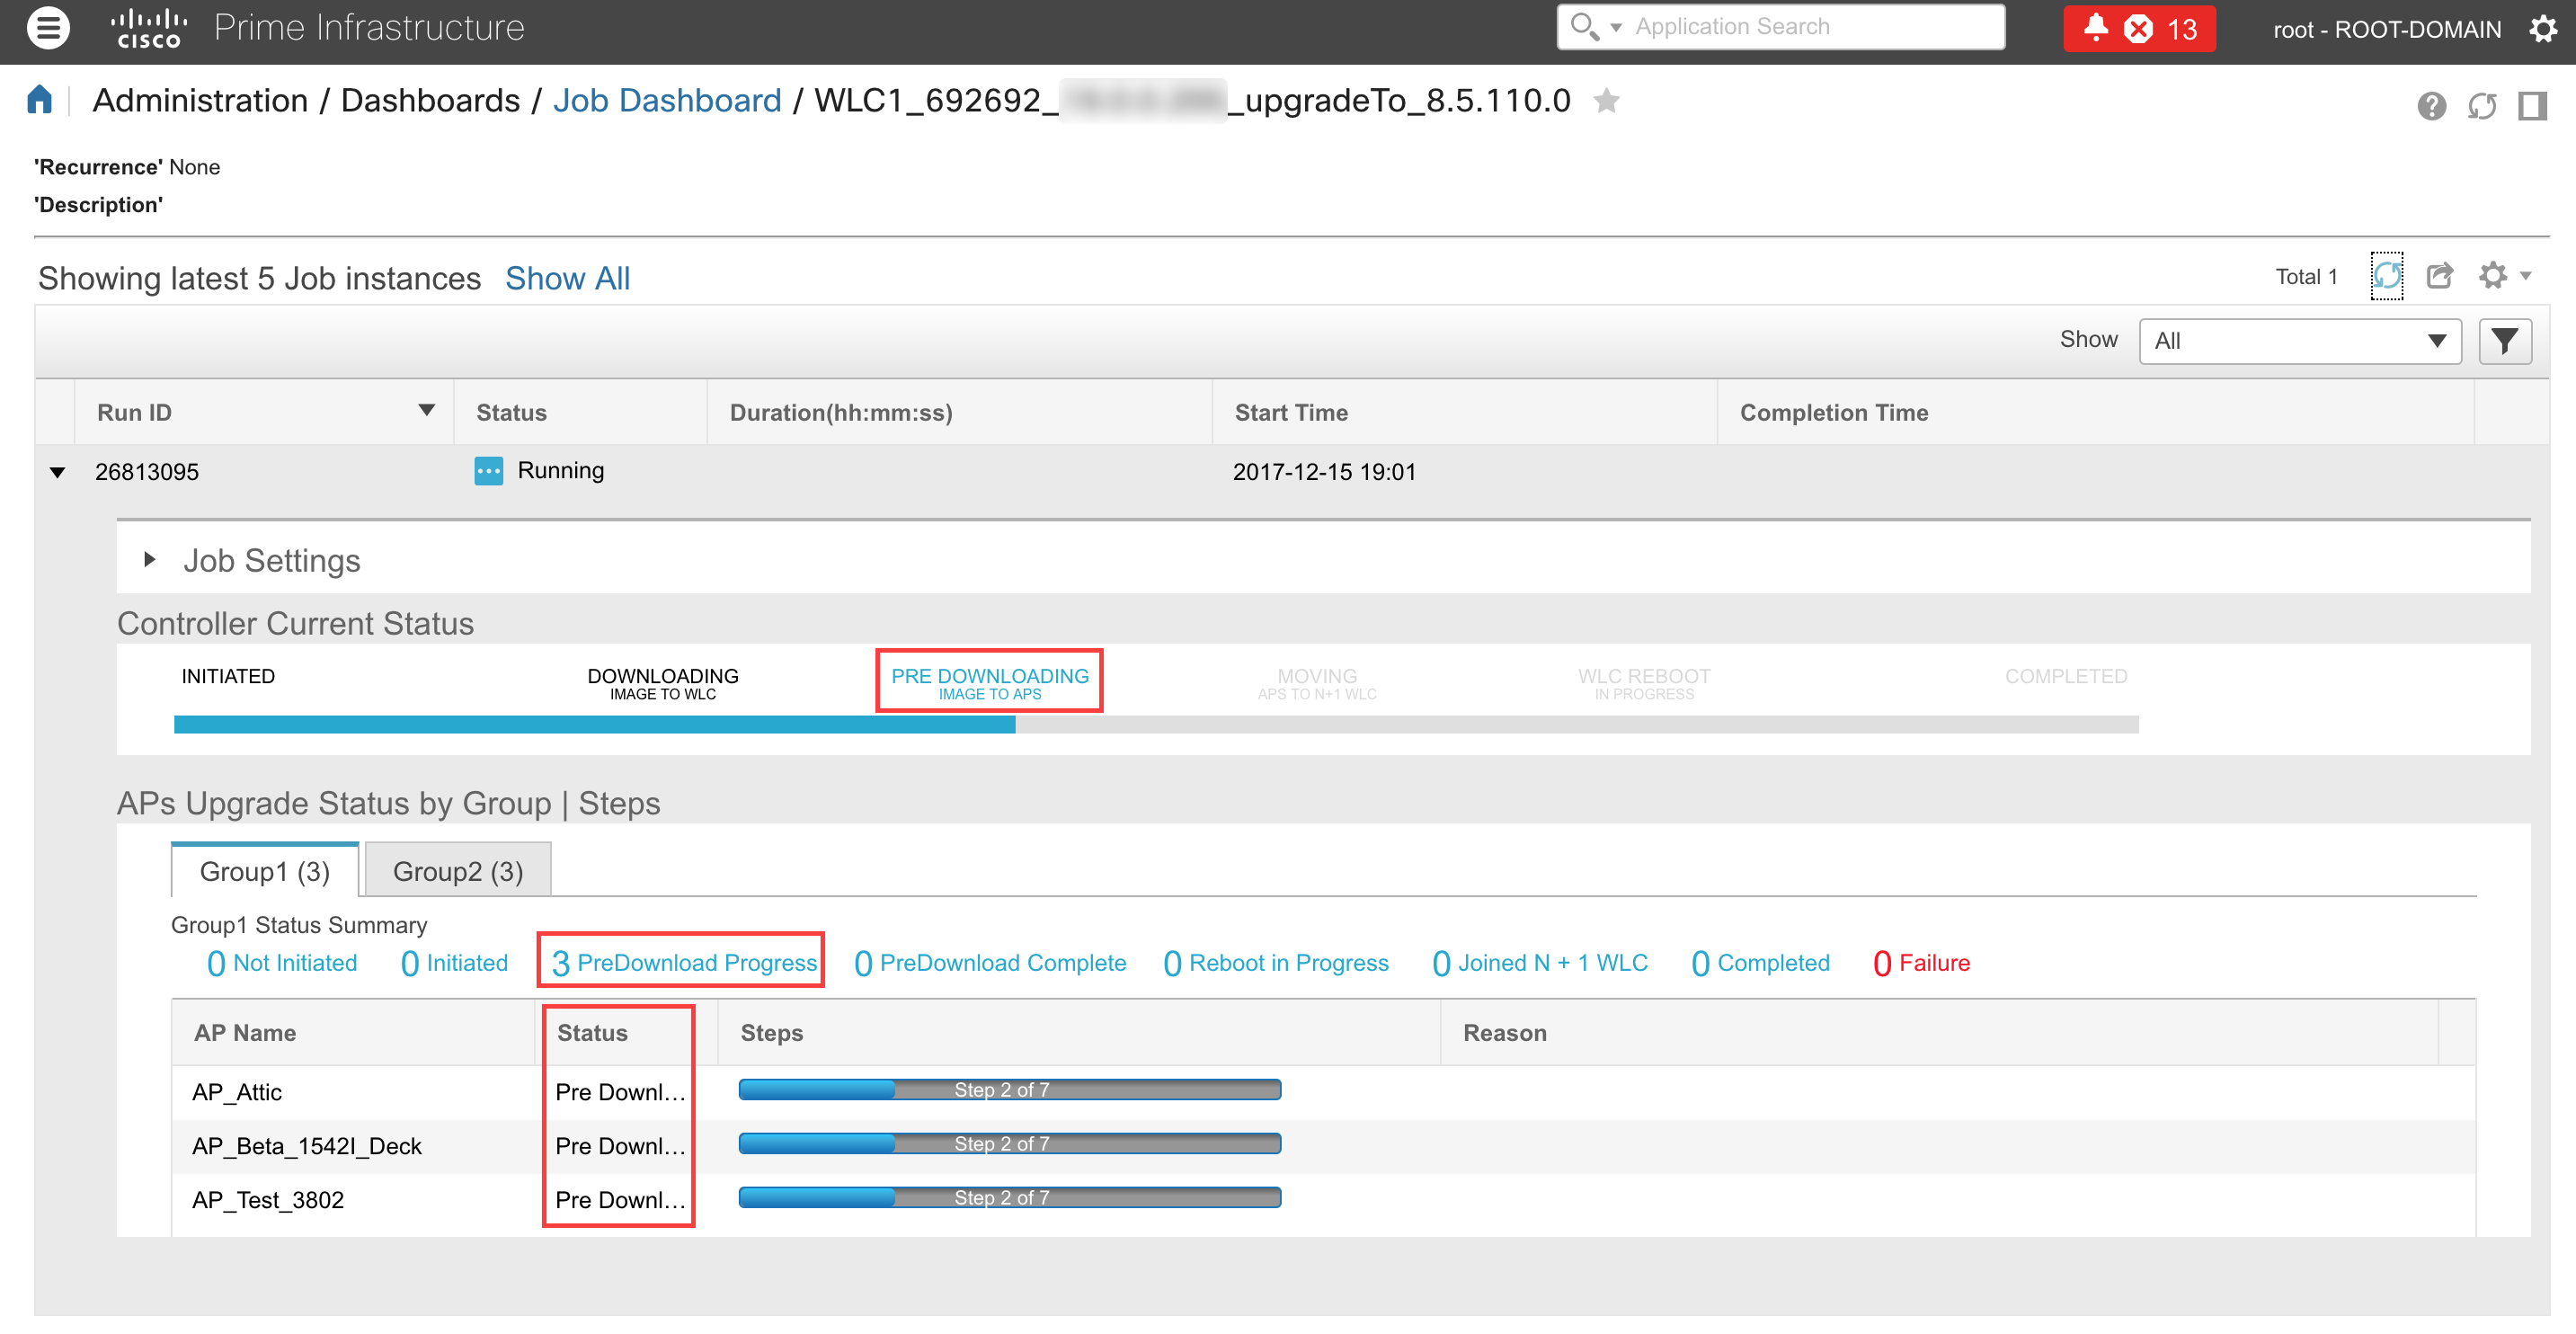
Be sure to check the status of each AP Upgrade Group, by clicking on the tabs
Here you can see that one of the AP Pre-Downloads has already completed.
Note: The counters for each category only pertain to the AP Upgrade Group Tab that you are currently viewing.
Eventually, the Pre-Download will complete for all of the AP Upgrade Groups. It’s interesting to see how much faster the CiscoOS (802.11ac Wave 2) APs transfer code, vs. the earlier AireOS APs.

Step 8 – Prime Moves the First AP Upgrade Group to the N+1 WLC
Once all APs have successfully Pre-Downloaded their code, Prime will configure the APs in the first AP Upgrade Group to move to the N+1 WLC, and reboot (joining with their new code version). If you’ve ever Pre-Downloaded code to APs before, you are aware of the multi-step process of downloading the code, interchanging the images, and rebooting the APs. Prime takes care of all of that for you, in this process.
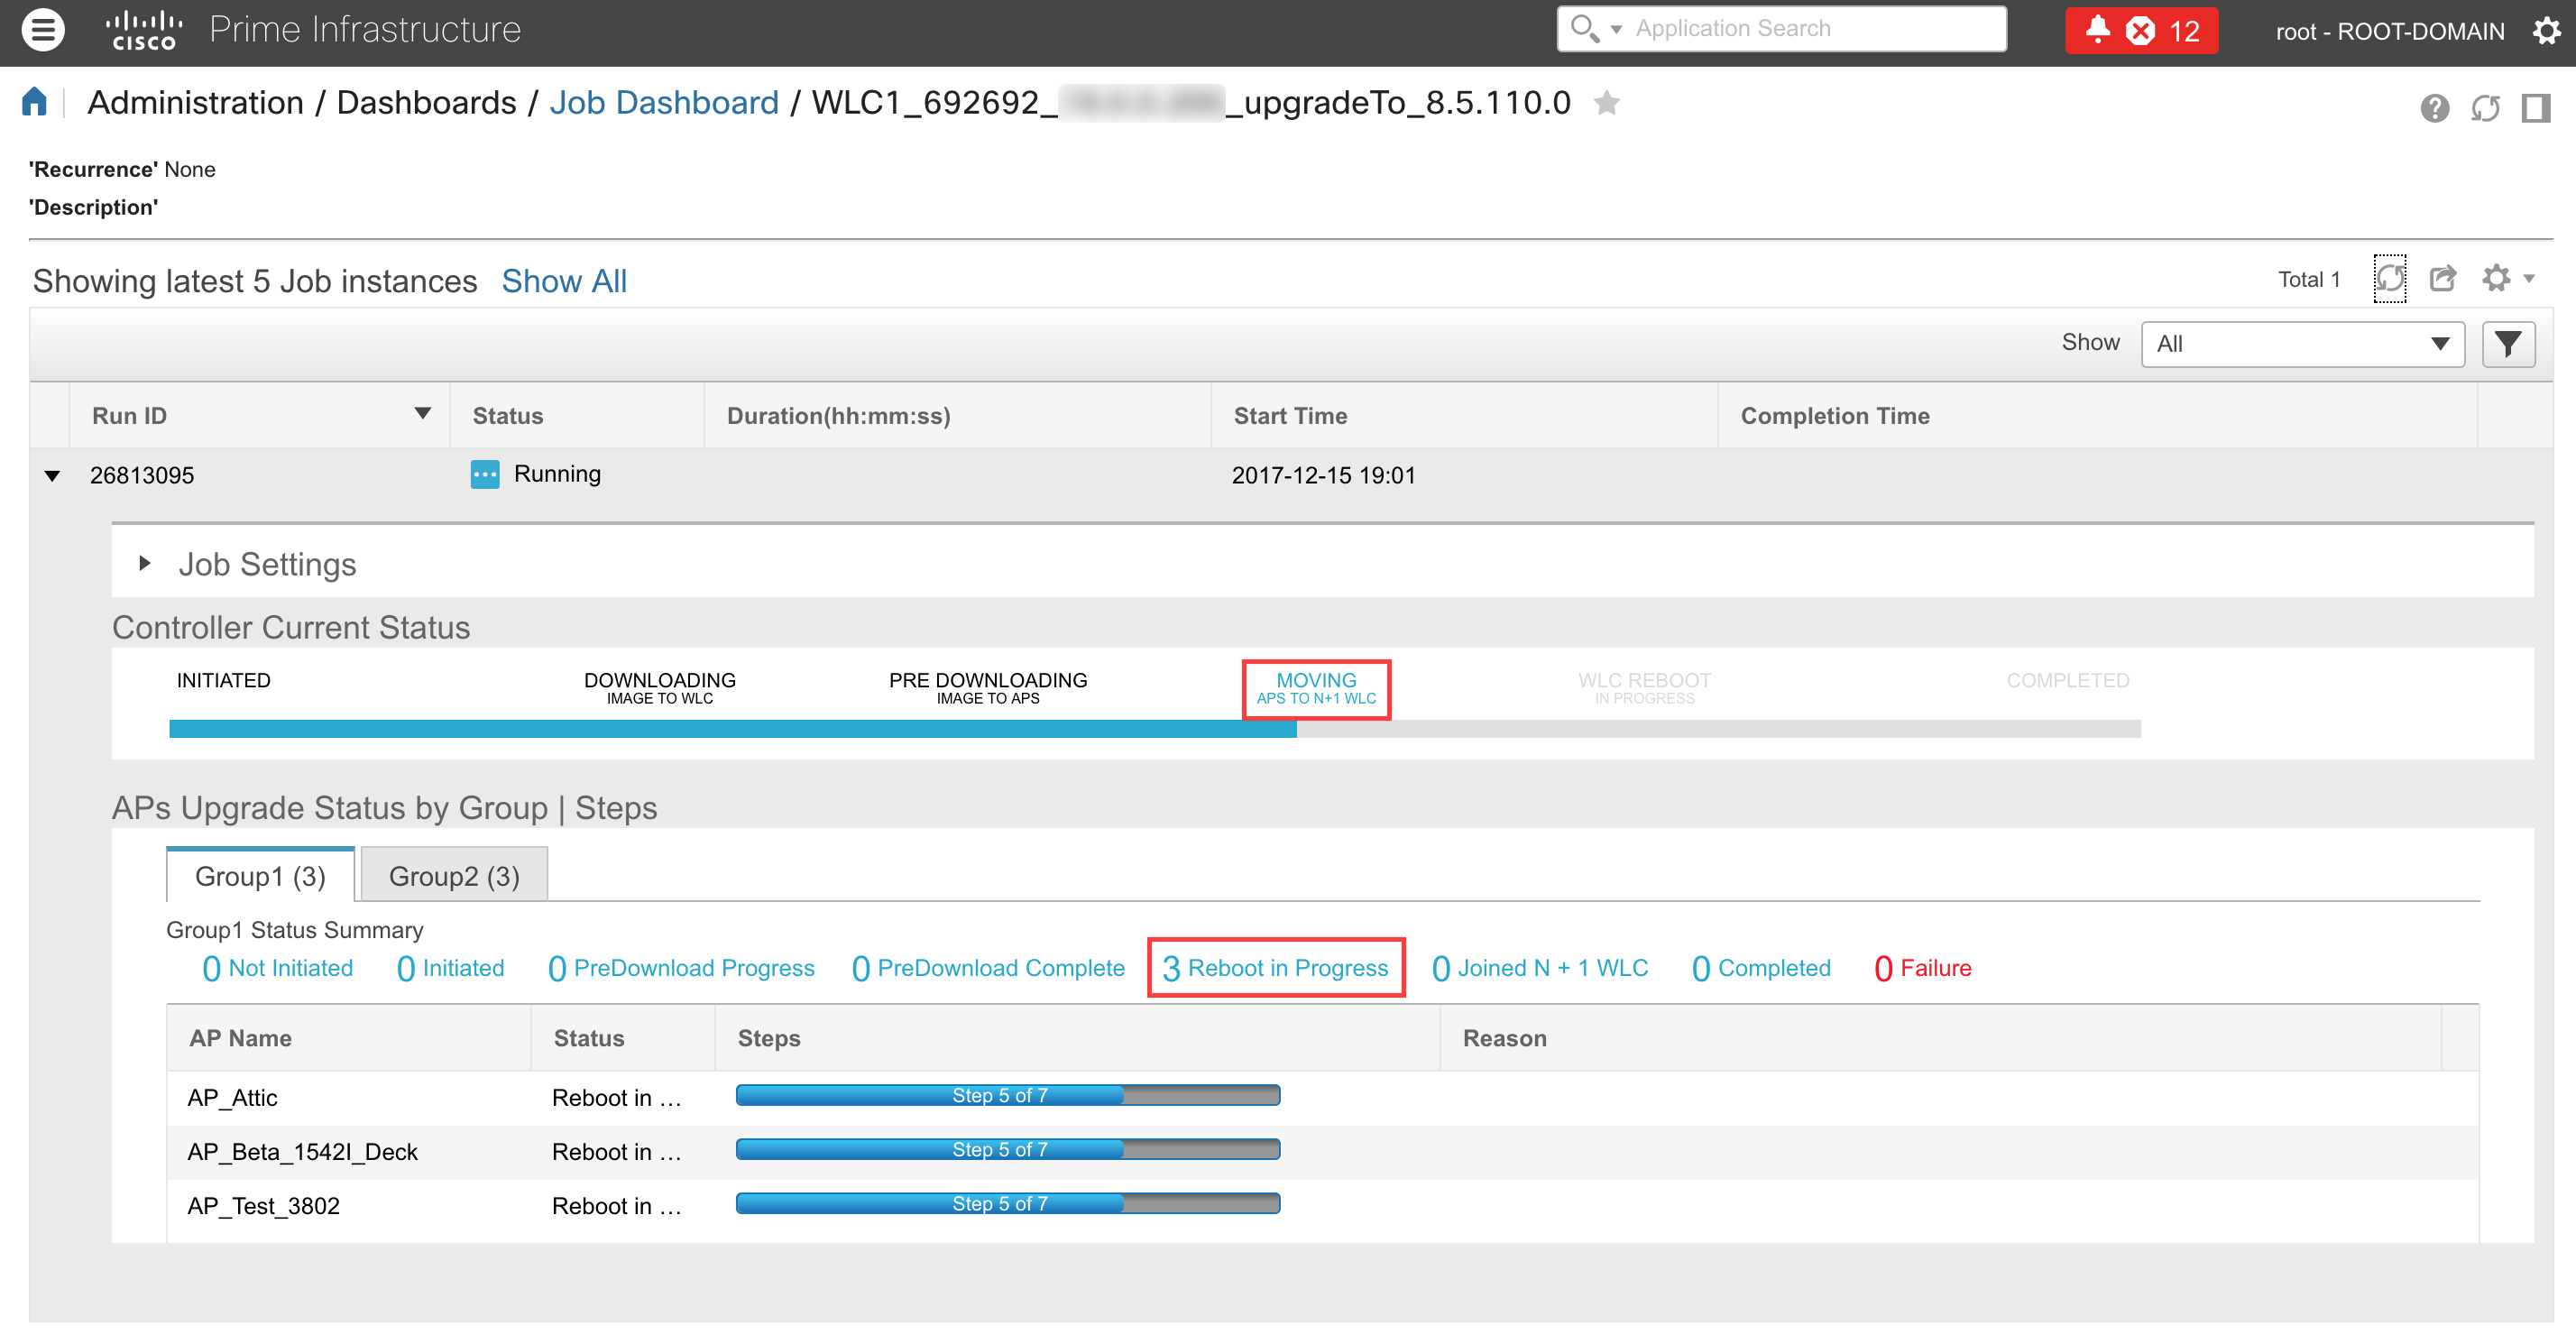
If you click on the tab for the next AP Upgrade Group, you will notice that they are sitting and waiting for their turn:

Eventually, all of the APs in the first AP Upgrade Group will join the N+1 WLC.
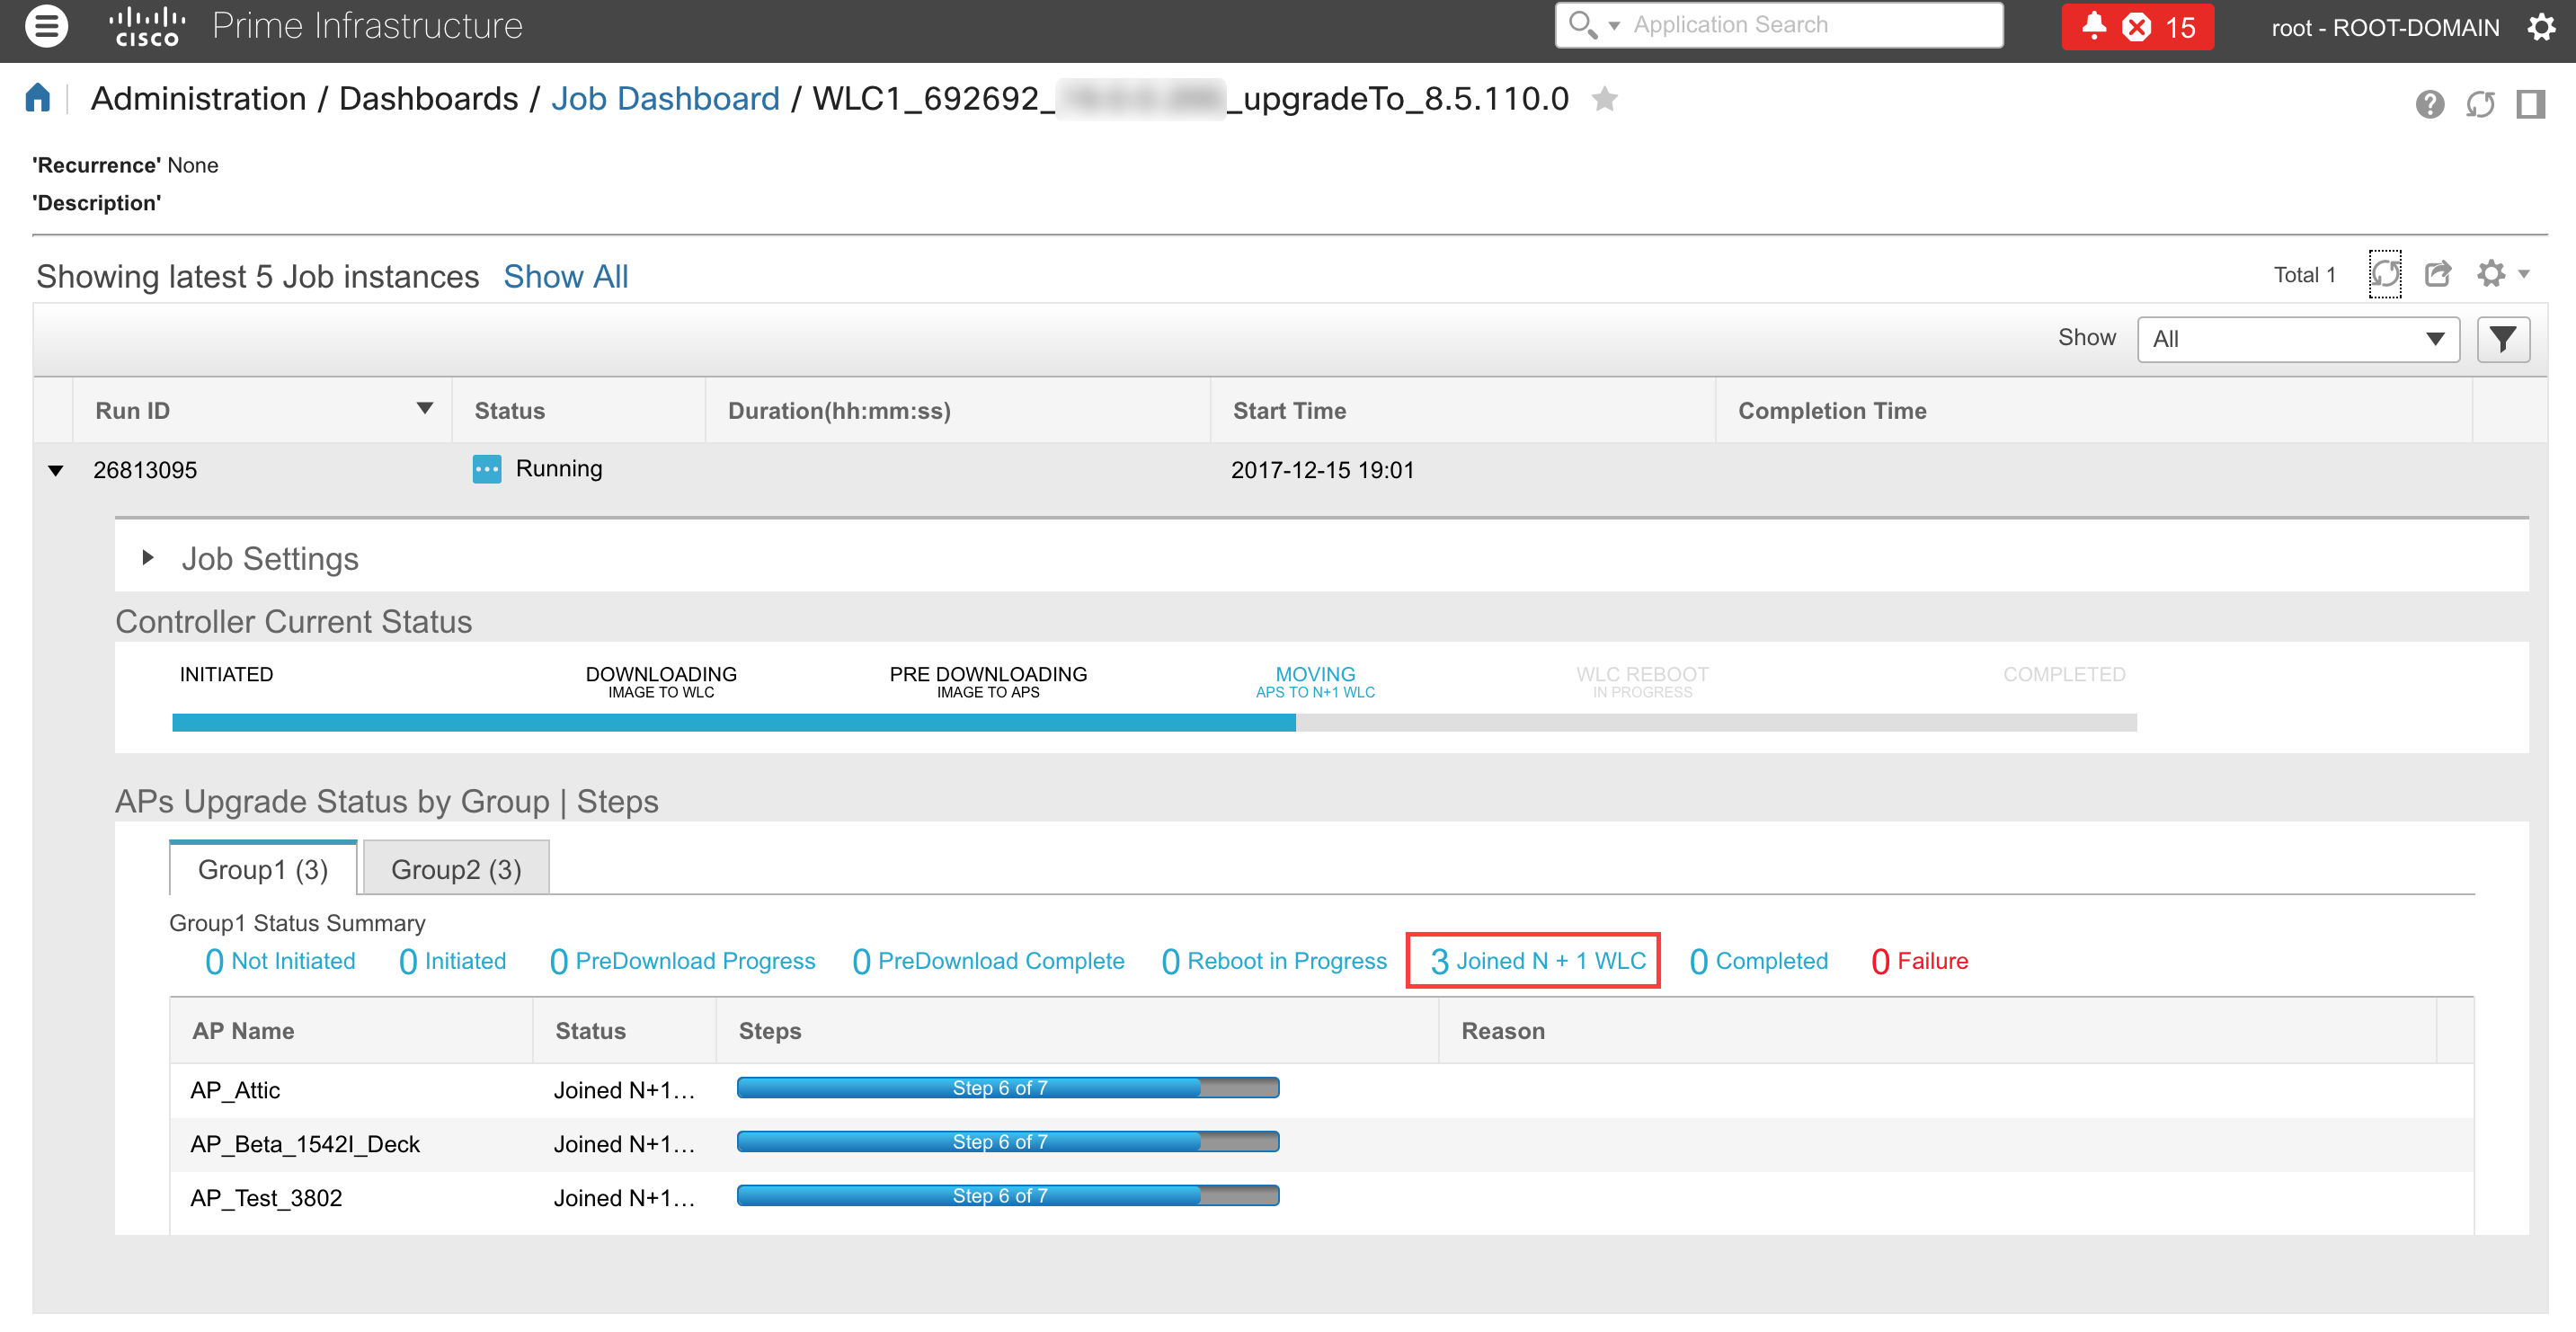
Step 9 – Prime Moves the Next AP Upgrade Group to the N+1 WLC
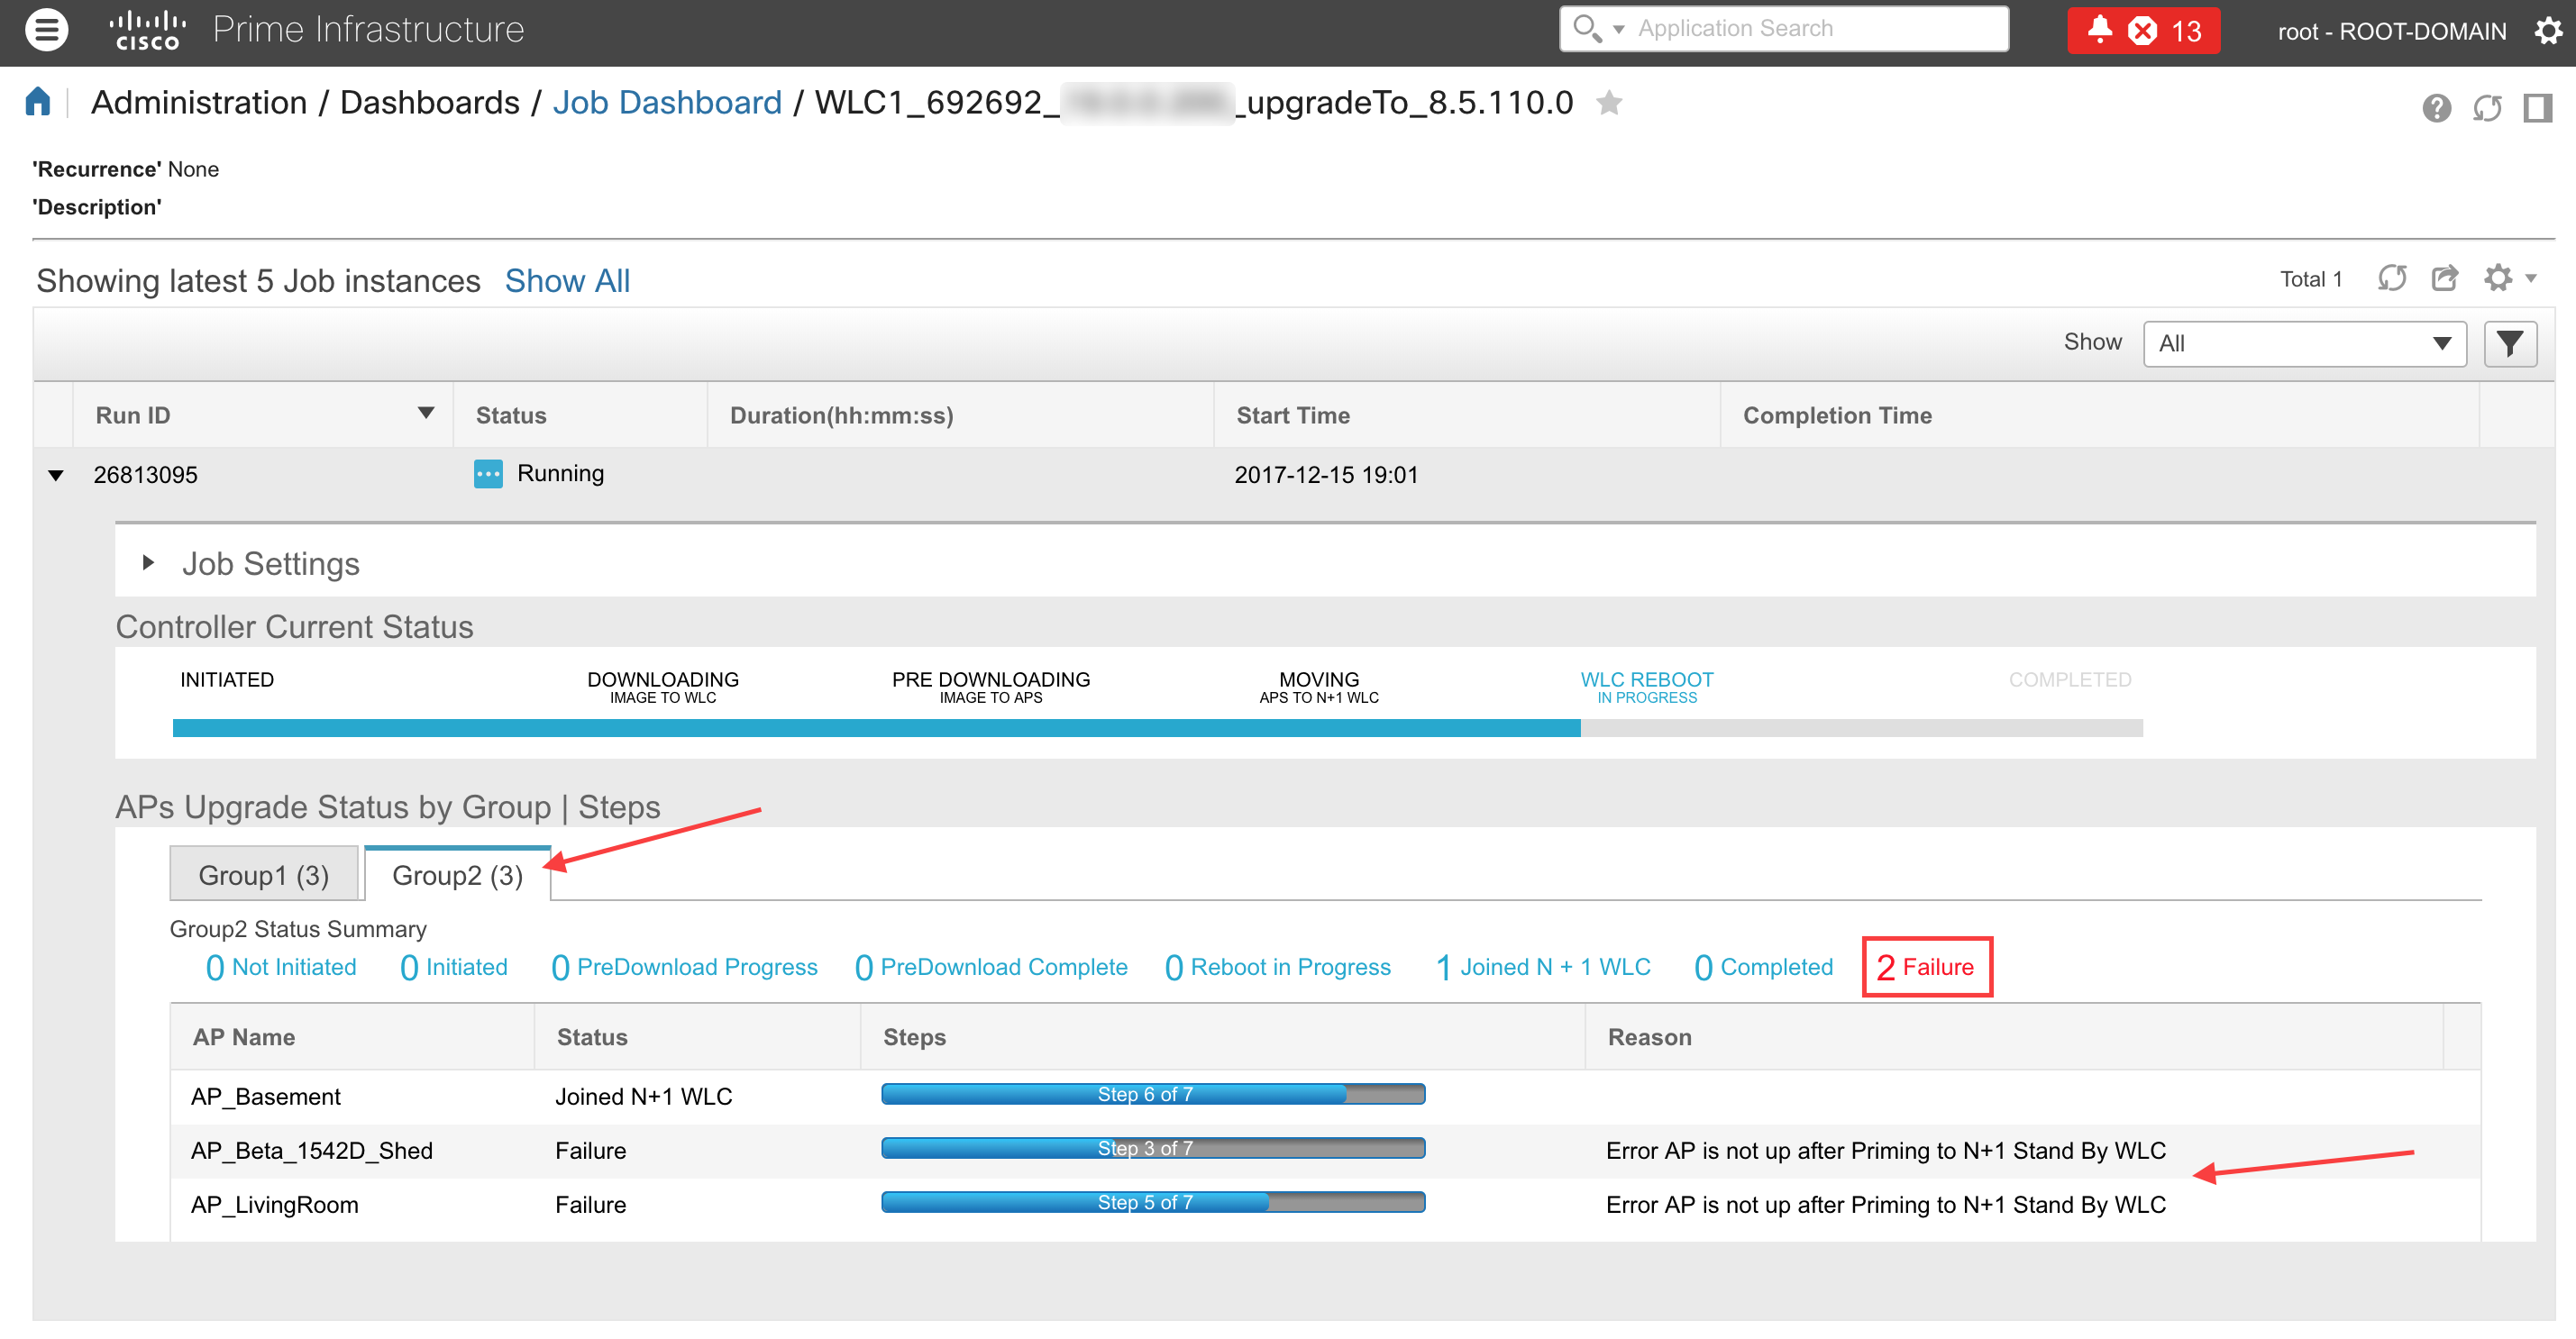
Once Prime has verified that all of the APs in the first AP Upgrade Group have successfully joined the N+1 WLC (this is why the AP Register SNMP traps are so important), it will move on to the second group. You can see the status of those APs, by clicking on the tab for that AP Upgrade Group
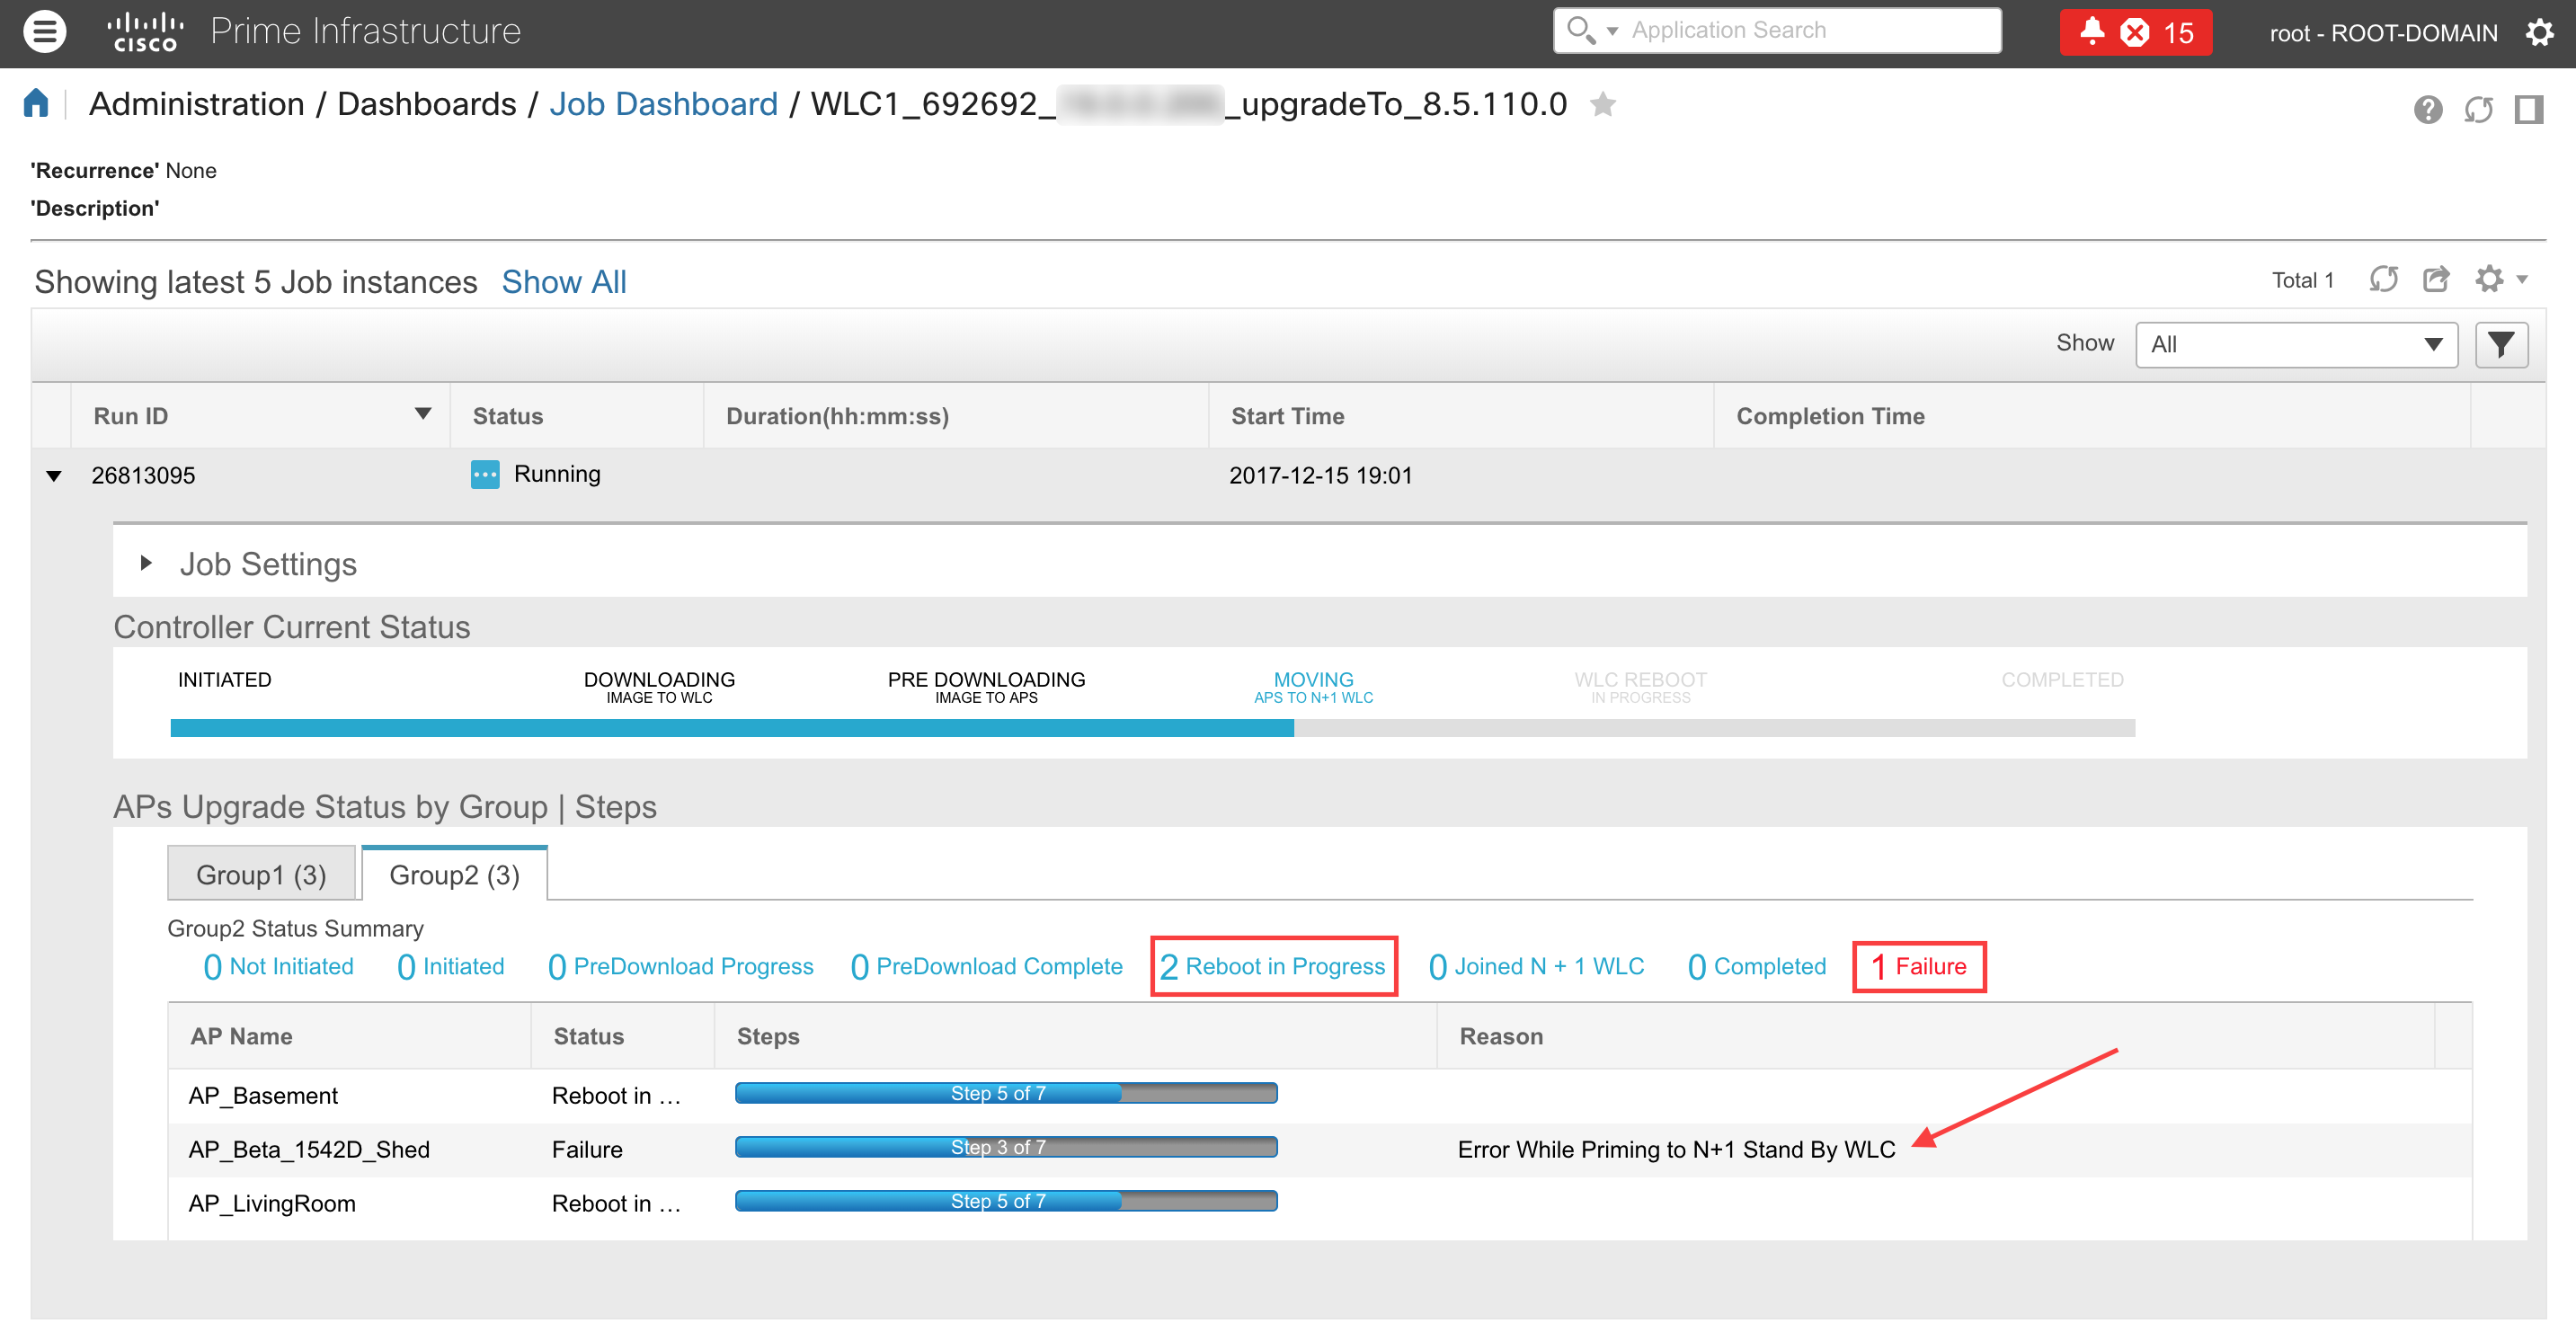
Note: One of my APs failed to receive the configuration to move to the N+1 WLC, because it is a Mesh AP (in MAP mode), and got kicked off the network when its RAP was moved to the N+1 WLC. I staged it this way intentionally, because I wanted to see what the failure scenario looked like. This is a great example of the importance of putting thought into which APs you include in each AP group. In this case, I simply manually changed the Primary WLC in the configuration of this AP, once it came back online.
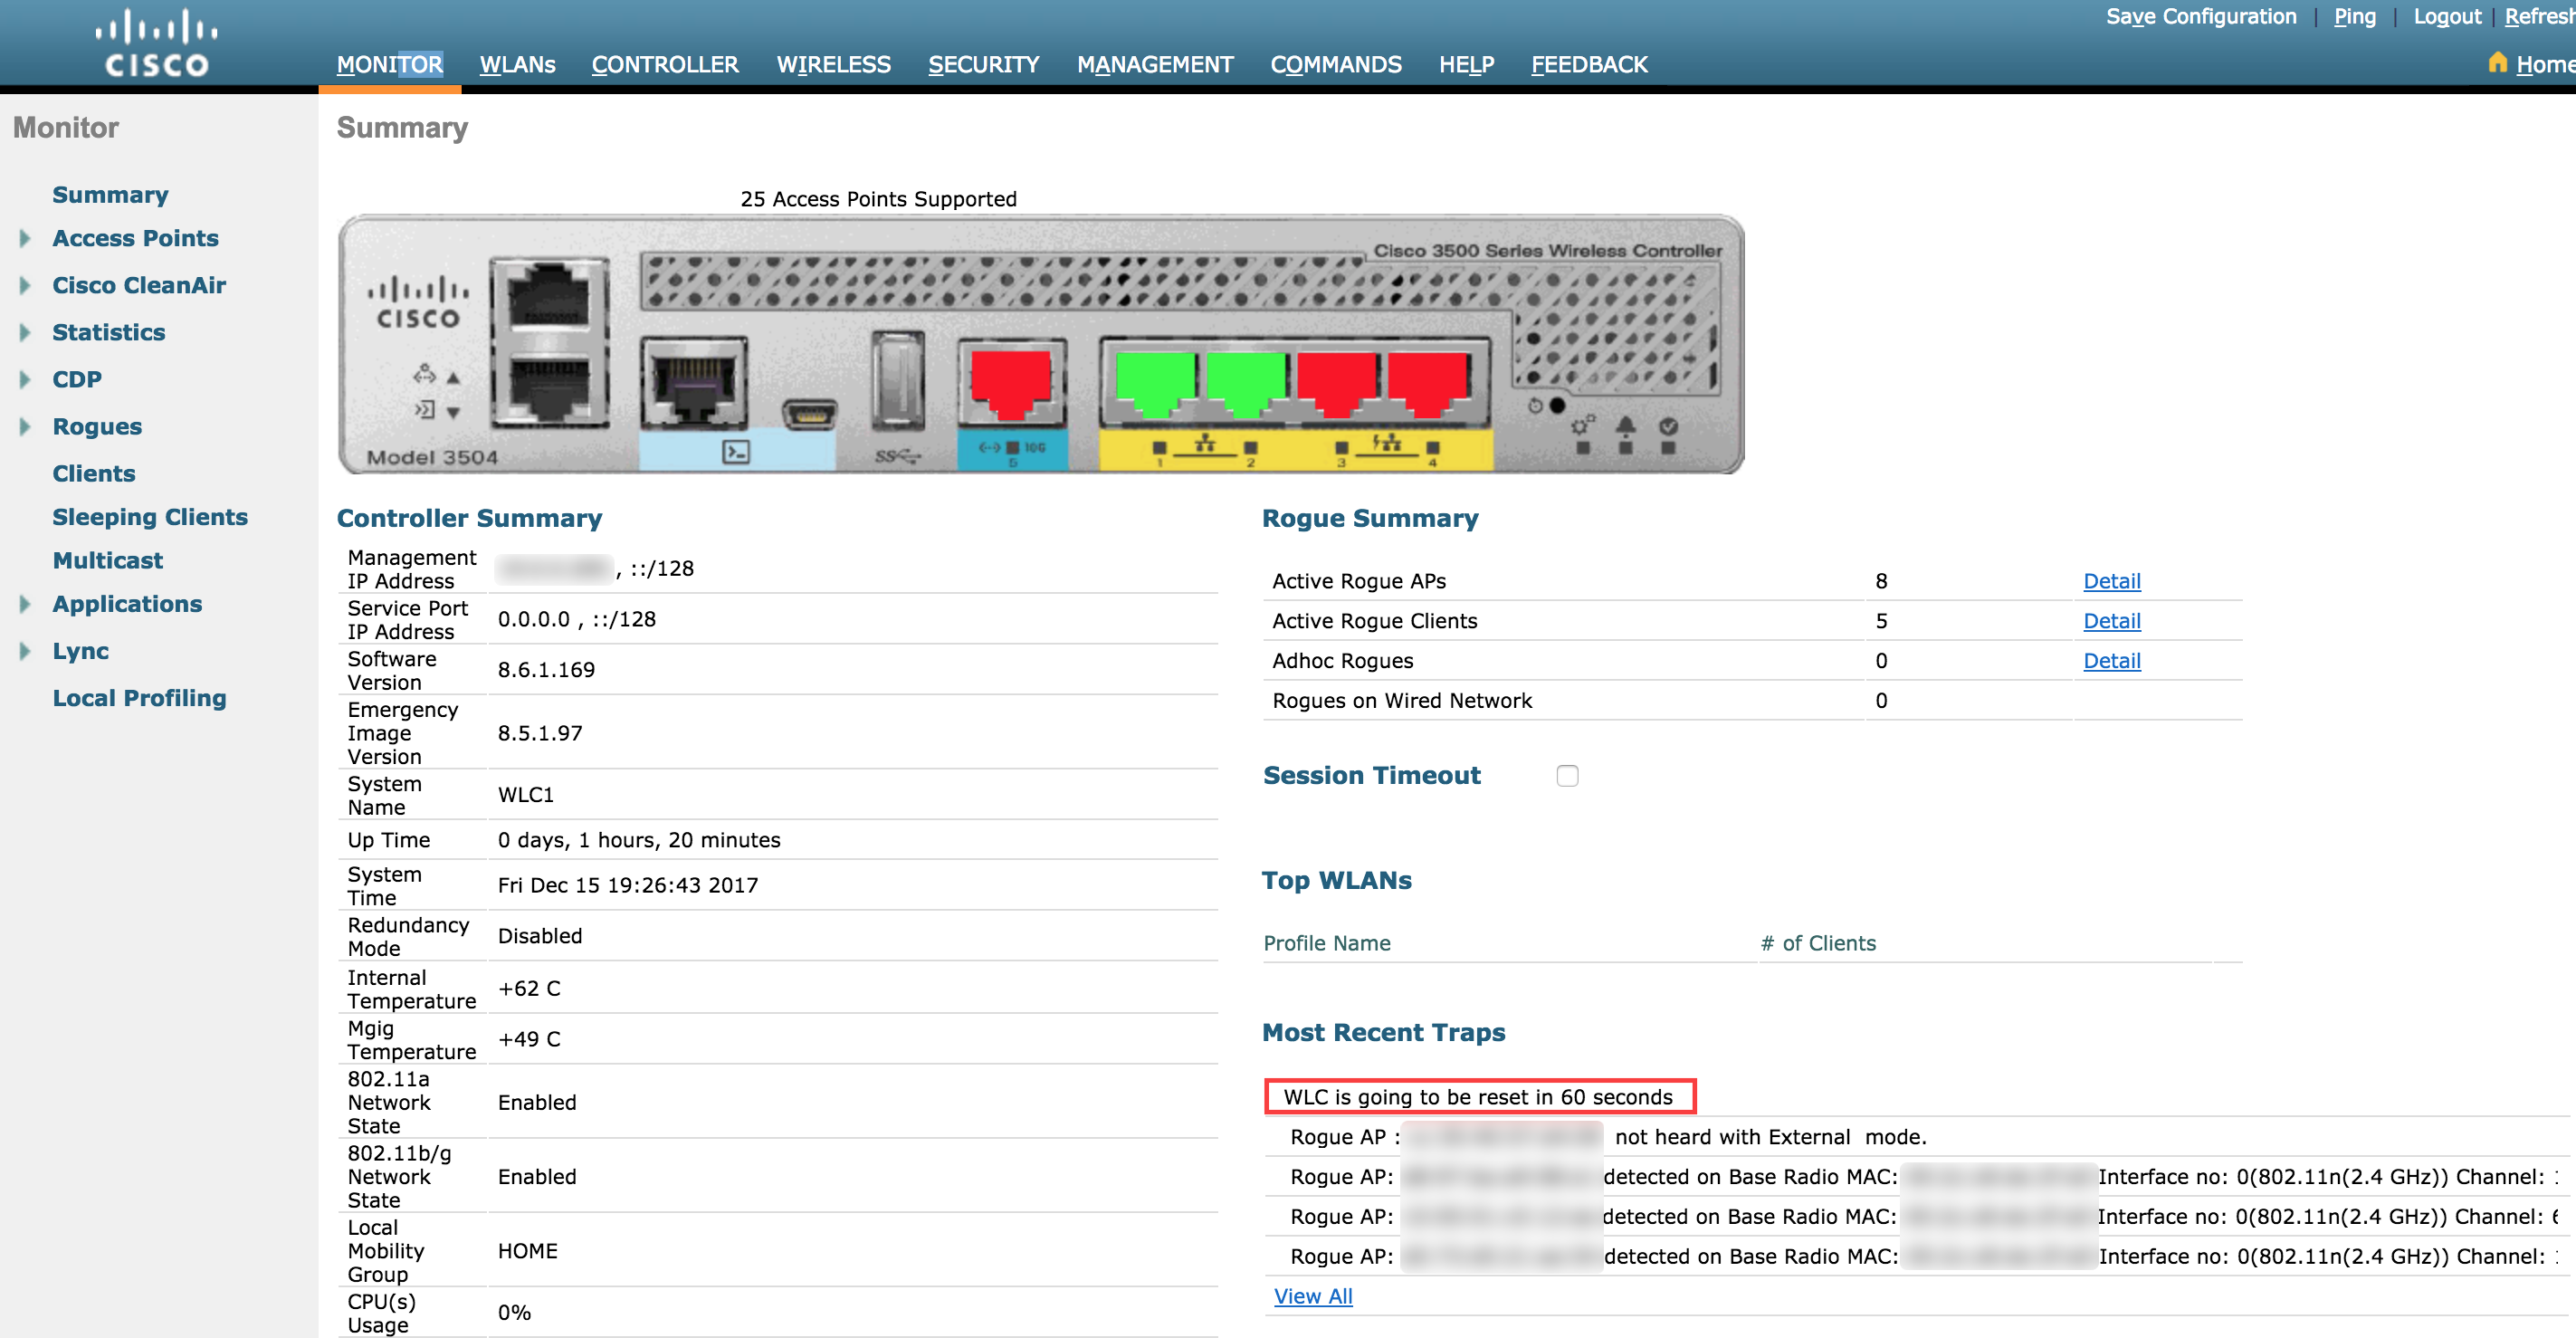
Step 10 – Prime Reboots the Primary WLC
Once all APs have joined the N+1 WLC, Prime will reboot the Primary WLC.
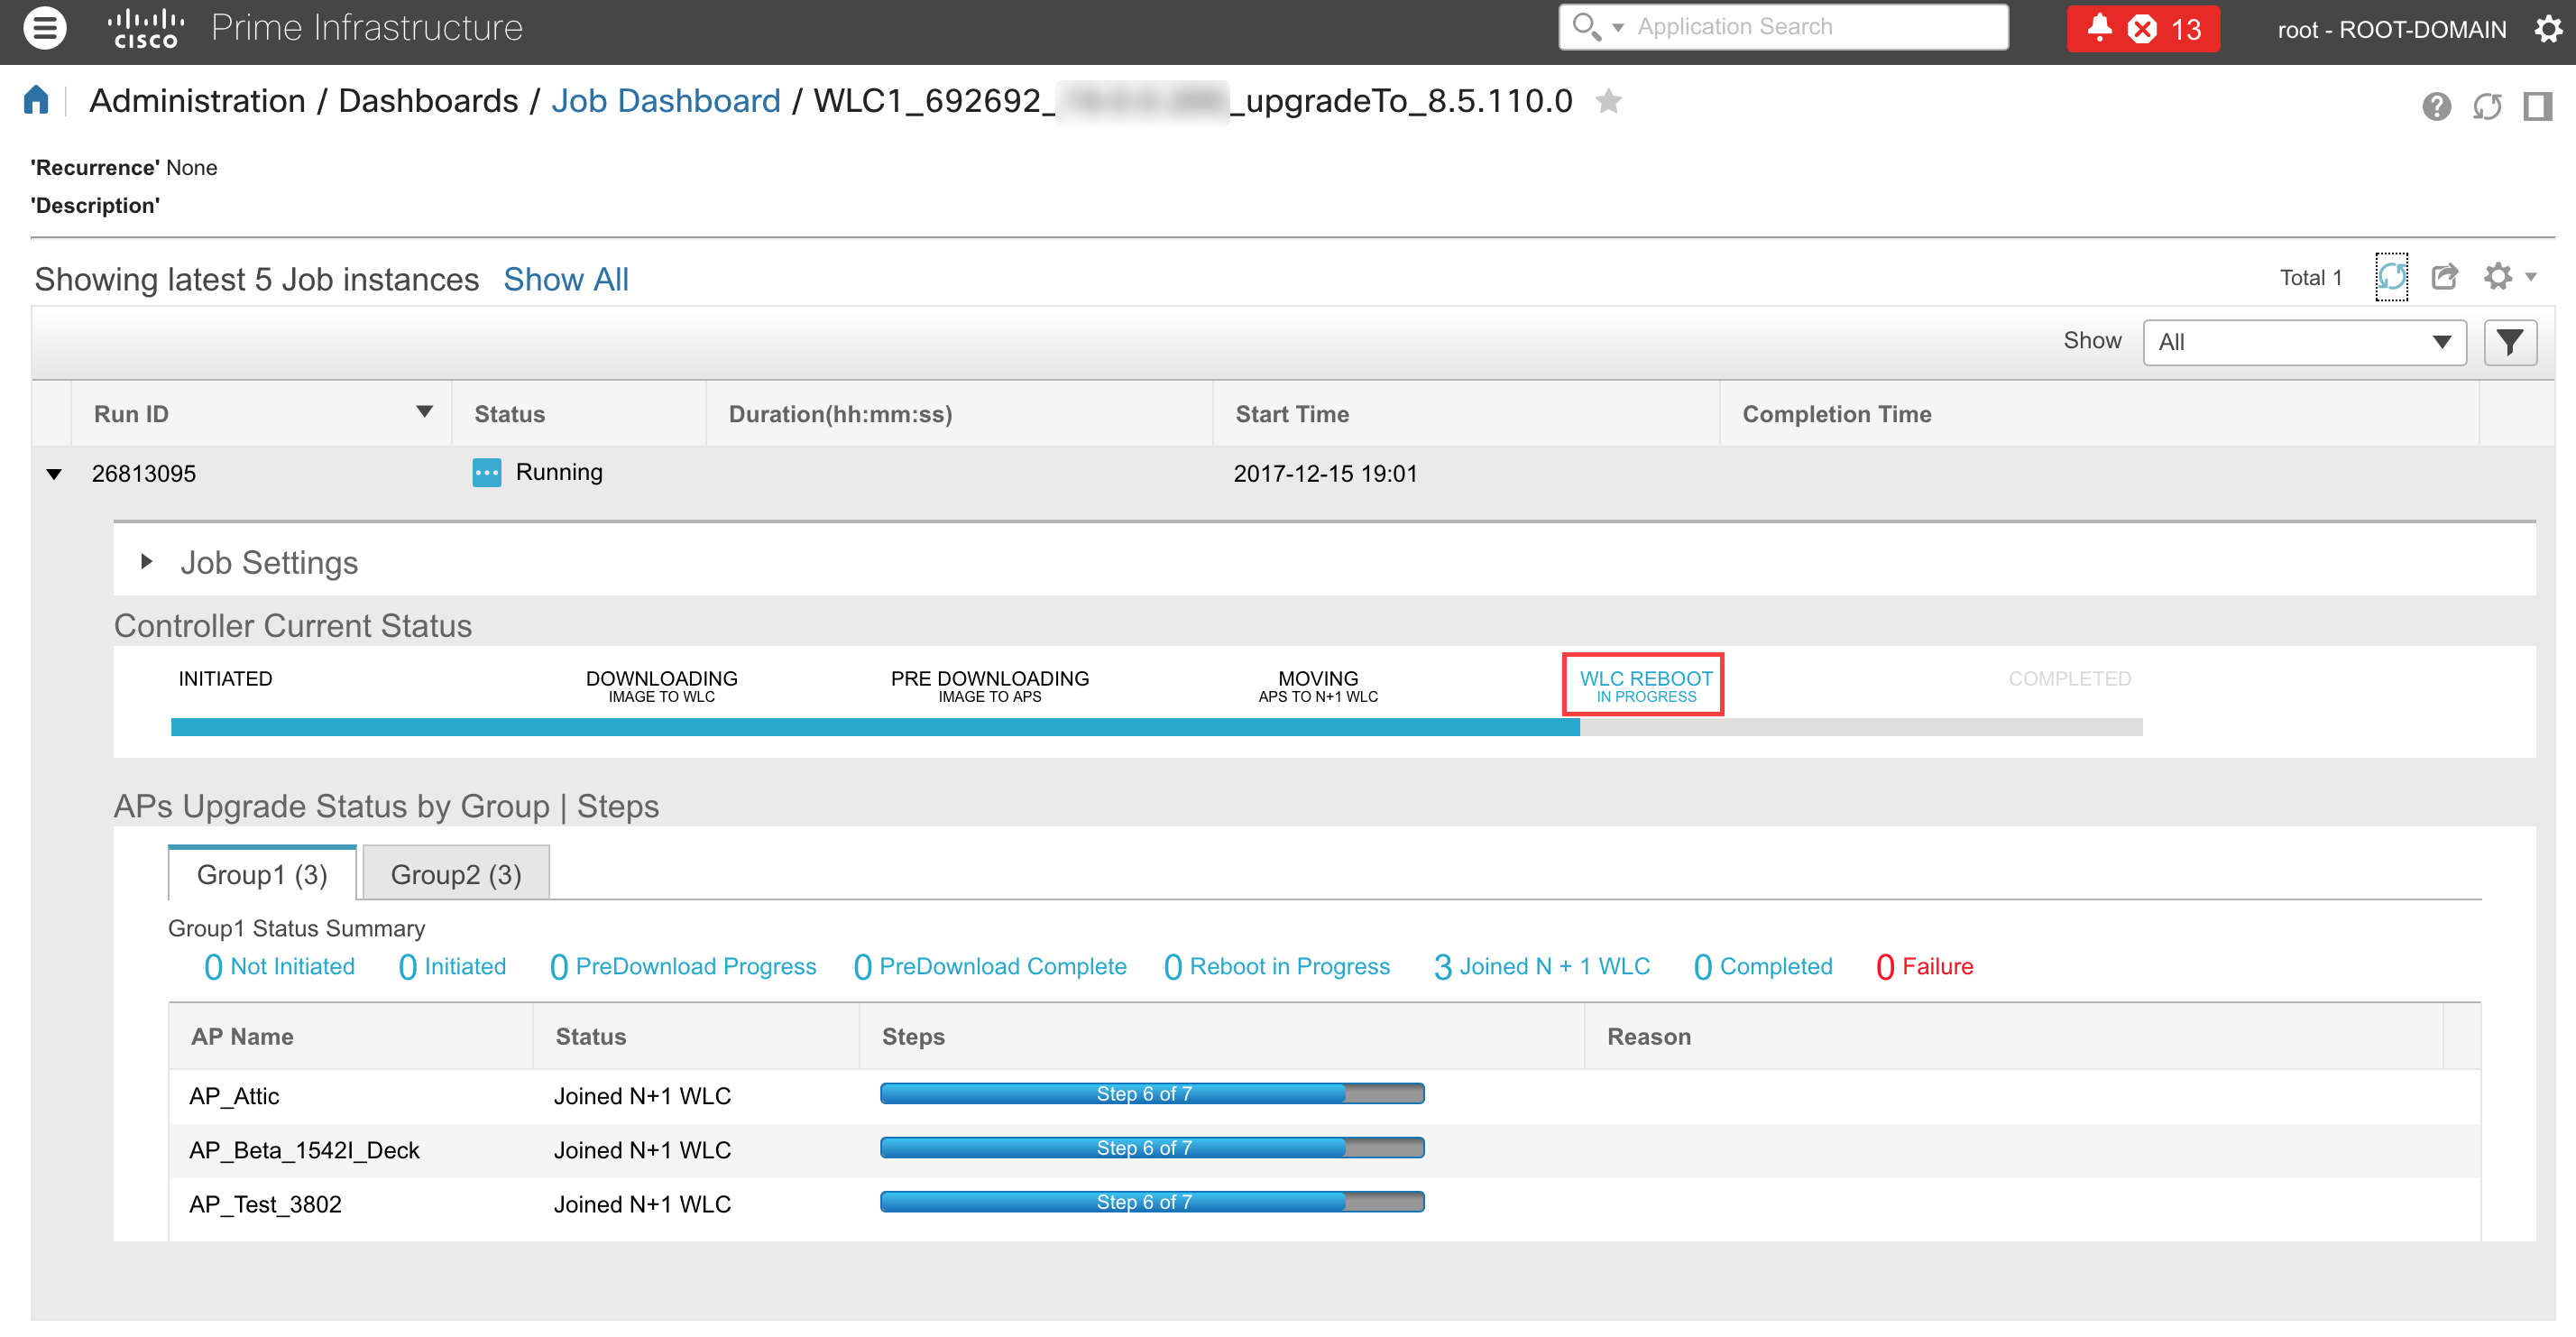
It actually schedules the WLC to reboot in 60 Seconds, instead of initiating an immediate reboot, as seen in the WLC Trap Log:
I noticed that Prime may not wait long enough for Mesh APs in MAP mode to come back online, after being moved to the N+1 WLC. Depending on your environment, this process may take 10 minutes, and in my case it caused Prime to note these APs as having not joined the N+1 WLC. They did eventually join (viewing AP Upgrade Group 2, here)
Step 11 (Optional) – Prime Moves the APs from Each AP Upgrade Group Back to the Primary WLC
I did not perform this step as part of this exercise, but the result is pretty obvious.
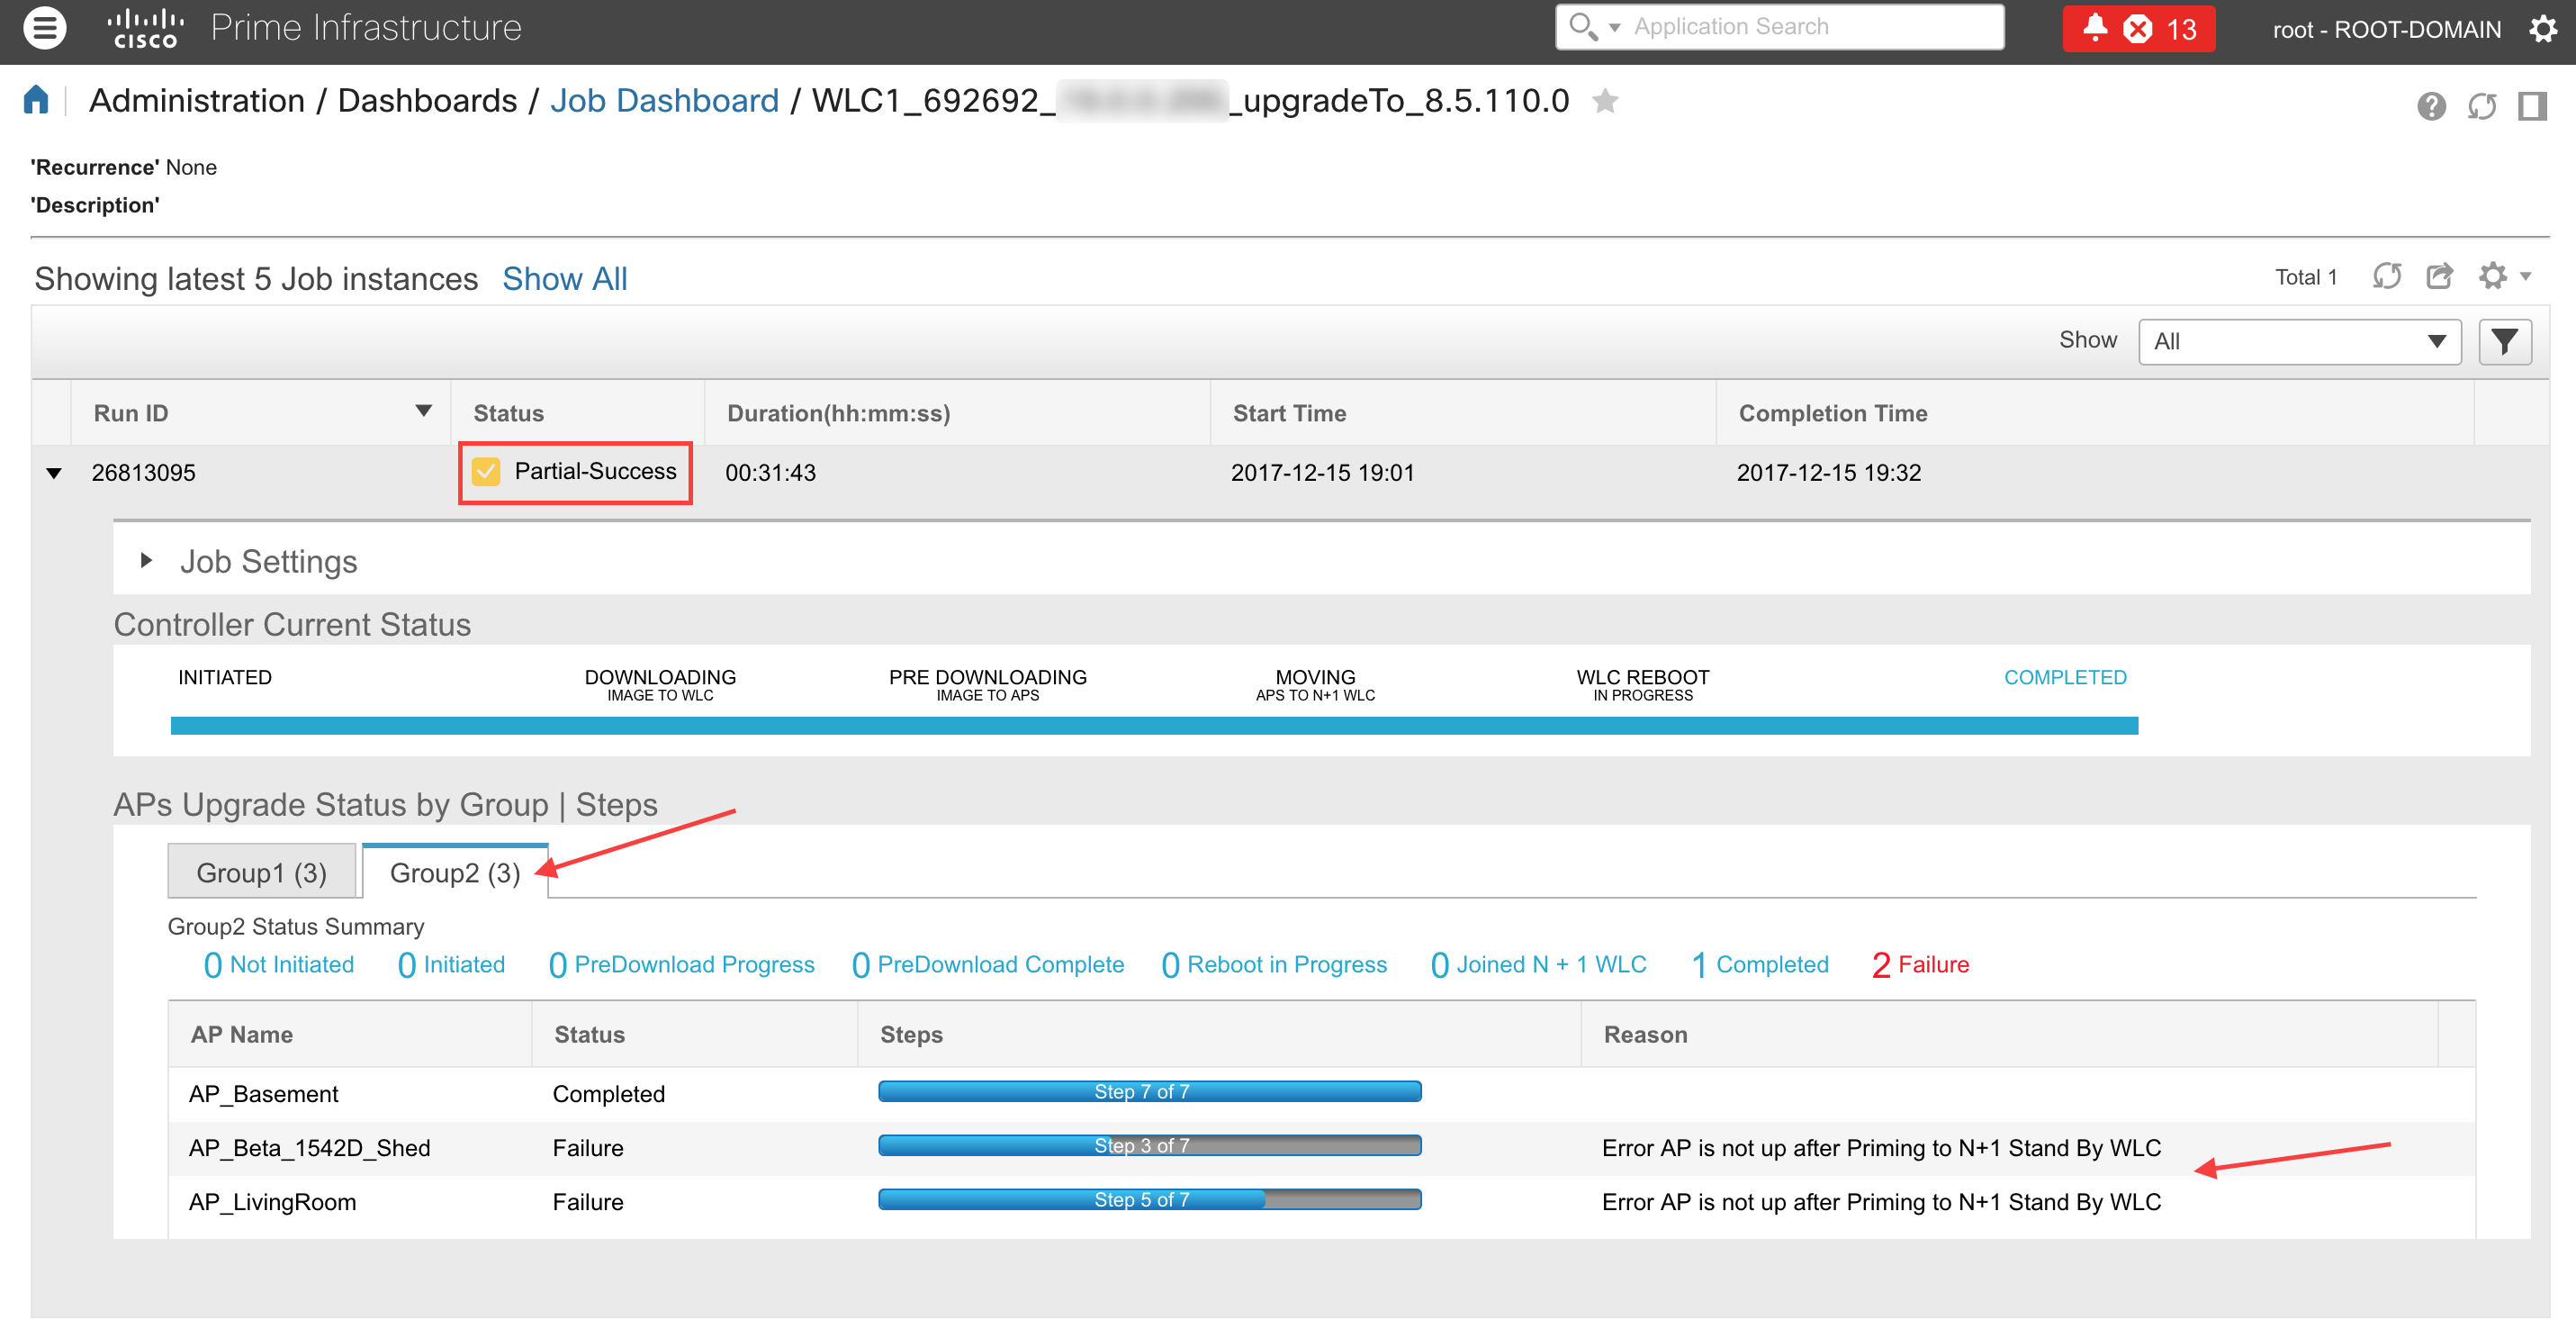
Step 12 – Complete!
Prime will reflect the results of the entire process. In my case, it was a “Partial Success,” due to the Mesh APs that either didn’t receive the configuration commands because they were offline, or because Prime didn’t wait long enough for them to join the N+1 WLC. Even though it reports a Partial Success in this case, it was a complete success, as far as what I expected it to do. The failure of the one MAP was intentional, and the other MAP did come online after Prime timed out waiting for it.
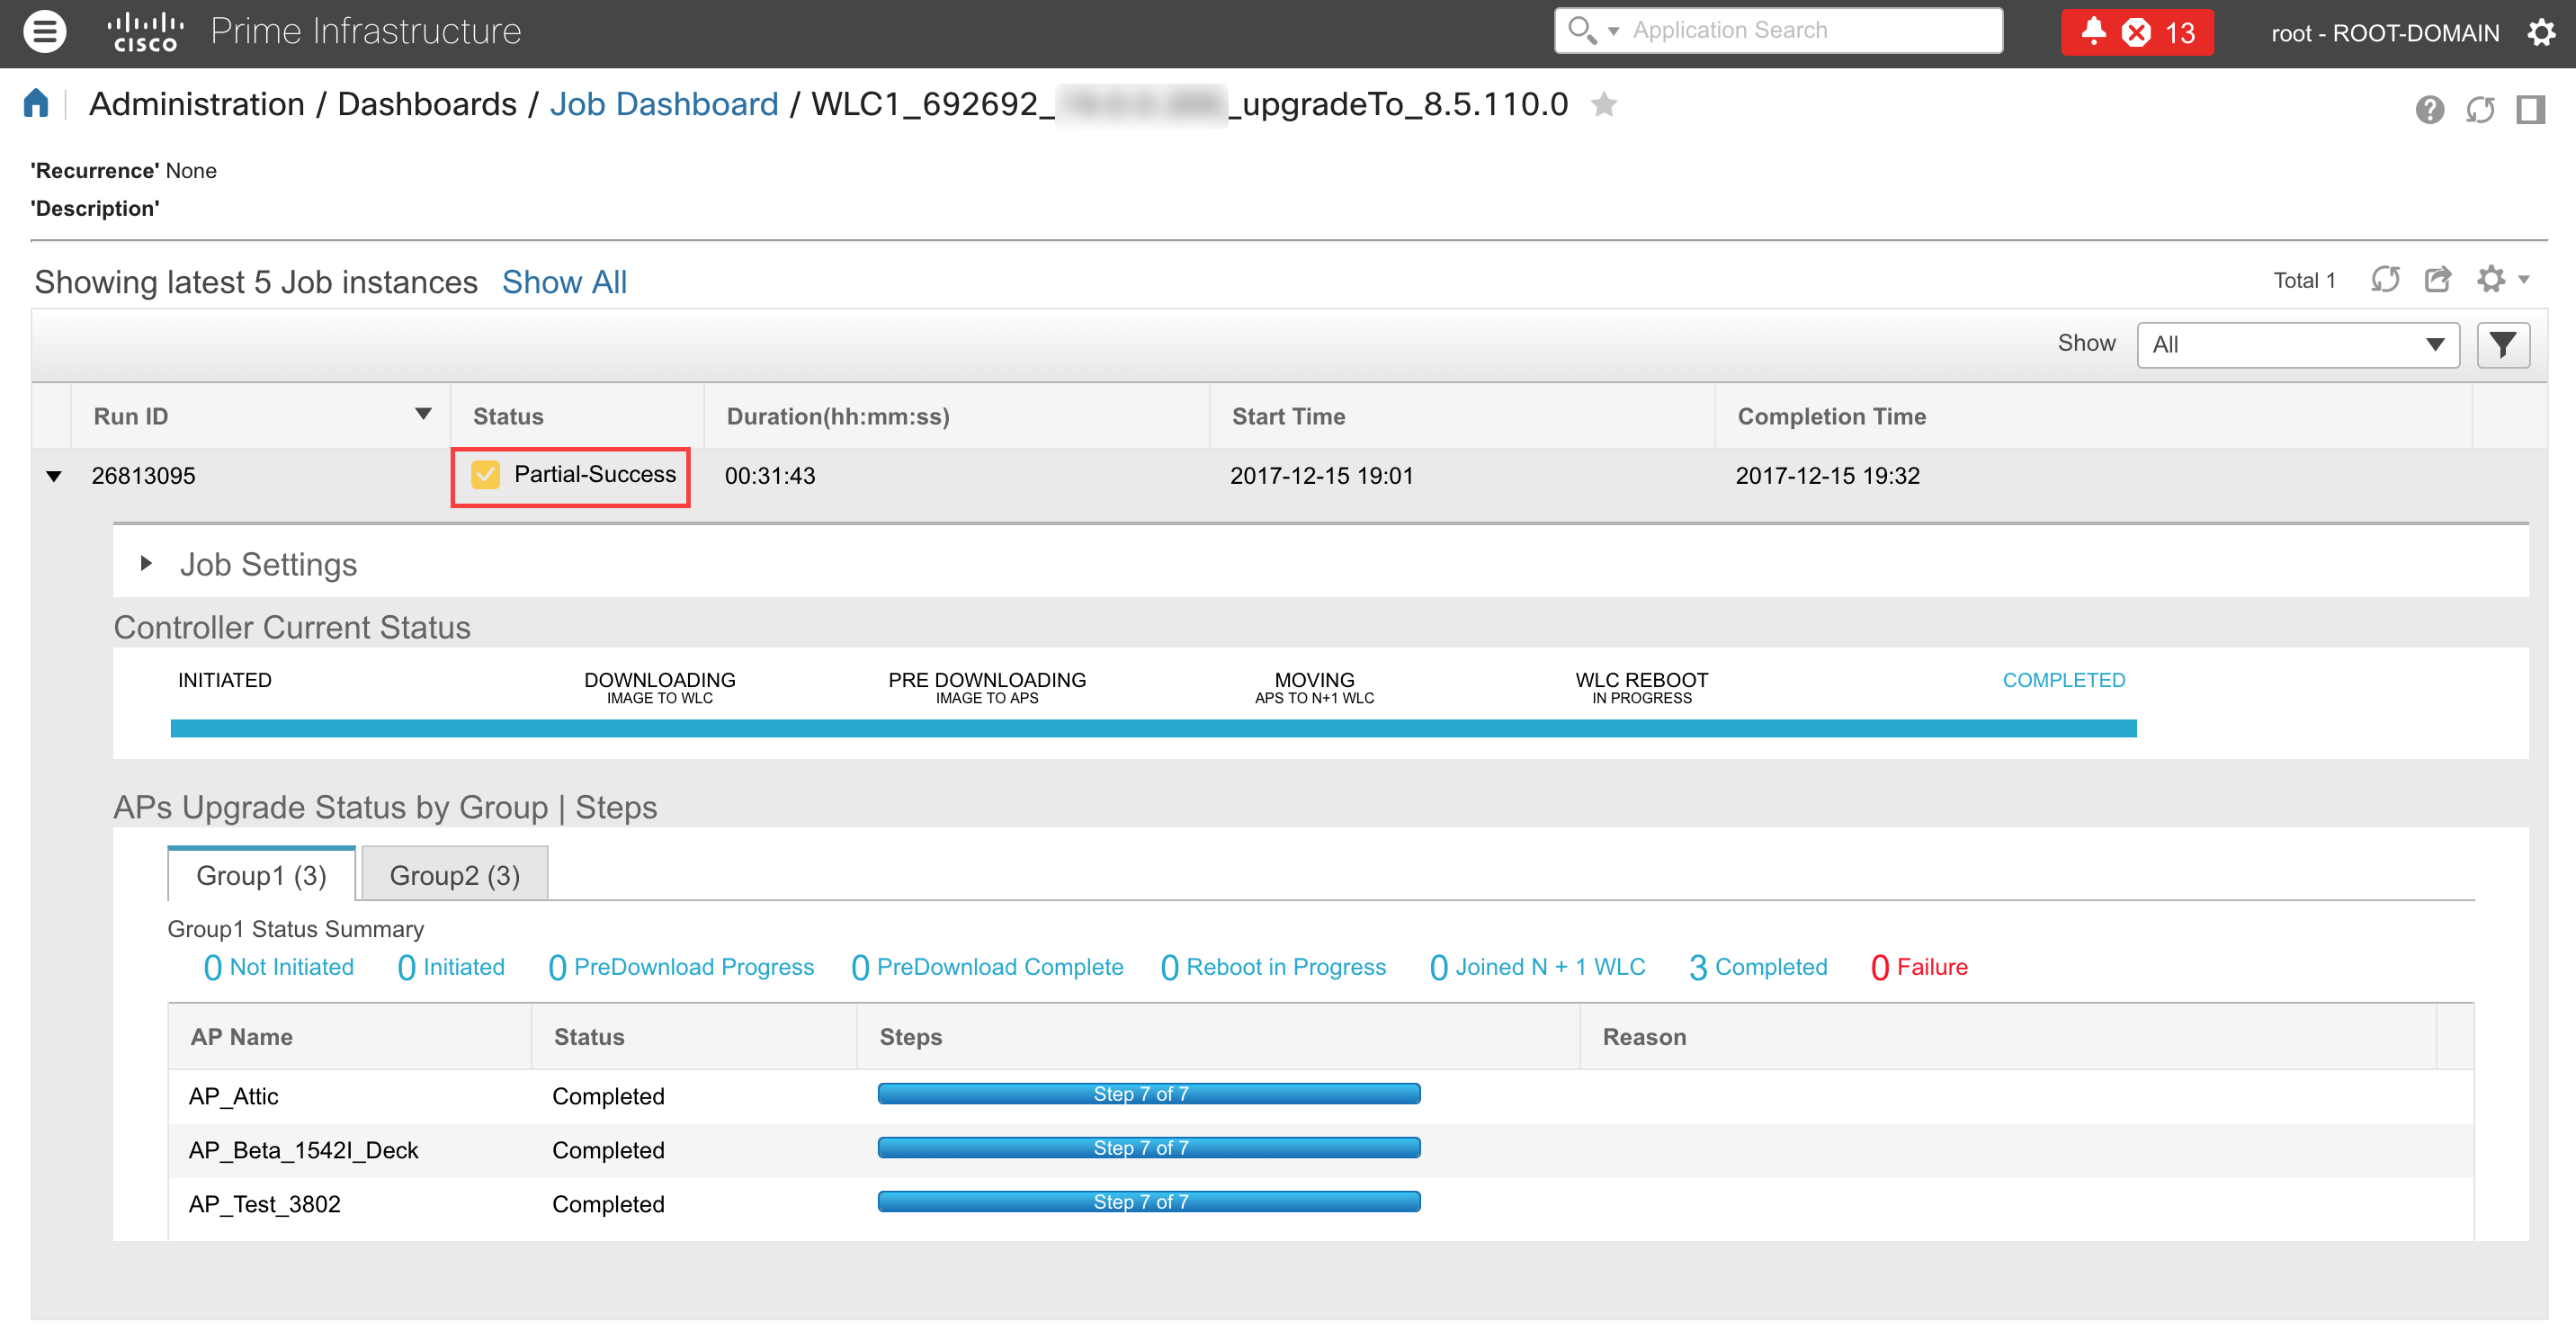
Be sure to check each AP Upgrade Group for a detailed status of every AP
In Conclusion
I hope this guide was helpful in outlining the process, and the steps required to complete it. I’ve personally been waiting for this feature for quite some time, and am glad to see that it is now publicly available.
Very useful article. I will try it out with 2 pairs of 8540 Controllers in SSO mode. Should work then also. But at the moment I have got only Prime 3.2 running at the customer.
Great article! It is very well written. It came in handy on my first Rolling AP Upgrade via Prime 3.9.0.
Cheers! Glad it helped!